Translate web pages
This post is also available in:
![]()
![]()
![]()
![]()
![]()
![]()
![]()
![]()
![]()
![]()
![]()
![]()
![]()
![]()
![]()
![]()
![]()
![]()
With Vivaldi Translate, you can translate full web pages with just a click of a button. No Extensions needed.
Translate a web page
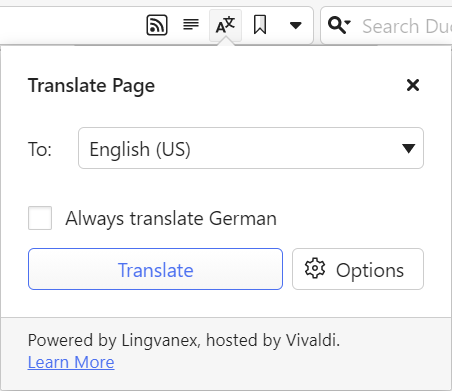
When a website you’re viewing is in a language different from your browser’s user interface language, Vivaldi offers to translate it for you by displaying a ![]() Translate Page button on the right side of the Address Field.
Translate Page button on the right side of the Address Field.
To translate the page to your default language:
- Click on the
 Translate Page button.
 - Then, click on Translate in the pop-up.
To display the content of the web page in its original language again:
- Click on Translate Page to open the pop-up.
- Click on Revert to (original language).
Translate selected text
To translate just a small block of text:
- Highlight the text you want to translate.
- Right-click on the selected text.
- Click on Translate Selection in the context menu.
Once the text has been highlighted, you can also type „Translate selection” into Quick Commands. In addition, you can create a Keyboard Shortcut or a Mouse Gesture for the action.
In the translation overlay, you can change both the source language and translation language.
Show translation in Translate Panel
To display translations of selected text in the panel instead of the overlay popup:
If you prefer the popup dialog, disable the setting.
To learn more, take a look at the Help page about Translate Panel.
Translation options
In addition to translating the page to your browser’s default language, you can choose to translate into any of the supported languages. To change the translation language:
- Click on Translate Page in the Address Field.
- In case you already translated the page to another language, click Revert to (original language).
- Select a different language from the drop down menu.
- Click Translate.
To eliminate extra steps for future translations, you can enable or disable translation of certain languages and sites.
To change your preferences:
- Click on Translate Page in the Address Field.
- Click on Options.
- Change your preferences.
Available options:
- Always translate – always translate the current language. Alternatively, tick the Always translate checkbox above the Translate button.
- Never translate – never translate the current language.
- Never translate this site – never be asked about translation on that particular site again.
- Offer to translate pages – disables the automatic translation of pages and pop-ups that show automatically. The button remains in the address field to reverse the action.
Reset translation settings
To reset all settings:
- Go to Settings > General > Language.
- Click on Reset Translation Settings to Default.
To reset a setting for a specific language or site:
- Type vivaldi://translate-internals in the Address Field.
- Go through the list of saved preferences.
- Click on X for the ones you want to reset.
Troubleshoot translation issues
When translation doesn’t work as expected, first reset the settings as instructed in the previous paragraph. If that doesn’t help, discuss the issue with the Team and Community on the Forum, to see if others can reproduce the bug or have suggestions for a fix.
To report a bug to the browser developers:
- Open vivaldi://translate-internals.
- Take a screenshot of the Prefs tab.
- Save the content on the Detection Logs tab by clicking on Dump above the table.
- Go to https://vivaldi.com/bugreport/.
- Fill in the form making sure to include the following information:
- Link of the page where translation fails.
- Your default user interface language and the language you tried to translate to.
- Other information that helps to reproduce the bug.
- Attach the files. You can also send the attachments after submitting the bug report in a reply email to the bug tracking system’s autoreply.
- Submit the bug report.