Vivaldi webmail
This post is also available in:
![]() 日本語
日本語 ![]() Español
Español ![]() Deutsch
Deutsch ![]() Nederlands
Nederlands ![]() Български
Български
Vivaldi gives you a free webmail account at Vivaldi.net. No ads and no strings attached.
Your Vivaldi Mail
- Storage capacity: 5GB
- Maximum attachment size: 20 MB
Getting started
To get started with your Vivaldi webmail account:
- Go to mail.vivaldi.net.
- To log in, use your Vivaldi account’s username and password.
If you don’t have an account register a new account and verify your phone number.
Setting up Vivaldi Mail in your mail client
In your desktop or mobile email client create a new mailbox account using the following settings:
Incoming mail
IMAP:
Server: imap.vivaldi.net
Port: 143
Authentication method: normal password
Connection security: STARTTLS
IMAPs:
Server: imap.vivaldi.net
Port: 993
Authentication method: normal password
Connection security: SSL/TLS
POP3:
Server: pop3.vivaldi.net
Port: 110
Authentication method: normal password
Connection security: STARTTLS
POP3s:
Server: pop3.vivaldi.net
Port: 995
Authentication method: normal password
Connection security: SSL/TLS
Outgoing mail
SMTP:
Server: smtp.vivaldi.net
Port: 587
Authentication method: normal password
Connection security: STARTTLS
SMTPs:
Server: smtp.vivaldi.net
Port: 465
Authentication method: normal password
Connection security: SSL/TLS
Importing mail from another account
- The best way to move all of your emails from your current provider is to set up your email client (e.g. Opera M2, Thunderbird, etc.) with both Vivaldi Mail and your current email providers account using IMAP.
- Once you set up both, you can move emails from your current mail provider’s IMAP folder to Vivaldi Mail IMAP folder.
- After you move all the emails, you can use the Vivaldi webmail web interface. If you want to move sent emails, don’t forget to move the email in Sent folder or similarly named IMAP folder.
- After the migration, you can also configure your email provider to forward all incoming emails to your Vivaldi Mail address to avoid checking multiple accounts.
Exporting emails
To export all your emails, do the same as with Importing emails. Set up both accounts in a mail client and copy mail from Vivaldi folders to the destination mailbox.
To download a single email:
- Open the email;
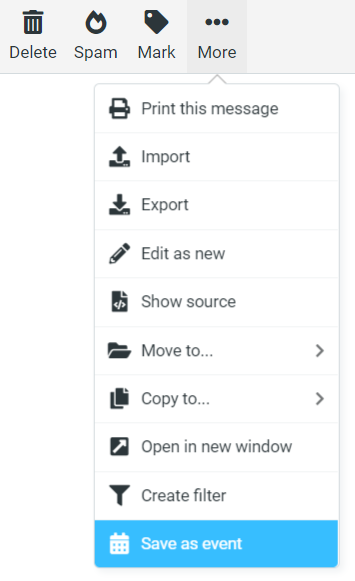
- Click on More (. . . ) in the top menu;
- select Download (.eml).
Composing emails
To send a new email in webmail, click on Compose in the top left corner.
You can add recipients to your email by typing them to the To field. As you type you’ll see suggestions from saved contacts. Alternatively, you can open the Address Book from the right side of the ‘To’ field, select the contact(s) and click on Insert. From the + button next to the Address Book button, you can also add CC, BCC, Reply-to and Followup-to recipients.
![]()
By default the editor is in Plaint text mode, but you can switch to HTML editor by changing the ![]() Editor Type from the top left corner of the email field. To always compose emails with the HTML editor, go to Settings > Preferences > Composing messages and select in which cases you want to compose HTML messages.
Editor Type from the top left corner of the email field. To always compose emails with the HTML editor, go to Settings > Preferences > Composing messages and select in which cases you want to compose HTML messages.
Attaching Files
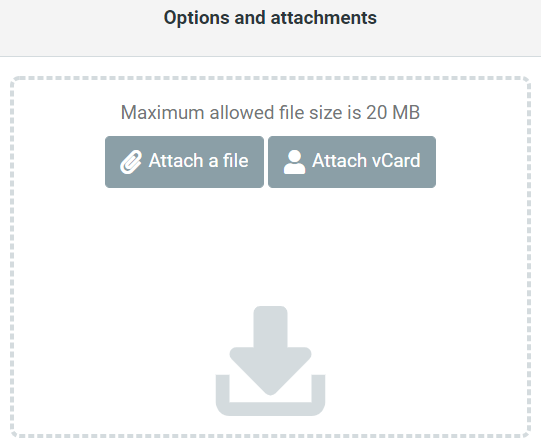
To add a file to the email, click on Attach a File in the Options and attachments section on the right side of the composer and upload the file. The size limit for attachments is 20MB.
To add an inline image:
- Make sure you’re using the HTML editor;
- Click on
 Insert/Edit image button;
 - Click on
 Browse folder button to look through already attached files or upload a new image from your computer;
 - Choose the image you want to add and click OK.
Contacts
Adding new contacts to the address book:
- To add someone, who has sent you an email, click on the click on the senders name and select Add to address book.
- On the Contacts page, click on Create button in the menu on the top right of the page.
- Contacts can also be imported from vCard or CSV files.
Calendar
- Emails can be saved to the calendar as events from More > Save as event.
- Events shared with you can be saved to your Calendar by clicking on the small downward arrow next to the attached event file and selecting ‘Save to Calendar’.
- Events can be sent to others by opening the event and selecting Send from Options.
Identities
In Vivaldi Mail all emails need to be delivered to and sent from [email protected]. This means that different aliases, unfortunately, can’t be used. But, if you have set your Vivaldi Mail up in a mail client, you may use plus addressing (also known as sub-addressing). With plus addressing you can add a keyword to your email address ([email protected]) which allows you to create different variations of the email address. Everything between the + and @ symbols is ignored when deciding, to which account the email belongs to.
You can also create Filters with these addresses to automatically organise your emails into different folders.
Signature
To change your email signature go to Settings > Identities > select your identity > Signature. You can add either a Plain Text or HTML signature.
Filters
Filters are a good way to automatically organise your mailbox. In Vivaldi webmail you can create filters, for example, to move incoming emails to a specific folder, to reply with a predefined message or to set a flag for the email.
To create a filter go to Settings > Filters. To create a new filter click on Create button in the menu on the top right of the page. Add a filter name, select the scope, make a rule and decide what sort of action should be executed. Don’t forget to save the filter.
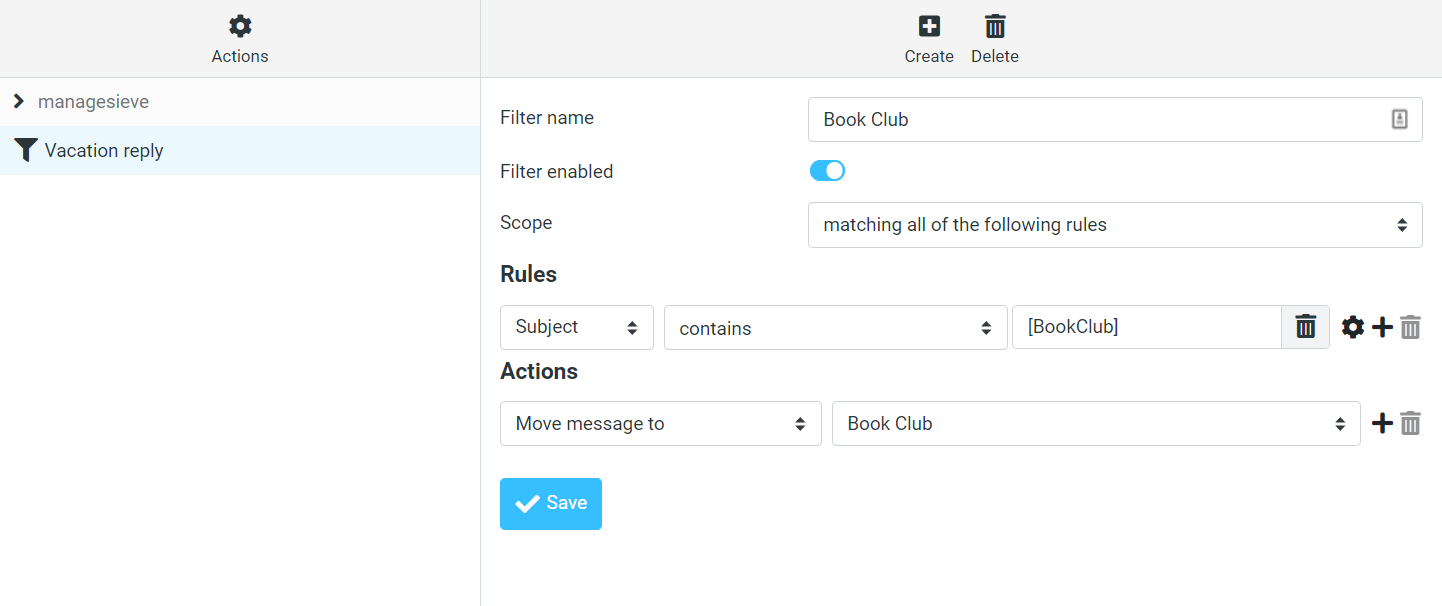
When you’re filtering by email address, make sure to use the full email address ([email protected]) not just the domain (@email.com).
To add a new filter set or manage existing filter sets, go to Settings > Filters > Actions.
Encryption
If you want to send and receive encrypted emails:
- in Settings > Preferences > Encryption enable:
- message encryption and signing
- message signatures verification
- message decryption
- Import or create a new key pair(s) in Settings > PGP Keys
- Share your public key with the person(s) you want to have encrypted conversations with by attaching it to an email from the Options and attachments section of the email composer.
- And save PGP keys sent by others, by clicking on Import on “This message contains attached PGP key(s)” message.
- When composing an email, in the Options and attachments section, check the boxes for Digitally sign this message (asks for the account password) and/or Encrypt this message.
Numerous additional options to customize the mailbox and its features can be found in Settings.
If you didn’t find an answer to your question in this article, don’t hesitate to ask our Community members on the Forum.
Further Reading
- [Help Page] Registration and login issues
- [Help Page] Updating Vivaldi Account information
- [Help Page] Report spammers, phishing and other scams