On the left side of the window, click Calendar on the menu.
When you log in with an existing account for the first time since CalDAV support was implemented, it will ask you to import your calendars to CalDAV so you can synchronize them with your phone and other calendar clients. Click Import to view your existing events and make them available for syncing.
In case you clicked Don’t Import, but have changed your mind and want to import the events:
Go to Settings > Preferences > Calendar > Import events from older calendar;
Disable the option Don’t ask me again if I want to import old calendar data;
Click Save.
Go back to Calendar, where you’ll be asked whether you want to import events.
Click Import.
Create a new event
To create a new event:
Click on Create on the menu above the calendar or click anywhere in the calendar;
In the event editor, add a summary (i.e. a title) and a start and end time. Additionally, you can add a description, reminders, participants, attachments and much more.
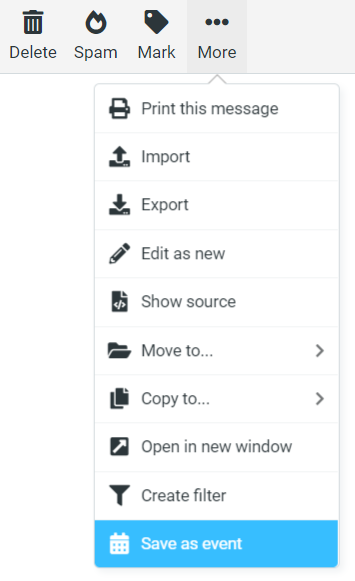
Save emails as calendar events
Emails can be saved to the calendar as events from More > Save as event.
Events shared with you via email can be saved to your Calendar by clicking on the small downward arrow next to the attached event file and selecting Save to Calendar.
Edit events
To change some information about an event:
Click on the event and then on Edit in the modal window;
Make the changes; If you’re making changes to a recurring event, select whether the changes should affect just the current event, only upcoming events or all events.
Click Save.
Delete events
To delete an event:
Click on the event and then on Delete in the modal window;
Confirm your decision by clicking OK. If you’re deleting a recurring event, select whether you want to delete just the current event, only upcoming events or all events.
Share events
Events can be sent to others by opening the event and selecting Send from Options.
Create a new calendar
To create a new calendar:
Click on the menu button above the list of calendars and select Add Calendar;
Give the new calendar a name, pick a colour and decide whether you want to get event reminders;
Click Save.
Edit calendars
To edit an existing calendar:
Select it in the list of calendars;
Click on the menu button above the list of calendars and select Edit calendar;
Make the changes;
Click Save.
Delete a calendar
To delete a calendar and all its events:
Select it in the list of calendars;
Click on the menu button above the list of calendars and select Delete calendar.
Confirm your decision by clicking Delete.
Import & export events
To import events stored as iCalendar (.ics) files on your computer:
Click Import on the menu above the calendar;
From Import from file, click Browse and find the iCalendar file;
Select the destination calendar and time frame;
Click Import.
To export events:
Click Export on the menu above the calendar;
Select which calendar’s events you want to export and the time frame;
Click Export.
Sync your calendars using CalDAV
To add one or all of your calendars to a calendar client or app:
Select the calendar;
Click on the menu button above the list of calendars and select Show calendar URL;
Copy the second URL to your calendar client. It looks like the link below: https://calendar.vivaldi.net/calendars/[email protected]/CALENDAR-NAME/; Some calendar clients allow you to synchronize all your calendars in one go using the following link: https://calendar.vivaldi.net/calendars/;
Add your username (make sure to include @vivaldi.net at the end), login password and other information that the client requires.
Do this for every calendar you want to sync.
Important
Some clients’ settings are case sensitive. If your username includes uppercase letters and calendar sync doesn’t work, try writing your username identically or only with lowercase letters anywhere it’s mentioned.
Calendar Settings
You can customize the calendar in Settings > Preferences > Calendar. There you can change settings like: