Customize your profile on Vivaldi Social
This post is also available in:
![]()
![]()
![]()
![]()
![]()
![]()
![]()
To update your profile on Vivaldi Social, either:
- Click on Edit Profile below your username in the top left corner of the page.
- On your Vivaldi Social profile, click on Edit Profile (see the blue button on the screenshot below).
- Go to Preferences > Public Profile.
Don’t forget to click Save changes when you’re done.
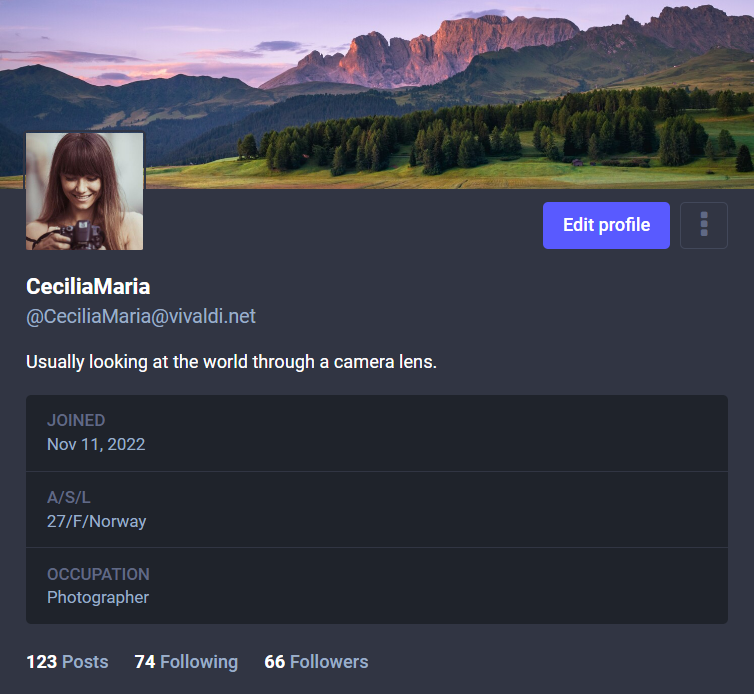
Edit profile
Display Name
This is the name shown to everyone and is noticeable even before users see your username. Max name length is 30 characters.
Bio
You can let others know in a few words (max 500 characters), who you are, what kind of content you post and what your interests are.
Extra fields
In addition to writing about yourself in the Bio, you can add up to 4 facts about yourself in the metadata section. What you include there is up to you, but as an example, you could add your age, location, occupation, as well as links to your website and/or profiles on other platforms.
To add extra information:
- In Profile appearance settings, look for the Profile metadata section.
- First enter a title for the bit of information in the Label box.
- Then on the same row on the right side add the content.
Avatar
As on other Vivaldi services, your Vivaldi account’s profile image will be displayed also on Vivaldi Social. To update the avatar, log in to your account on Vivaldi.net, click Manage account below your current avatar and upload a new image on your account’s profile.
You’ll see the new avatar next time you log in to your account on Vivaldi Social. Log out and in again to see it immediately.
Header image
You can add a banner image to your account, which will be displayed on your profile on Vivaldi Social as well as in follow lists and account directories. Recommended image size is 1500×500 px as all images will be scaled to that size automatically. Supported file formats include PNG, GIF, or JPG images that are up to 2MB in size.
To upload a new header image:
- In Profile appearance settings, click on Choose File in the Header section.
- Select the file you want to upload.
- Click Open.
Other
This is an automated account – Enabling it will let people know that the account mainly performs automated actions and might not be monitored. The label BOT will be shown next to the display name.
Privacy and reach
Reach
Suggest account to others – If you’d like your posts to reach a wider audience and gain new followers, enable this setting. That way your account will show up among recommendations, trending content, and more.
Automatically accept new followers – When enabled, followers will be added automatically. When disabled you need to review all follow requests before your content will start showing up in their Home feed. A ![]() lock icon will be displayed on your profile next to your username which will let people know that their follow request needs to be approved by you.
lock icon will be displayed on your profile next to your username which will let people know that their follow request needs to be approved by you.
Include public posts in search results – When you opt-in, your public posts will be included in search results across the Fediverse. Enable it if you want to reach wider audiences, keep it disabled if you’d rather keep your posts a little more private. When enabled, you can set post visibility to Unlisted to opt the specific post out of search.
Search Engine Indexing – By opting out of search engine indexing your profile and posts won’t show up in relevant searches with various search engines.
Hide your social graph – Enable this option, if you don’t want to share information about who you follow and who follows you. People can still the number of accounts you follow and follow you.
Display from which app you sent a post – among the publishing date, post privacy, number of boosts and favorites, the post will also say from where you made the post from.
Verification
There’s no account verification system like on some social media platforms, e.g. blue ticks on Twitter, Instagram, Facebook, etc. Instead you can verify yourself as the owner (or with enough authority) of the links in your profile metadata. For that, the linked website must contain a link back to your Mastodon profile. The link back must have a rel="me" attribute, for example: <a rel="me" href="https://social.vivaldi.net/@YourUsername">Mastodon</a>.
Properly verified links have a green background.

Featured hashtags allow you to highlight topics that are important to you and you tend to post often on. Viewers of your profile can click on the hashtags to see all posts you’ve made with the hashtag.