Follower Tab
Explore links on web pages without loosing sight of the source tab with Follower Tabs.
Explore links on web pages without loosing sight of the source tab with Follower Tabs.
Use Tab Tiling in Vivaldi to create split-screen views of browser tabs.
Get access to Vivaldi’s free and private email service, Vivaldi Webmail.
Take control over how Vivaldi uses valuable system resources by reviewing relevant settings in the Performance settings category.
Hardware acceleration helps to perform some tasks faster than they would be performed when relying only on software. On some devices, using Hardware Acceleration can cause issues with playing videos and other media, so disabling the setting is often recommended to try to solve the issue.
To disable Hardware Acceleration:
If you’re using Vivaldi on a device that runs on battery, you can extend the battery life by capping background activity, visual effects, smooth scrolling, and video frame rates.
To choose your energy saving level:
Memory Saver helps reduce memory usage by automatically hibernating tabs that haven’t been used in a while. This way, active tabs, such as those used for gaming or streaming, can run more smoothly. Learn more about the feature on the Help page about the Memory Saver.
Prefetching resources helps to speed up web page loading times. The feature is enabled by default, but if you wish to disable it, go to Settings > Performance > Network Performance.
In this section, you’ll find a shortcut to the Extensions management page. To learn more about the feature, visit the Help page about Extensions.
The About Page shows the current Vivaldi browser version, lets you check for updates, and provides quick access to essential information.
To access the About Page, either:
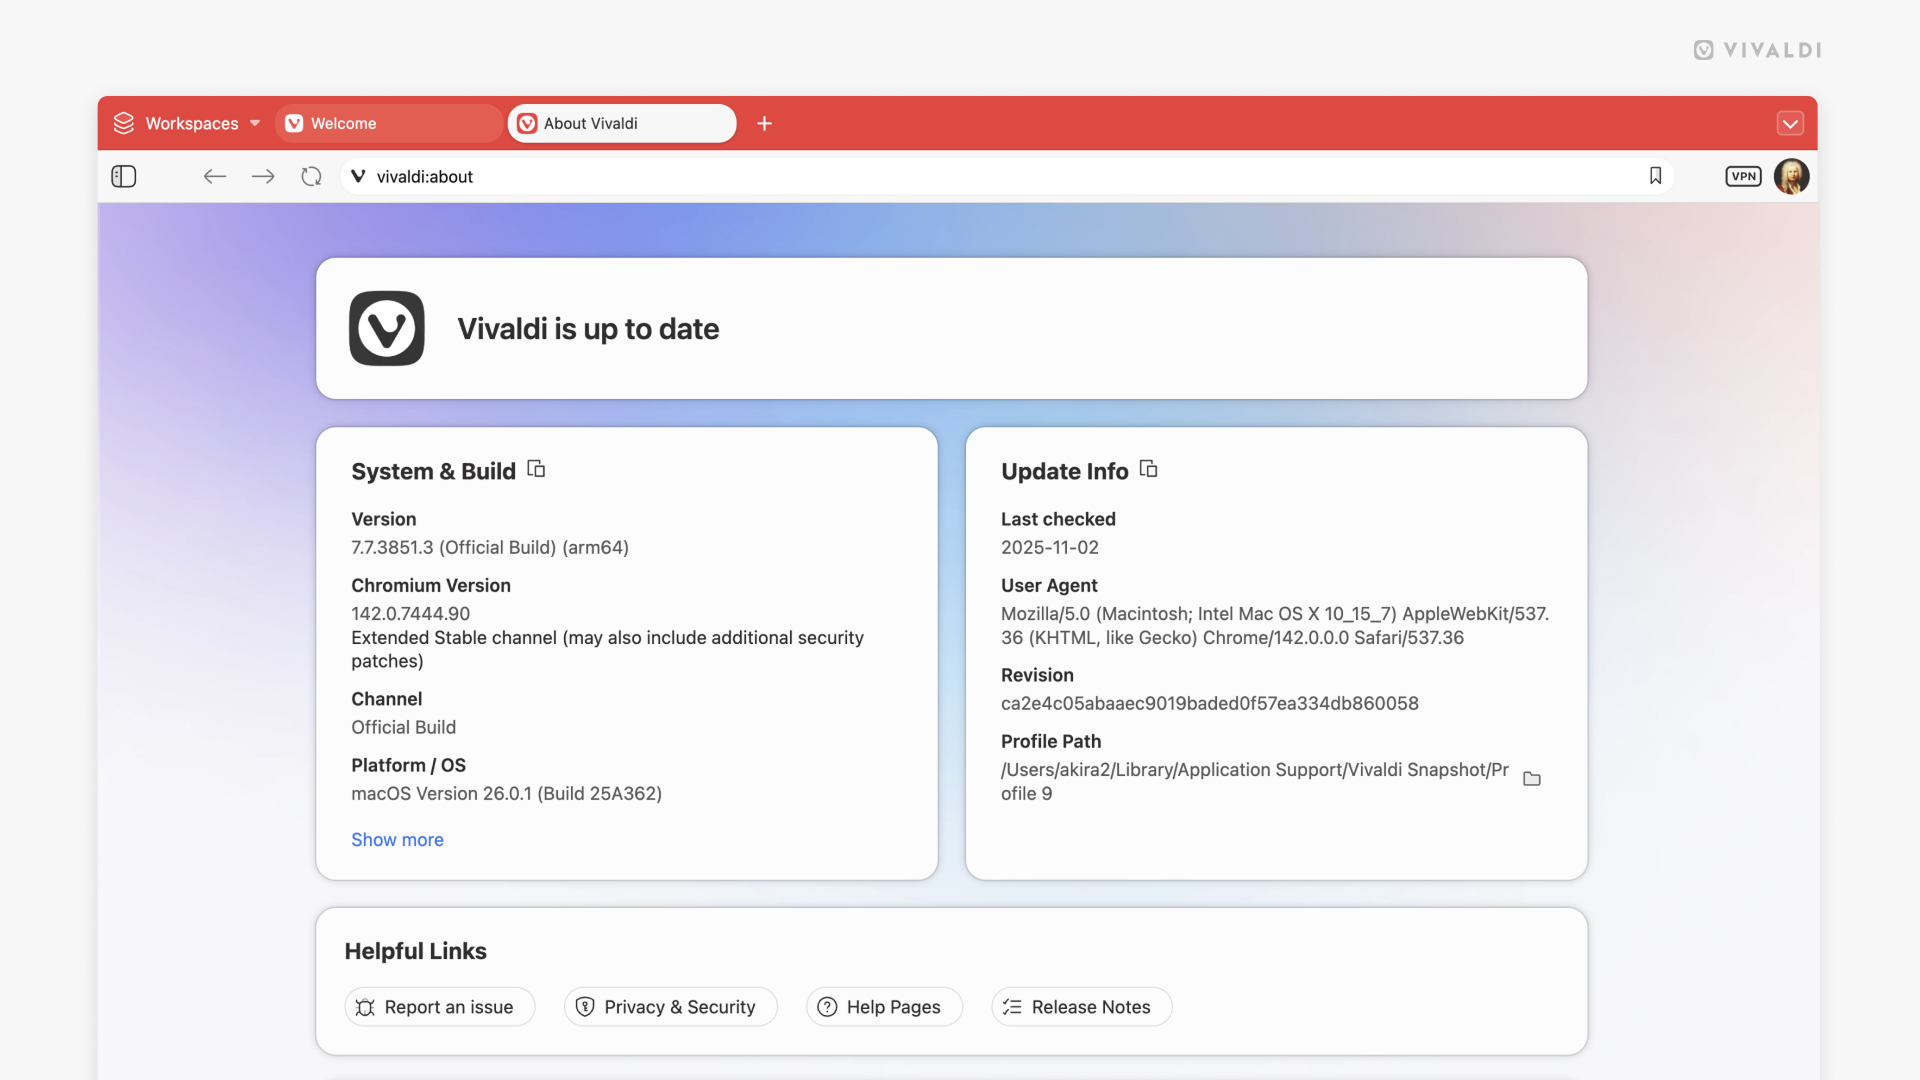
At the top of the page, you can see at a glance whether you have the latest version of Vivaldi or whether you need to restart the browser to update it. In case you have automatic downloading and installing of updates disabled, you’ll see a download button when a new version is available.
In this section, you’ll see detailed information about the Vivaldi and Chromium versions, your operating system, and more. Click on the Copy button next to the section title to copy all of the information to your clipboard. It can be useful information to share when discussing an issue on the Vivaldi Forum or reporting a bug to the team, for example.
In this section, you’ll see additional information about your Vivaldi browser. For example, the User Agent and the Profile Path. The latter is useful when you’re looking for the local files of your browser data. To get to the folder in your File Manager/Finder easier, there’s an ![]() Open Profile Folder button right next to the Profile Path.
Open Profile Folder button right next to the Profile Path.
In this section, you’ll find a handful of links to some useful pages.
At the very bottom of the About Page, you’ll find links to the Chromium Projects’ homepage, to Credits on vivaldi:credits, which lists the licenses for the third-party code used in Vivaldi, and the Vivaldia Game.
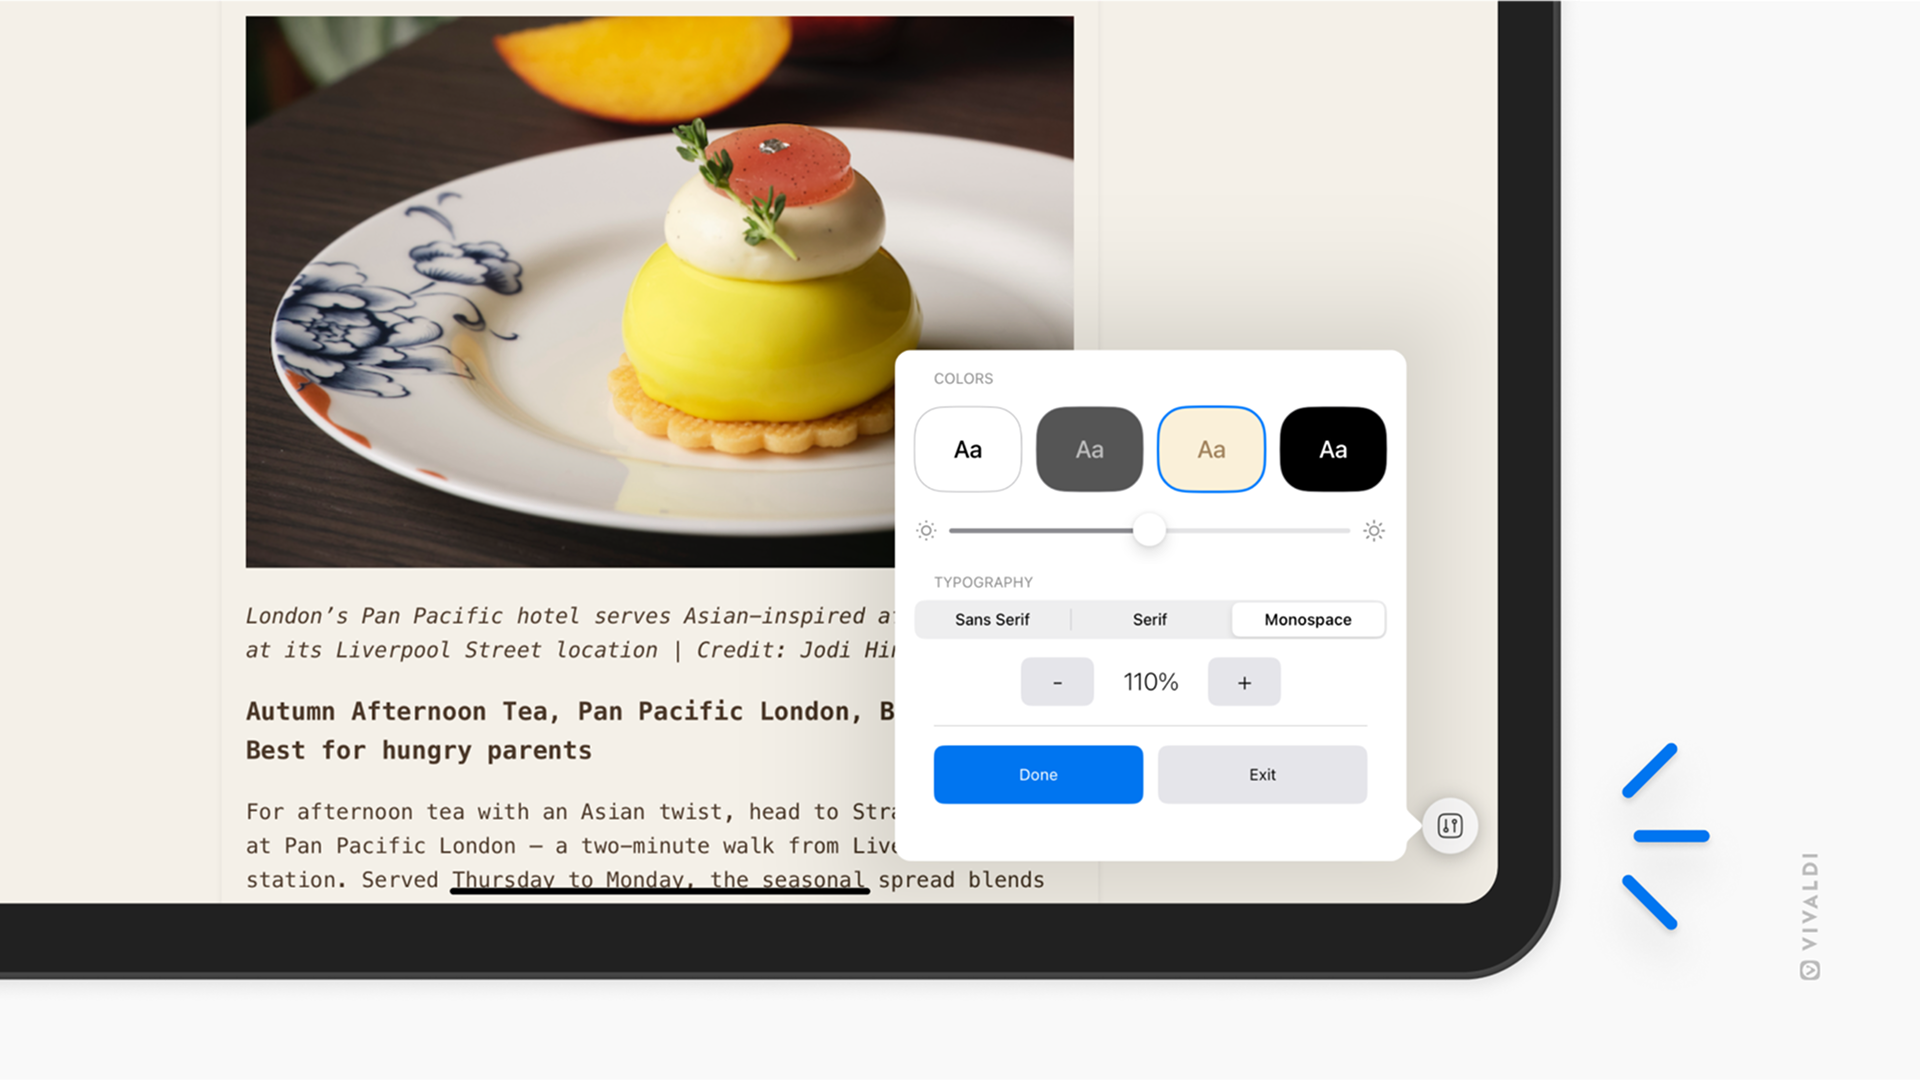
Using Reader View is an excellent way to declutter your screen to focus on the content – especially on smaller screens.
Reader View is only available on web pages with longer text content, such as news or blog articles.
To switch to Reader View:
To exit Reader View, tap the same button on the Address Bar.
To make reading more comfortable, you can adjust the background color, brightness, and the font’s style and size.
To change the settings:
If Reader View is a feature you won’t be using and you don’t want the button to show up on the Address Bar, you can disable the feature altogether.
To disable the feature:
If you change your mind, you can re-enable the feature following the same steps as listed above.
The Tab Button pop-up is a unified place in the Vivaldi browser to find, switch, and recover your tabs.
When you encounter an issue and you’re trying to determine whether you can fix it yourself or need to report a bug, follow the steps below. Remember that in many cases it’s important to reload the web page for any changes to take effect.
Sometimes the simplest things help, so exit/quit the browser, and hopefully on restart the issue will be gone.
If you’ve kept your computer on for a long time, restarting the device may help as well.
If you’re using an older version of the browser, there’s a chance that the bug has already been fixed and you won’t be having the issue in the latest version of Vivaldi. So make sure to update your browser regularly.
You can also check recent Snapshot changelogs on our Snapshot blog. The latest fixes and newest features are tested in Snapshots, before being released in the Stable version of the browser. Then you need to wait until the next version of Vivaldi Stable is released.
On desktop, sometimes an Extension or a specific Setting can cause the issue. To check if that’s the case, test the website or feature in a Guest Profile or in a new User Profile.
Click on the ![]() User Profile button (the image can also be your chosen avatar or Vivaldi account’s profile picture) on the Address Bar to create a new profile or open the guest window.
User Profile button (the image can also be your chosen avatar or Vivaldi account’s profile picture) on the Address Bar to create a new profile or open the guest window.
It is possible to install a second version of Vivaldi to test the issue. It’s best to test with the newest version of the browser, i.e. the Snapshot, as the likelihood of the issue being fixed is highest there and in that case, you just need a little patience until the fix is released in the Stable version. On Windows, you can install any version as a Standalone. On macOS and Linux, you can run the Stable and Snapshot versions side by side.
Since Vivaldi is based on Chromium, we sometimes inherit bugs from upstream. If that’s the case, you’ll likely be able to reproduce the bug in other Chromium-based browsers. In that case, please report the bug to the Chromium team.
Some websites make sure to check from which browser you’re viewing their pages from and based on the information may alter what you see. The websites may also block access to their content and features altogether. To check whether a website is displayed differently because you’re using Vivaldi, you can change the browser’s Sec-CH-UA identity and check the website again.
To change which browser brand is reported:
Website functionality may depend on elements with trackers that are blocked by the Tracker and/or Ad blocker. Click on ![]() Content Blocker on the left side of the address bar to disable blockers and test the website.
Content Blocker on the left side of the address bar to disable blockers and test the website.
Extensions are a common cause of issues on the desktop browser. That’s one of the reasons Vivaldi has so many built-in features – so your browsing experience won’t be hindered by extension compatibility problems.
To disable Extensions go to ![]() Vivaldi menu > Tools > Extensions and toggle all Extensions off from the bottom right corner of each Extension card.
Vivaldi menu > Tools > Extensions and toggle all Extensions off from the bottom right corner of each Extension card.
If the issue doesn’t occur with disabled Extensions, start enabling them one by one and test in between each re-enabled Extension.
Whether you’re using the built-in Proton VPN in Vivaldi or another VPN service, disconnect/pause the connection and reload the web page to see if the issue still persists.
In case the issue you’re facing is related to playing videos and other media or to the user interface’s appearance and responsiveness, you can go to Settings > Performance and see if disabling Hardware Acceleration makes a difference. Remember to restart the browser before testing the issue again.
Cookies are used for a lot more than tracking users’ browsing habits. Sometimes websites require Third-Party Cookies to display content that was originally posted on a different site. For example, embedded videos or Vivaldi Blog’s comment section.
In Vivaldi, third-party cookies are blocked by default in Private Windows. To review and change your cookie settings, go to Settings > Privacy > Cookies.
Make sure your anti-virus product is up to date and not blocking Vivaldi. If your anti-virus product warns you about dangers in Vivaldi, it’s most likely a false positive. In that case, review your anti-virus product settings as they might be too sensitive. Read more about it in our answers to common security-related questions.
If the browser works as expected in a new User Profile with default settings, try resetting the settings in your main profile.
To reset settings:
Some Settings, such as Enable Mail, Calendar and Feeds, will not be reset.
Websites get updated all the time, but information about the old version of the site is still stored in cache files and Cookies. This may cause discrepancies in the displayed website and occasionally even break functionality.
In addition, storing old browsing data for a long time will use up your device’s memory space, so deleting it every now and then can have a positive effect on the browser’s speed as well.
To delete Cache and Cookies on desktop, click on the ![]() Clear Browsing Data button in the top-right corner of the History manager or go to
Clear Browsing Data button in the top-right corner of the History manager or go to ![]() Vivaldi menu > Tools > Delete Browsing Data.
Vivaldi menu > Tools > Delete Browsing Data.
If the issue is only occurring on a particular website you can opt for deleting Cookies and Site Data just for that site.
When you’ve followed the steps listed above and you can consistently reproduce the issue, please discuss it on our Forum. There, our Community members can test on their devices and either confirm the bug or suggest a fix for the issue. Some of them can also tell you whether the devs are already aware of the bug or whether a new bug report should be created.
To report a bug first check our bug reporting guidelines and then go to vivaldi.com/bugreport to file it.
One of the channels we like to use to share the latest news and useful information with you is email. For that, we have several newsletters and onboarding email series that you can subscribe to.
To subscribe to Vivaldi’s newsletters:
Some newsletters and email series are more context-based. To those, you can subscribe either in the browser or on relevant pages on our websites. In some cases, for example, when signing up to a Vivaldi account, you’ll receive emails with tips to get you off to a good start automatically.
To unsubscribe from newsletters and onboarding emails:
Option 1
Option 2
Option 3
We recommend not unsubscribing from Technical Updates, as you may miss out on important information regarding your account and the availability of our services.
Some Vivaldi services come with their own pages to manage emails.
To manage emails from the Vivaldi Forum:
To manage emails from Vivaldi Social:
To manage emails from Vivaldi Community Blogs:
Keyboard Shortcuts can speed up browsing significantly and Single Key Shortcuts take it to another level. With Single Key Shortcuts you don’t need to remember countless key combinations, you can browse using only one hand making it
To start using Single Key Shortcuts:
To use Single Key Shortcuts, first make sure that none of the input fields (Address Field, text box on a web page, etc.) are focused. Then simply press the command’s shortcut key on your keyboard.
To add or edit a keyboard shortcut:
You can also add multiple shortcuts for the same action.
You can see all Single Key Shortcuts in Settings > Keyboard and most of them can be customized. A handful of examples can be seen below.
Mail and Calendar shortcuts can be seen on the Help page about Mail Shortcuts and the Help page about Calendar Shortcuts, respectively.