Keyboard Shortcuts can speed up browsing significantly and Single Key Shortcuts take it to another level. With Single Key Shortcuts you don’t need to remember countless key combinations, you can browse using only one hand making it
To use Single Key Shortcuts, first make sure that none of the input fields (Address Field, text box on a web page, etc.) are focused. Then simply press the command’s shortcut key on your keyboard.
Tap on the + at the bottom of the screen to open a new tab.
Go to the web page you want to view.
Option 3
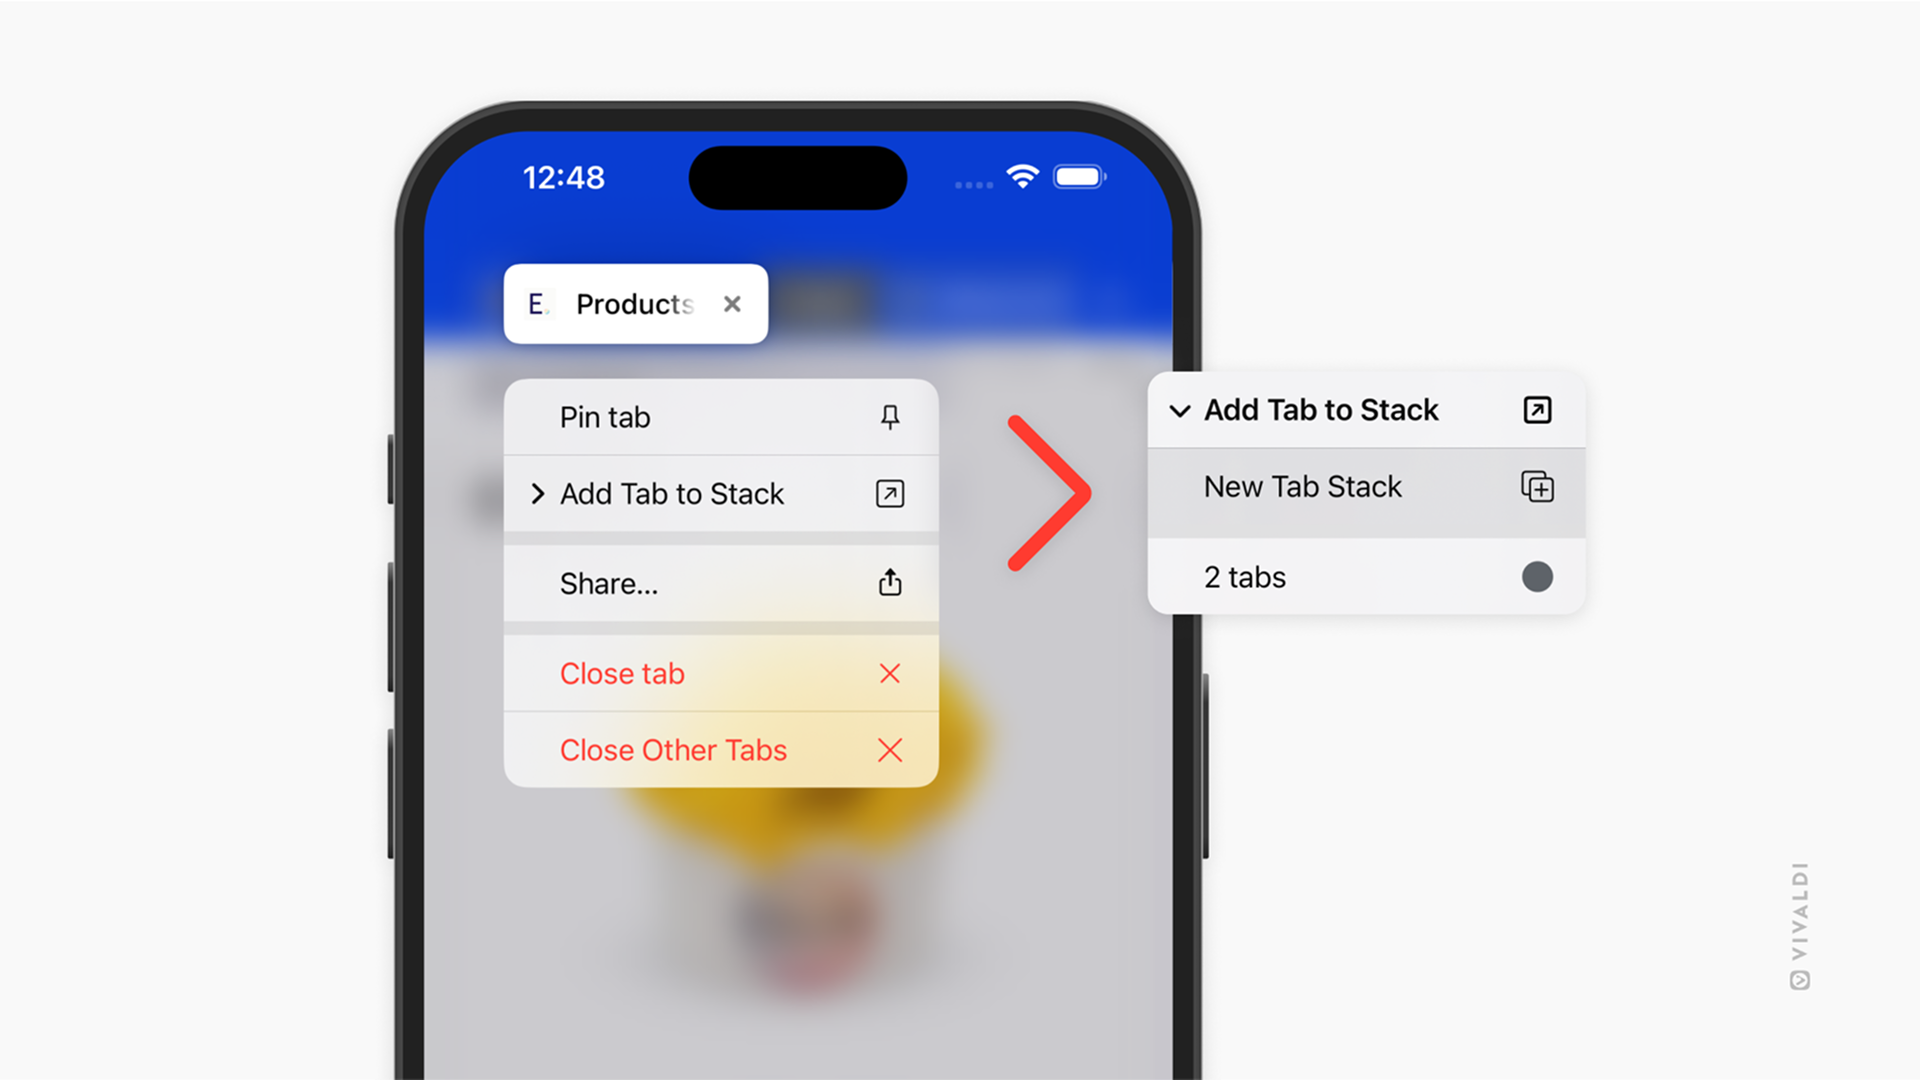
Long-press on a tab on the Tab Bar.
Select Add Tab to Stack from the context menu.
Tap on the stack you want to add the tab to.
Option 4
Long-press on a tab on the Tab Bar.
Drag the tab over a stack.
Release your finger to add the tab to the stack.
Option 5
Long-press on a link on a web page.
Select Add Tab to Stack from the context menu.
Tap on the stack you want to add the tab to.
View and switch tabs
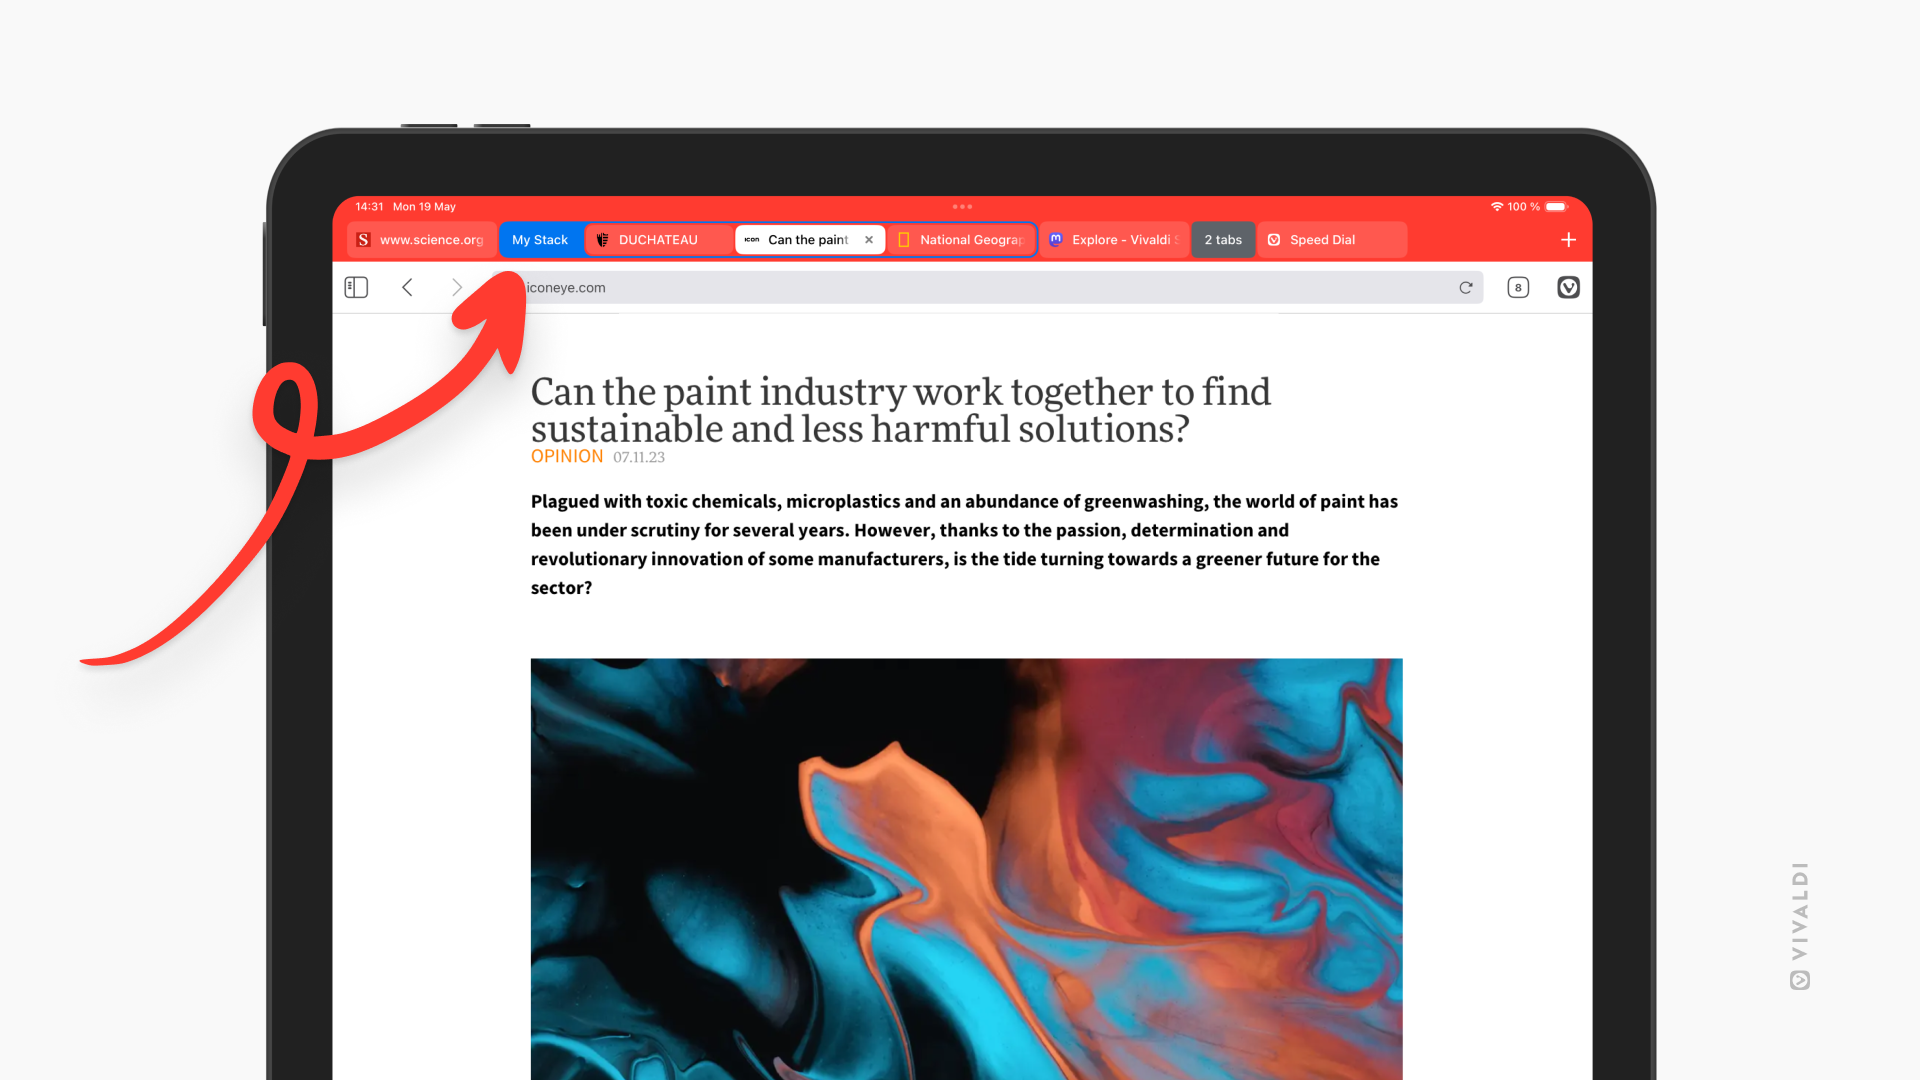
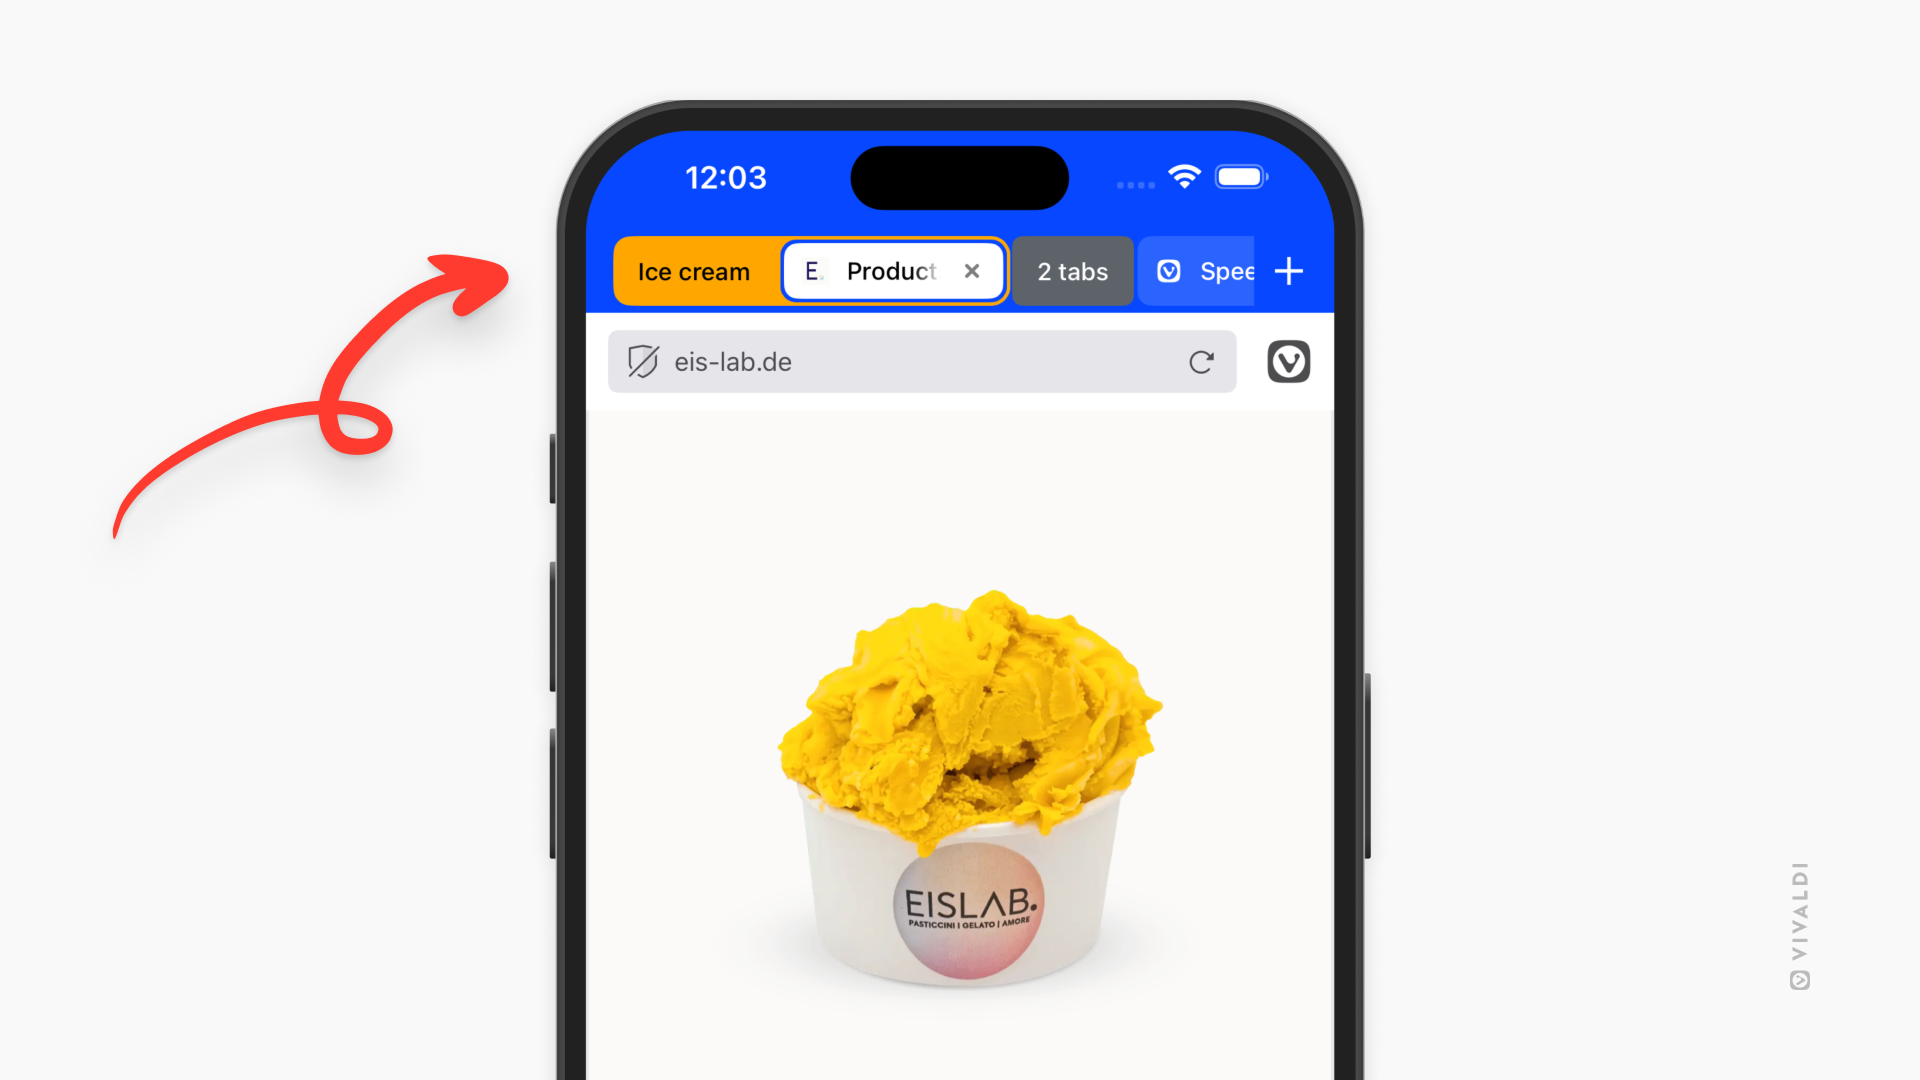
You can see your stacked tabs on the Tab Bar and in the Tab Switcher.
On the Tab Bar, stacked tabs are distinguishable by the border (in the stack’s color) surrounding the tabs in the group. Tapping the stack name will expand/collapse the stack.
To switch tabs, simply tap on the tab you want to view.
To view and switch tabs in Tab Stacks from the Tab Switcher:
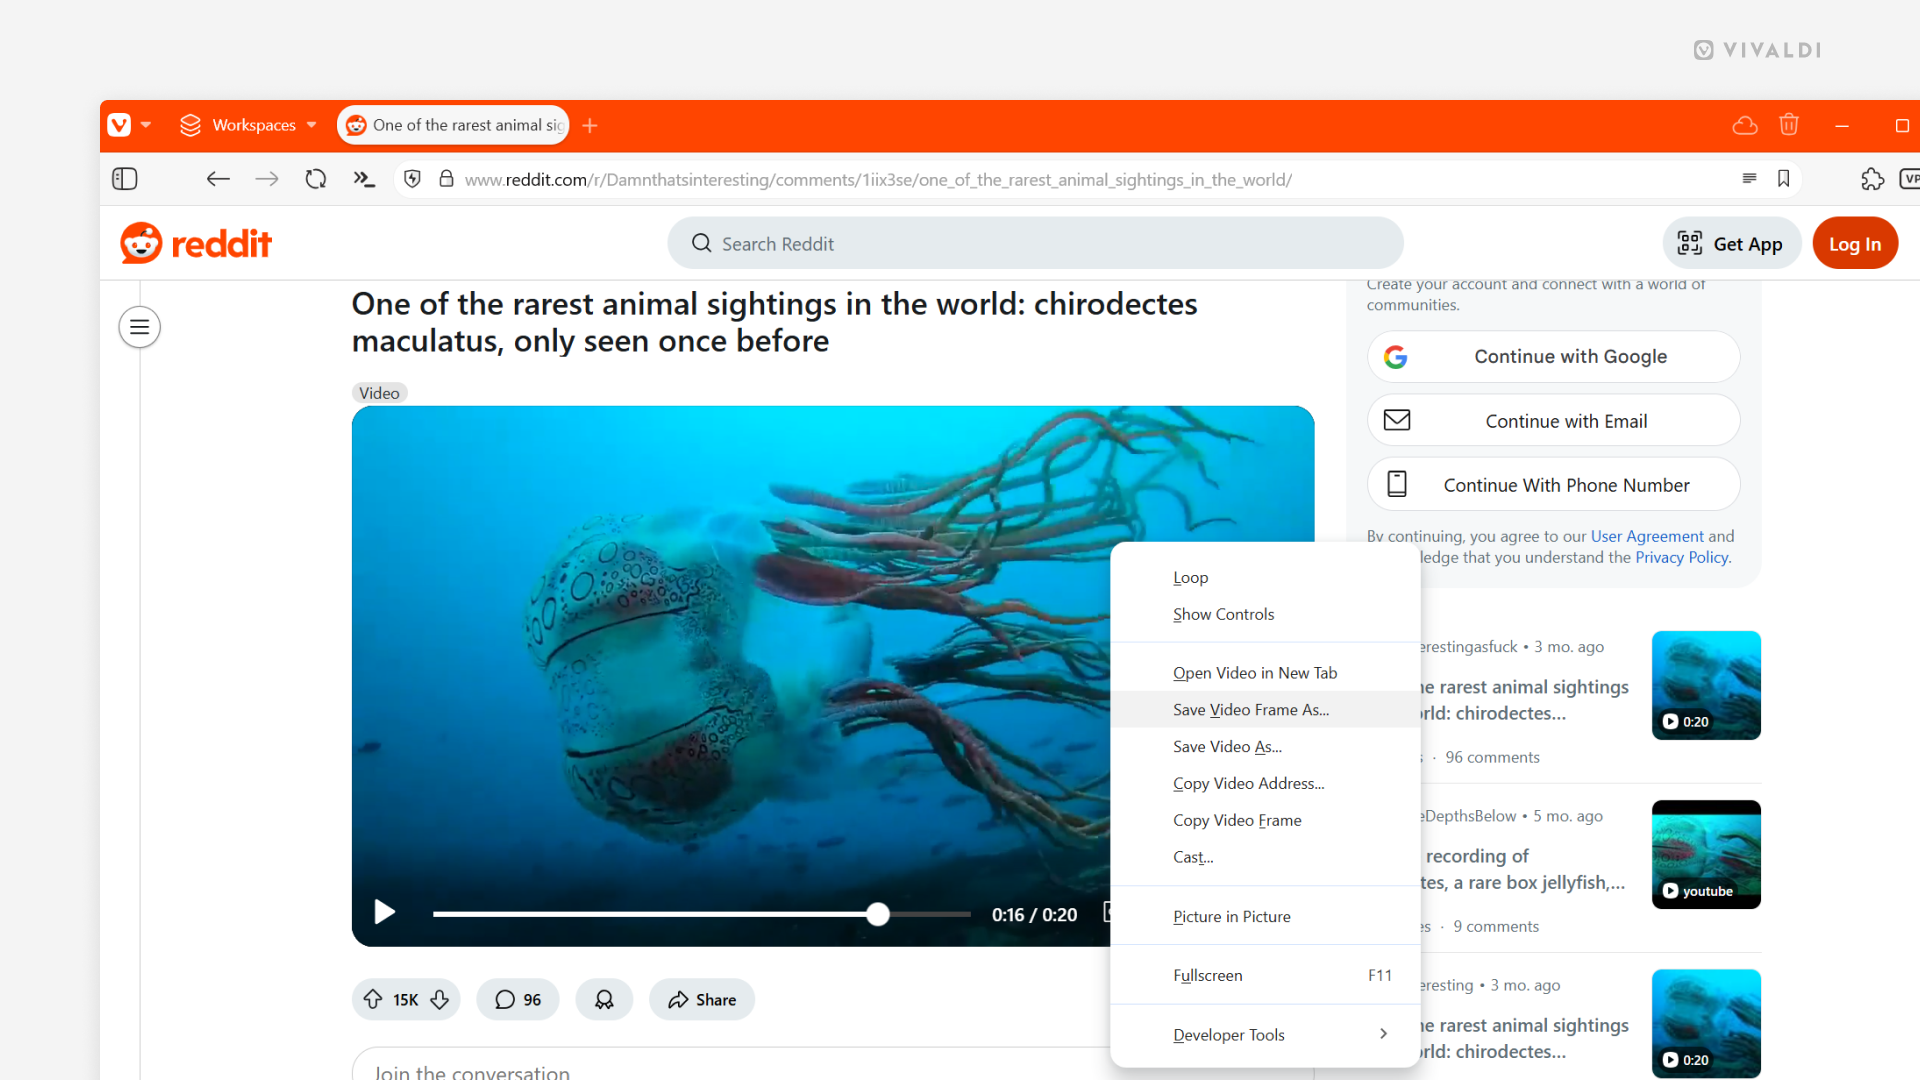
You can use the browser’s screenshot tool, to capture the content on web pages. But if that content is a point in a video, then saving a frame from it directly is faster and gives you a better result than trying to draw a frame around the capture area.
To save a frame from a video as an image file:
Play the video and pause it at the point that you want to grab a screenshot of.
Right-click (in some cases double right-click) on the video to open the context menu.
Select Save Video Frame As.
Select the saved file’s destination folder.
Click Save.
In addition to saving a frame as an image on your computer, you can also just copy it.
To copy a frame from a video:
Play the video and pause it at the point that you want to grab a screenshot of.
Right-click (in some cases double right-click) on the video to open the context menu.
In general, mobile devices, such as smartphones and tablets, have smaller screens than laptops and desktop setups. This usually means that user interface elements and web contents are much smaller and that can make browsing on mobile more difficult. Luckily in Vivaldi on iOS you can change the zoom level to make reading easier.
Zoom in on web pages
To change the text size:
While you’re on the page, go to the Vivaldi menu > Zoom text.
Tap on the – or + buttons to find the best zoom level.
Tap Done.
To reset the zoom level.
While you’re on the page, go to the Vivaldi menu > Zoom text.
Tap Reset or tap on the – or + buttons to go back to 100%.
Progressive Web Apps (PWA) are websites that can be installed as independent applications. They can be opened from shortcuts and used in their own window separate from the main browser.
Install a Progressive Web App
To install a website as a PWA:
Open the web page in Vivaldi.
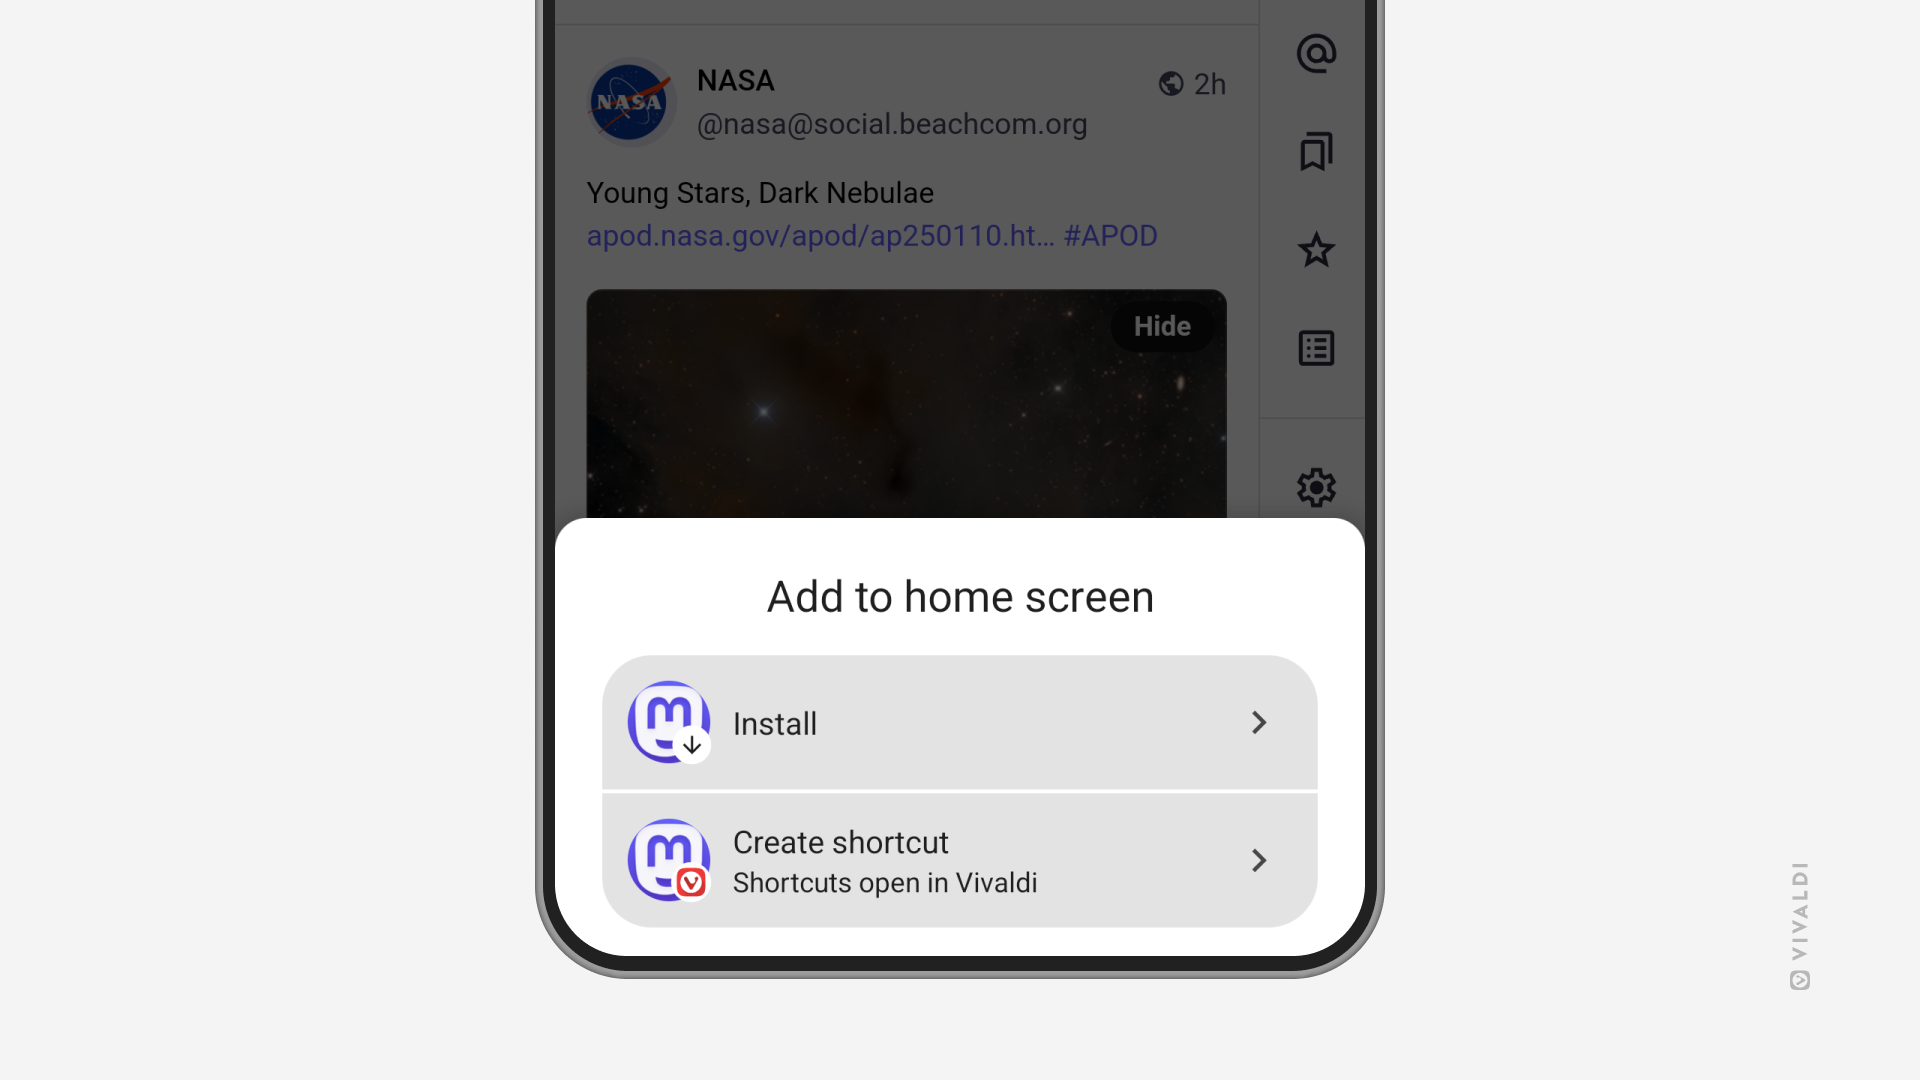
Go to the Vivaldi Menu > Add Page To > Home screen.
Select Install.
Tap Install in the confirmation dialog.
If the site doesn’t support PWAs, you’ll be offered to create a shortcut instead. While PWAs open in their own window, tapping on the shortcut will open the saved site in a new tab in the main app window.
Open links from Progressive Web Apps in the main browser
To open a link from a PWA as a new tab in the main browser window:
Long press on a link to open the context menu.
Select “Open in Vivaldi Browser”.
Delete Progressive Web Apps and Home Screen Shortcuts
To uninstall a PWA or delete a shortcut:
Long press on the PWA/shortcut icon on your home screen.
Vivaldi’s privacy and security settings give you solid control over safeguarding your private data.
By default, each setting has been enabled or disabled based on what we believe is in our users’ best interest, but you have the option to change each setting in Settings > Privacy and Security.
Always Use Secure Connection (HTTPS)
To always load websites using the secure HTTPS protocol instead of the less secure HTTP:
By default, when you do not enable this setting, Vivaldi will check if websites can be accessed securely and use the secure connection if possible. As a result, for most websites, this setting is not actually needed. However, you may choose to enable this setting if you absolutely never want to use websites that do not offer HTTPS, without clicking on a warning message first.
Note that this setting will sometimes cause websites that do offer HTTPS to show a warning if the website responds very slowly to HTTPS requests since Vivaldi cannot tell if this is the website not supporting it, or just supporting it very slowly. Only enable this setting if you are willing to accept this annoyance!
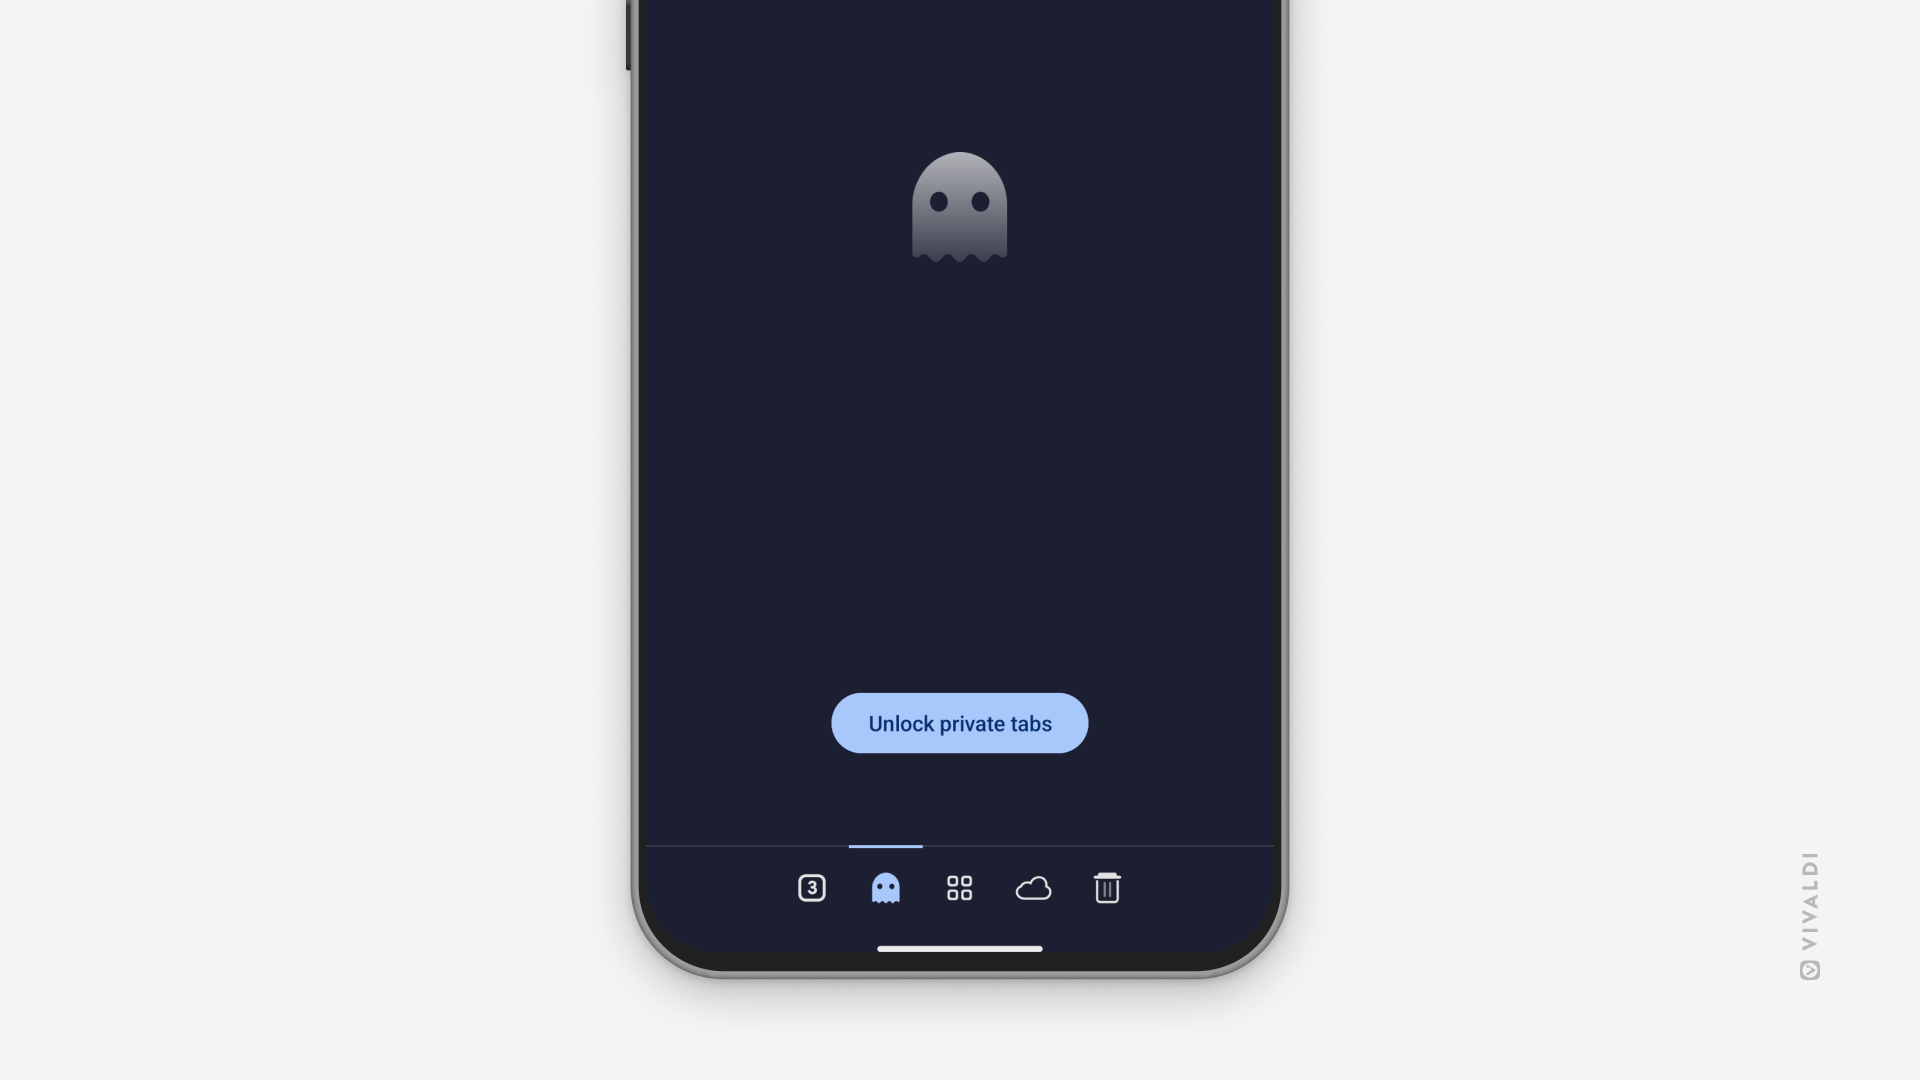
Lock Private tabs when you leave Vivaldi
When you leave Private Tabs open for longer, you can lock them for additional privacy. Next time you open Vivaldi and wish to view a private tab, you’ll first be asked for your phone’s or tablet’s screen lock PIN, password, pattern, etc.
Toggle on Lock Private tabs when you leave Vivaldi.
Verify yourself with your device’s unlock method.
Access payment methods
You can save your credit card details in Vivaldi to make online transactions faster in Settings > Payment methods. Websites can check whether you have payment methods saved. To block them from doing so:
Select between no preloading and standard preloading.
When Cookies are allowed, they may be used for preloading.
When a Google site asks to privately preload links on their page, Vivaldi encrypts and preloads pages through Google servers without cookies. This hides your identity from the preloaded site. Because the preloaded pages are encrypted, and the site linking to the pages is a Google site, Google servers don’t receive new information when privately preloading these pages.
Use secure DNS
In order to open a website, its IP address has to be fetched via a DNS (Domain Name System) provider. Secure DNS accesses DNS servers over HTTPS and encrypts all the data being transferred between your device and the DNS servers.
Select between your current internet service provider or:
Custom (enter your preferred provider’s URL manually),
Google (Public DNS),
CleanBrowsing (Family Filter),
OpenDNS,
Cloudflare (1.1.1.1), or
NextDNS.
Send a “Do Not Track” request
You may enable the option Send “Do Not Track” request. It’s a polite way of asking websites not to set tracking cookies. However, they can simply ignore it, and in most cases, the ones you want to avoid will be the ones who do not respect your request.
Touch to Search
When you’ve chosen Google as your default Search Engine, you can make use of the Touch to Search feature. It allows you to learn about topics without leaving the page.
To use Touch to Search:
Highlight the text you want to use as a search term by long pressing on the word and dragging the bubbles on either side of the word to expand the search term.
Open the search results view by sliding it up from the bottom of the screen.
Tap on a search result to open the web page in a new tab.
Swipe down to close the search.
To get more accurate results, you can allow Google to include surrounding text in the searches as well. To enable it:
Open the History Panel and tap on Clear Data on the right side of the bottom toolbar. Alternatively, open the Vivaldi menu > Settings > Privacy and security> Delete browsing data.
Pick a time range.
Select the data types you want to delete (take a look at the Advanced section as well).
Tap Delete data.
Clear session browsing data on exit
If you want to delete your browsing history and other data when you’re finished using the app, you can have it automatically deleted on exit. To enable the settings:
Go to the Vivaldi menu > Settings > Privacy and security > Clear session browsing data on exit.
Toggle on the setting.
Choose which data types you want to delete:
Browsing history.
Cookies and site data.
Cached images and files.
Close open tabs.
It’s not enough to minimize the app or remove it from the app switcher menu to exit the browser. To exit Vivaldi:
Go to the Vivaldi menu.
Scroll to the bottom of the menu.
Select Exit.
Broadcast IP for best WebRTC performance
Broadcasting IP for Best WebRTC (Web Real-Time Communication) performance is most relevant for users browsing over a VPN connection, who want to hide their IP even from websites using WebRTC to check real IP addresses.
In Vivaldi, broadcasting has been enabled by default, meaning websites can see your IP address, though, often just the internal network IP address. Disabling this setting will increase your privacy, but can cause issues with how websites function.
Vivaldi offers several options to customize your browsing flow in the iOS app. Continue reading to learn about a few of them.
Desktop view
To display a desktop version of the website, instead of the mobile version commonly displayed on smaller screens, open the Vivaldi Menu and select Request Desktop Site.
To permanently display desktop versions of all websites:
Go to Vivaldi Menu > Settings > Content settings > Default site view.
Select Desktop.
Homepage
On the bottom toolbar (when Tab and Address Bar are at the top of the screen), you have a choice between two buttons for the middle button. By default, it’s a search button, which will focus on the Address Field, so you can type in the next link or search keyword. The other option is to have a Home button, which will take you to either the Start Page or a website of your choice.
To enable the Home button:
Go to Vivaldi menu > Settings > General.
Enable Display Home Button.
To set a web page of your choice as the homepage:
Go to Vivaldi menu > Settings > General.
Select Specific Site.
Enter the web page link.
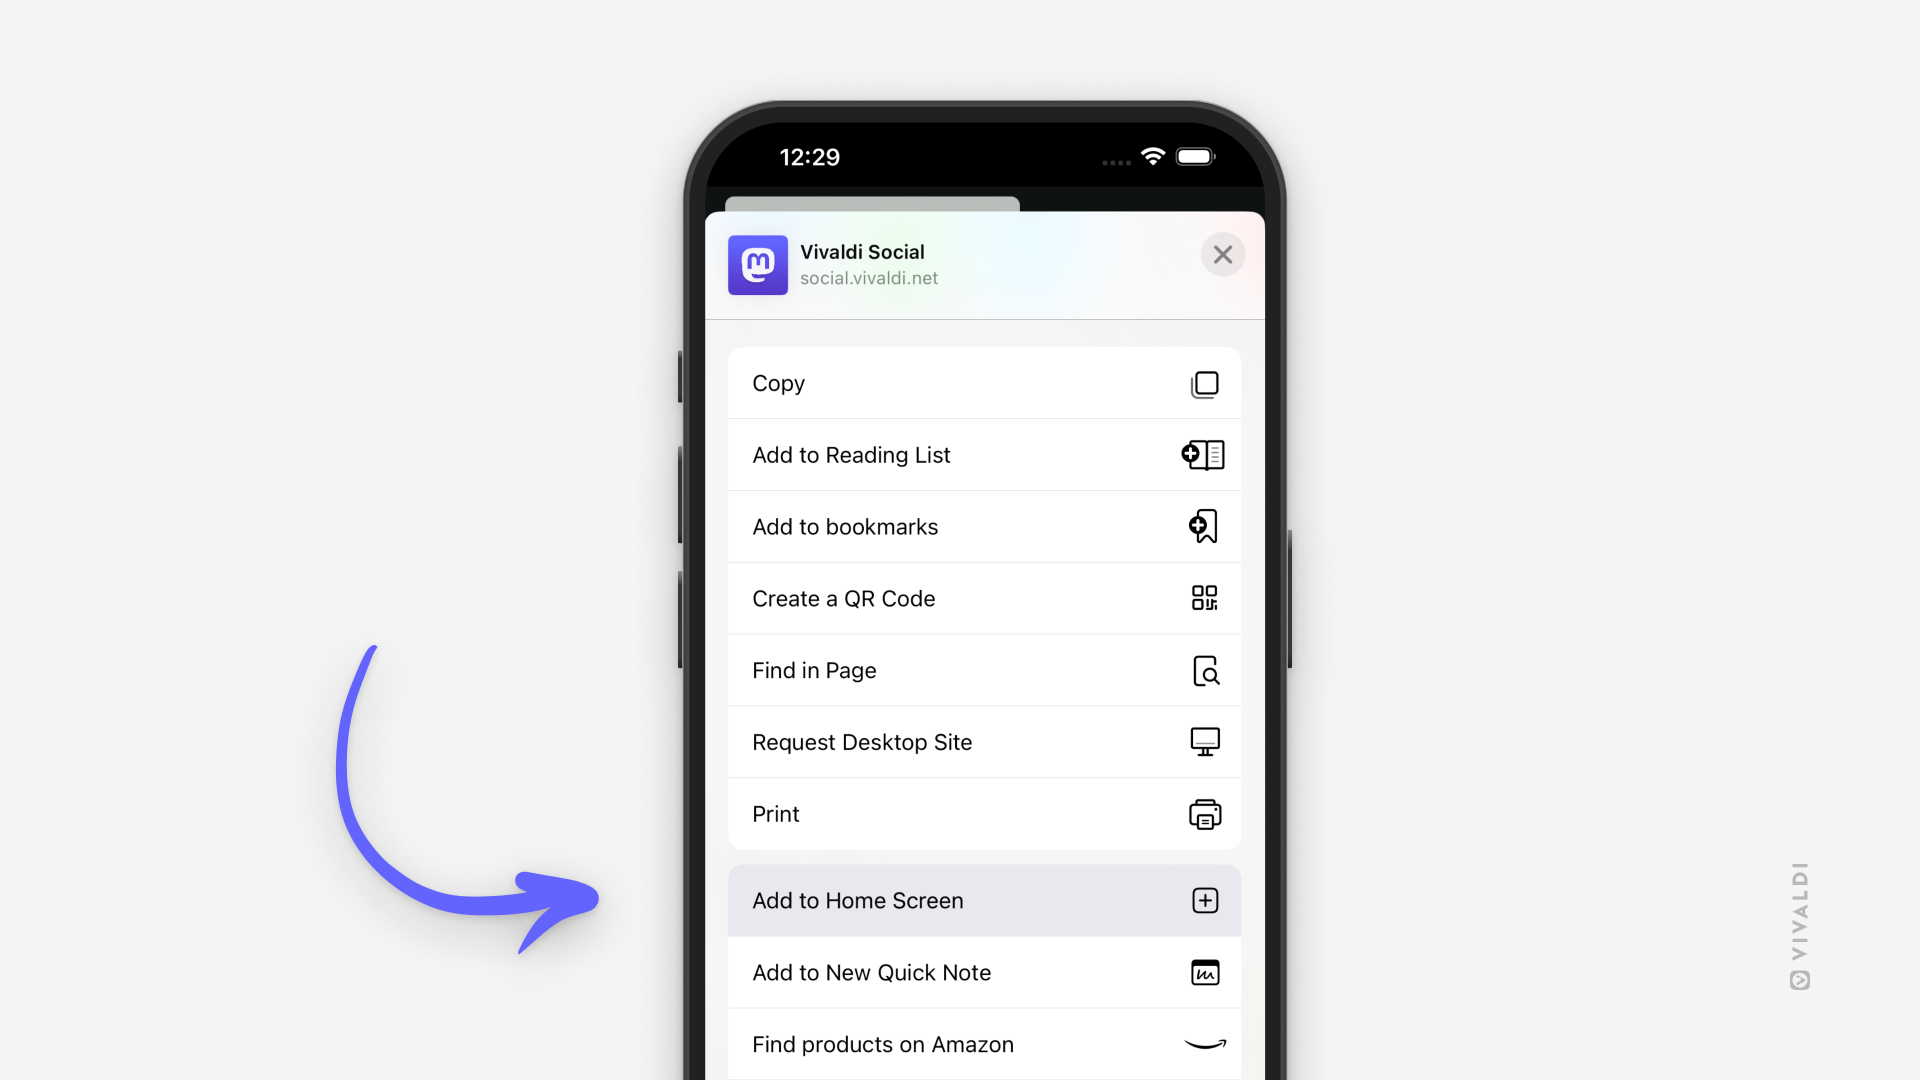
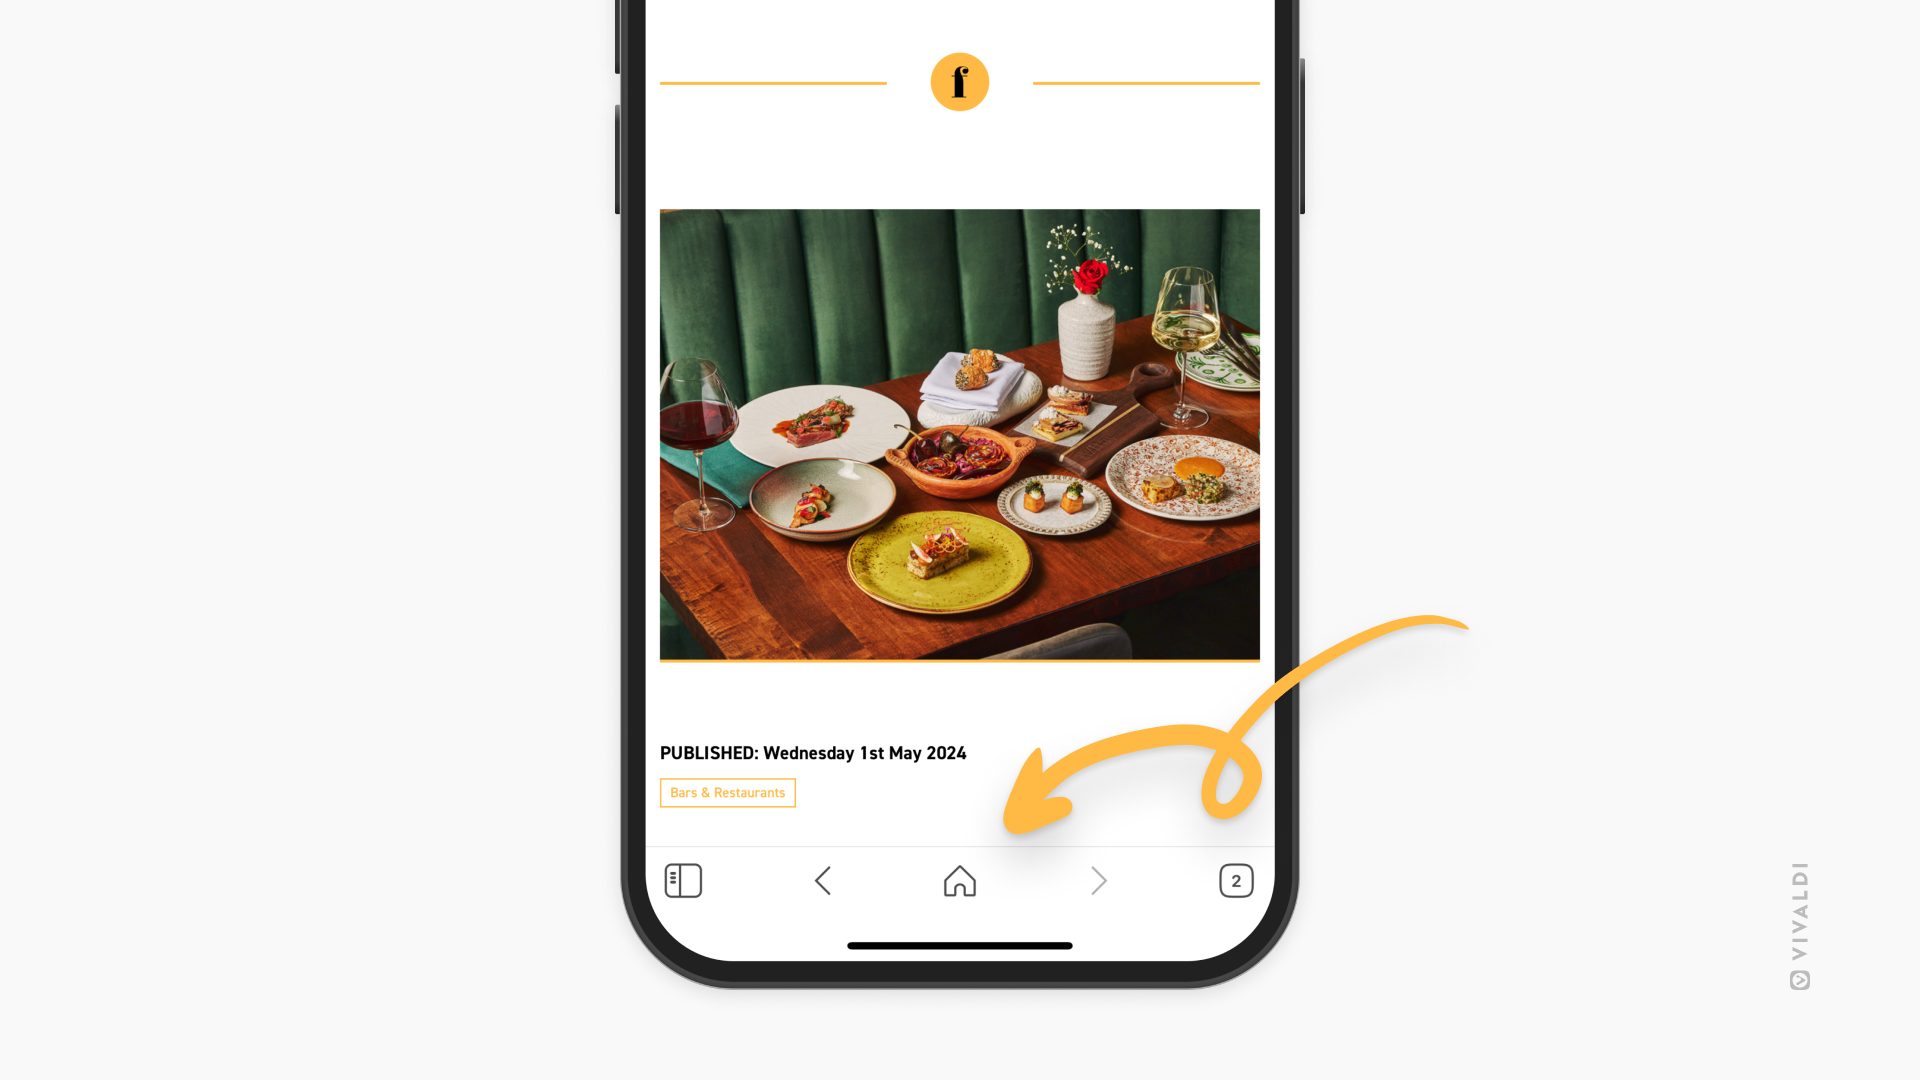
Home Screen shortcut
When Vivaldi is your default browser on iOS, you can create web page shortcuts for the Home Screen. That way you can access your most viewed websites even faster.
To create a Home Screen shortcut:
Open the web page you want to add to the Home Screen.
The main Vivaldi Menu in Vivaldi on iOS gives you access to most of Vivaldi’s key features and tools.
Access the Main Menu
Whether you’re using the browser on a small phone screen or a large tablet screen, the menu can always be accessed from the right side of the Address Bar. Just tap on the Vivaldi logo to open it. The options available in the menu depend on whether you have open a web page or the browser’s Start Page.
To close the menu, tap on the feature you want to use or on an area outside the menu.
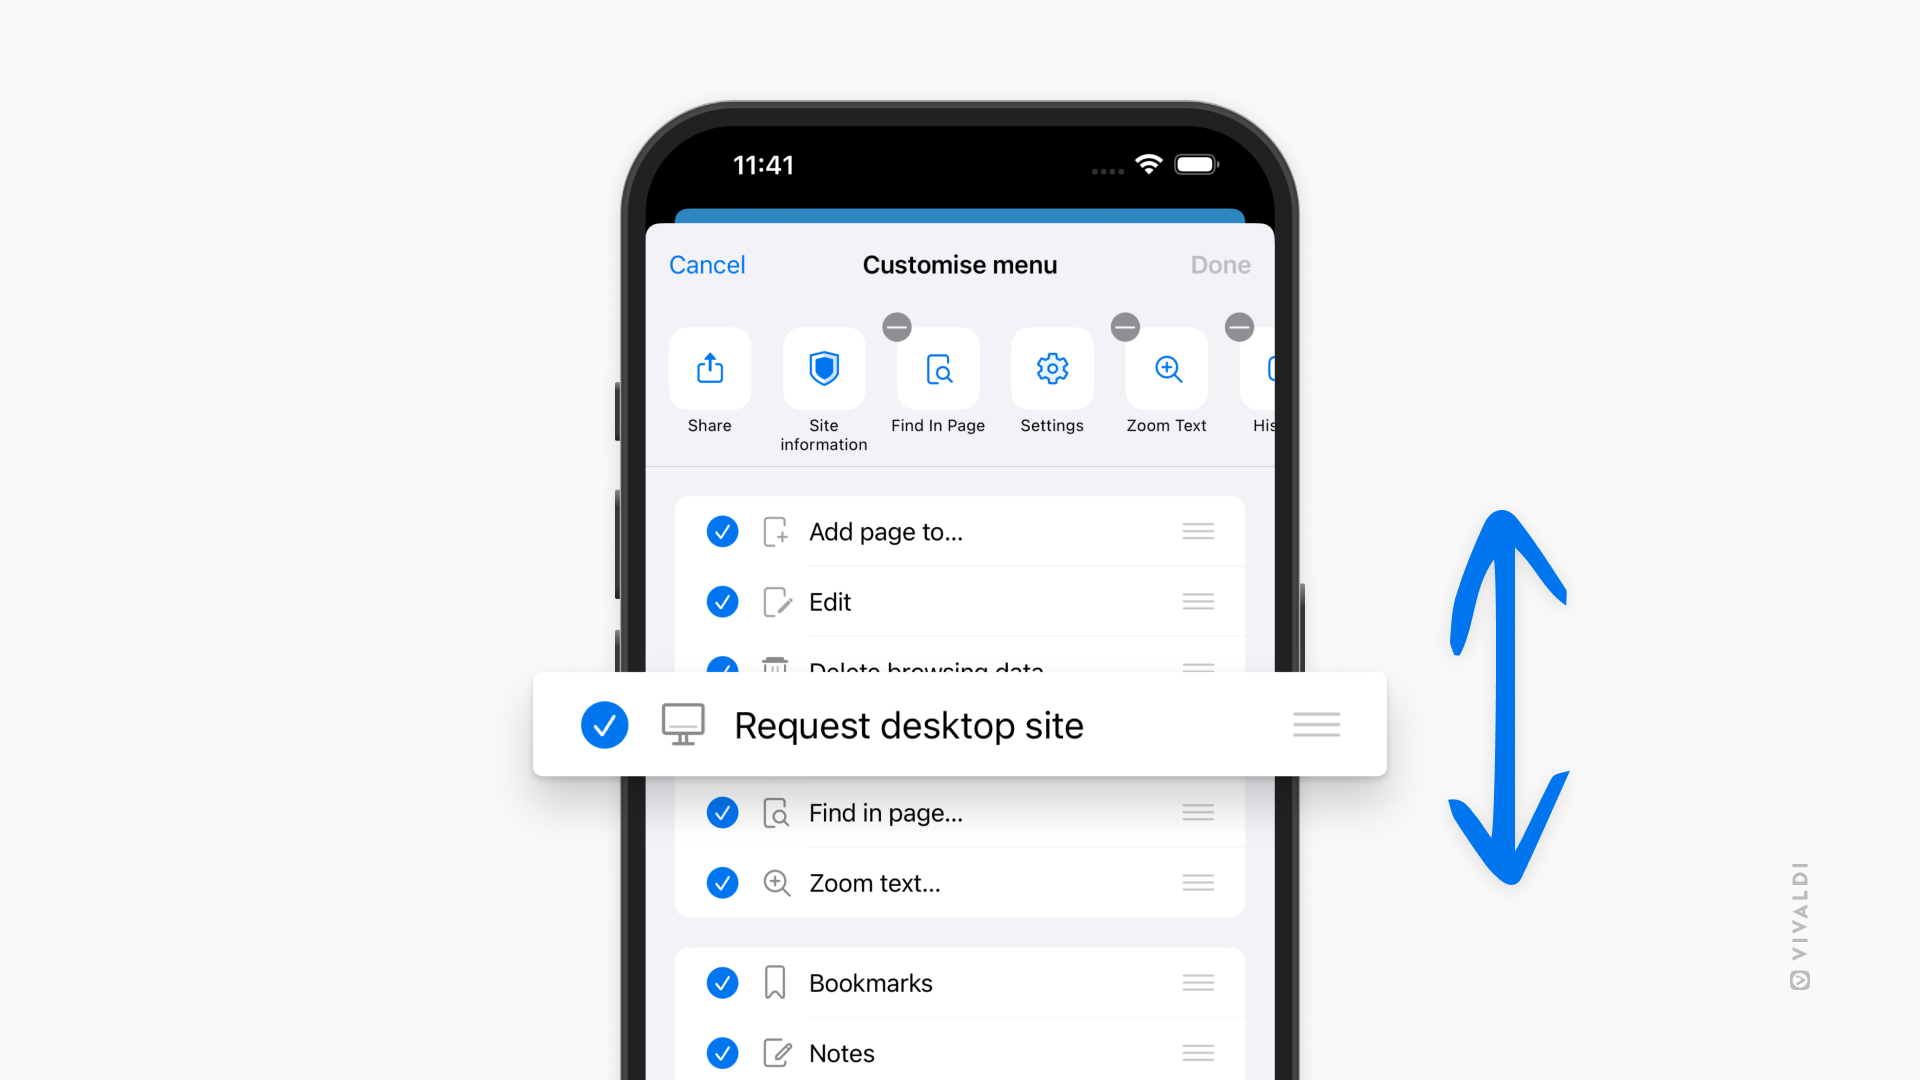
Customize the menu
You can customize the order and visibility of the menu to make sure that the options you use most are always within easy reach.
To customize the menu:
Open the Vivaldi menu.
Long-press on one of the menu options in the top row to open a context menu.
Select Customize menu.
To reorder menu entries:
Long-press on the menu item you want to move. With items in the list, long-press on the three lines on the right side.
Drag and drop it to its new location.
To hide menu items:
On the top row of menu items, tap on the Hide button in the top left corner.
In the list, tap on the checkmark in front of the menu item.
Customization is one of Vivaldi’s strong suits. There are many ways you can alter the appearance of the browser, so let’s take a look at what you can change to make Vivaldi look the way you want it.
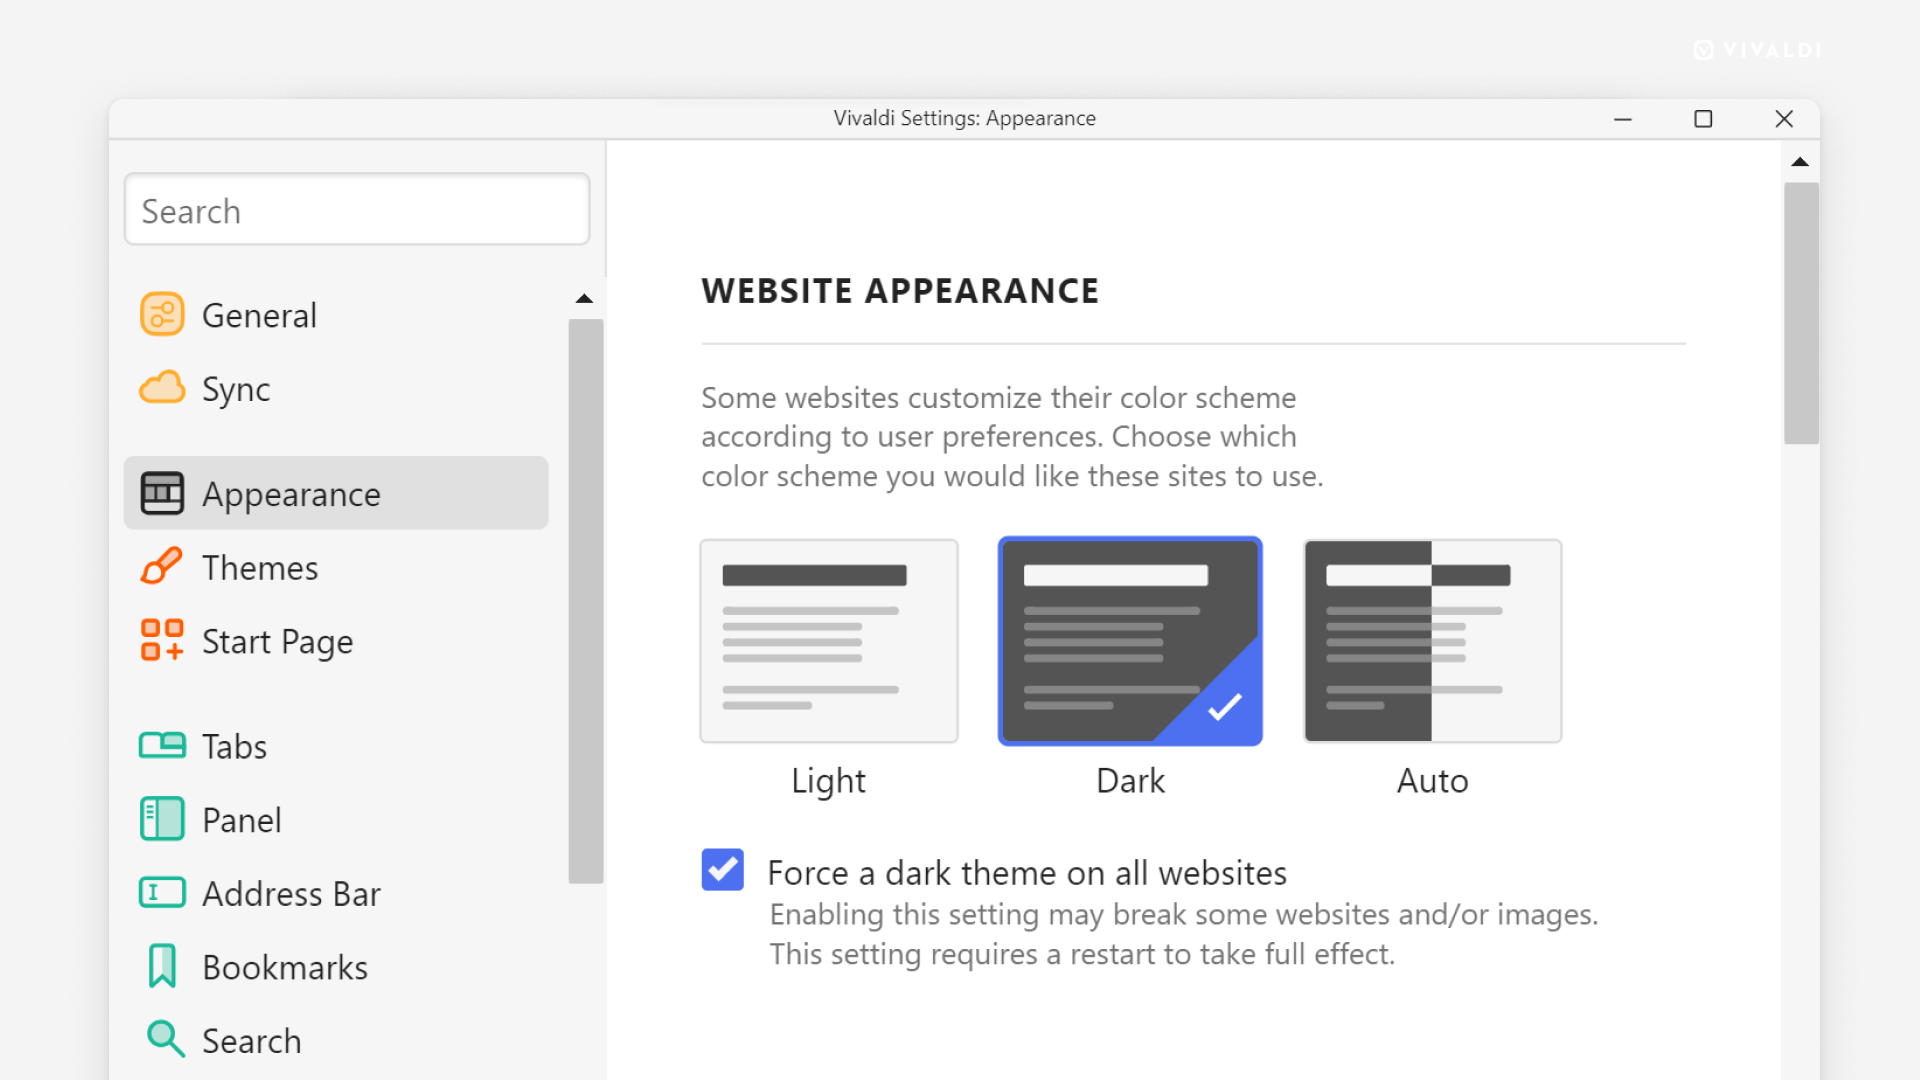
Website Appearance
If you prefer dark themes and want the web page content to match:
Some websites do not offer their site in dark mode. In that case, you can force dark mode, by selecting the “Dark” option and enabling Force a dark theme on all websites.
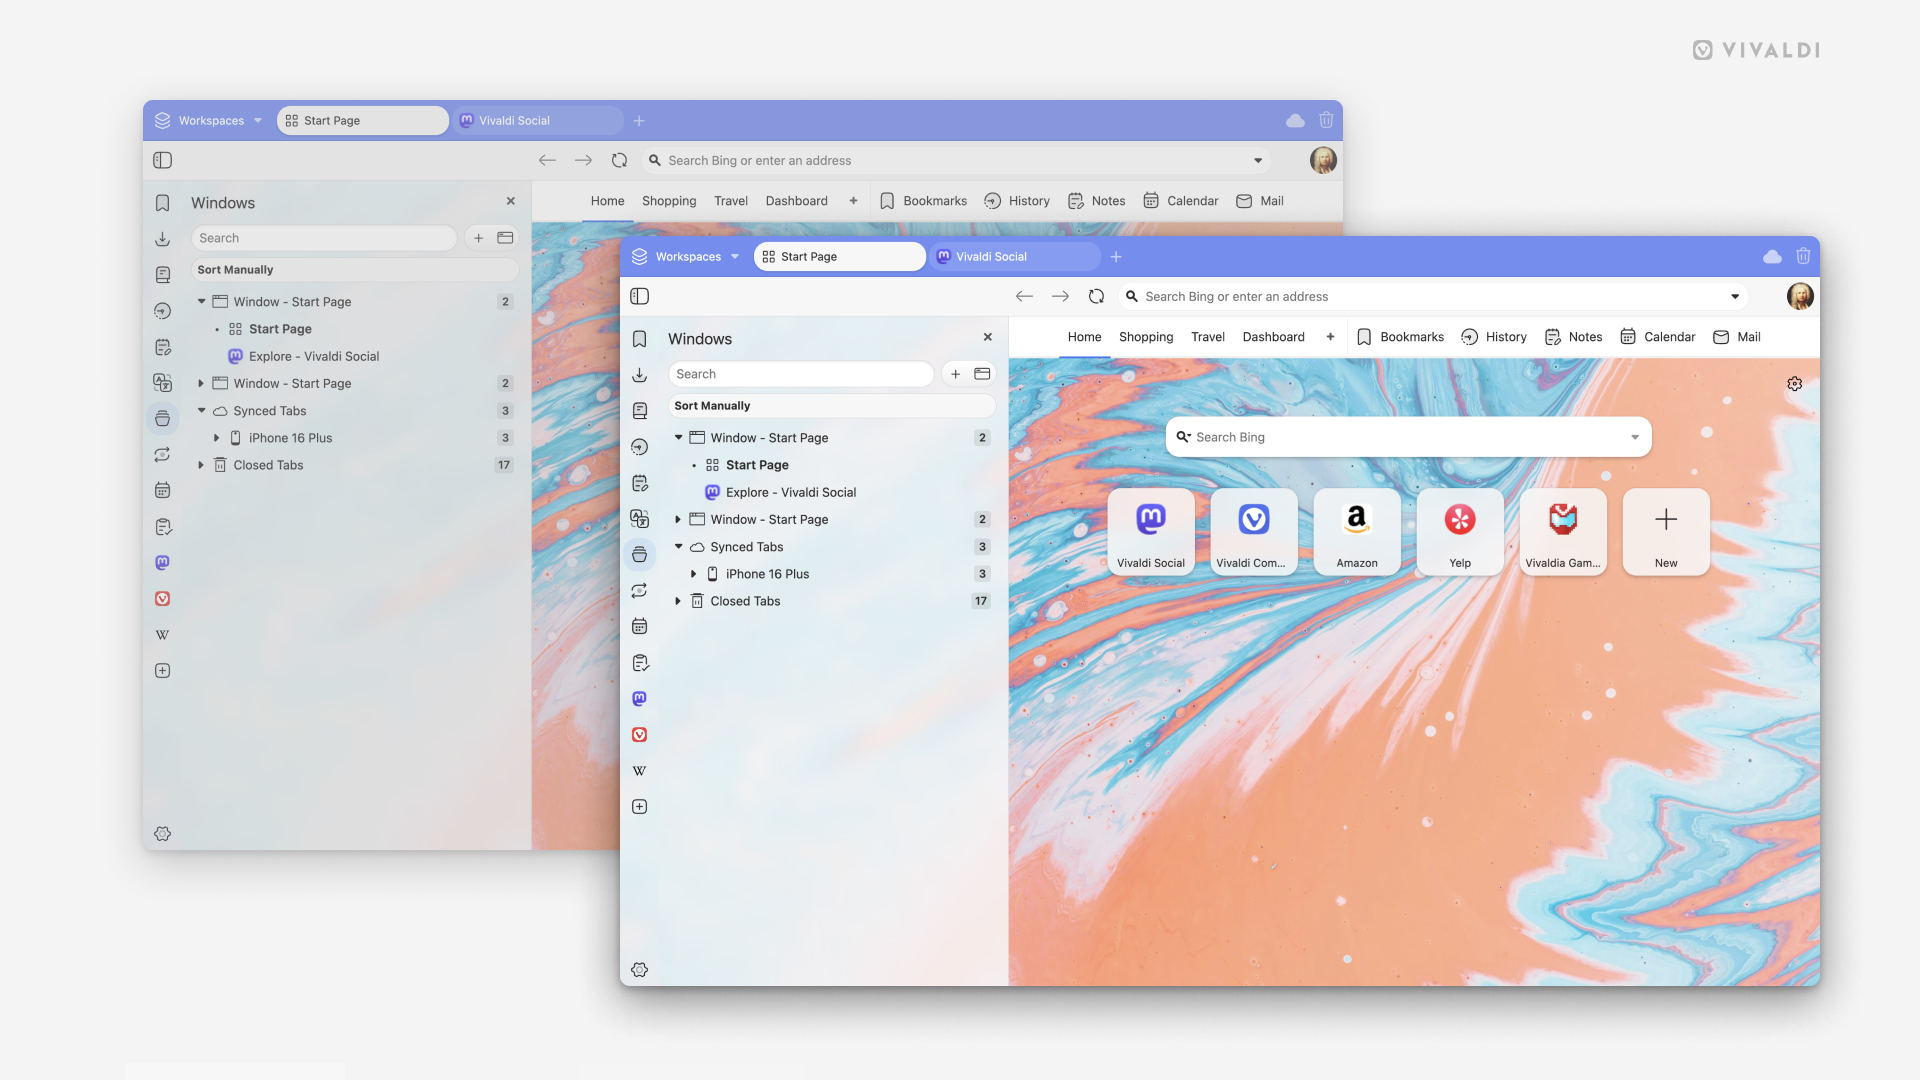
Window Appearance
To make small changes with a big impact take a look at the following settings.
Open Settings in a Tab
By default, Settings open in a little window of their own, but if you prefer to browse and change settings in a tab:
Go to Settings > Appearance > Window Appearance.
Enable Open Settings in a Tab.
Open Popups in Tabs
Pop-up windows in Vivaldi are blocked by default. If you’ve allowed them either globally or on select sites, you can decide whether to open popups in a new window or a new tab.
When using the Zoom feature or changing some settings, you can change the value using a slider. If you want to change the value step-by-step with more accuracy, you can replace sliders with button controls.
Integrate Vivaldi with the rest of your operating system’s user interface.
Use OS-based window controls.
Display the Active Tab’s full title.
Make use of macOS’ Split View feature.
Show Title Bar
When you have moved the Tab Bar to the left or right side of the browser window, you have the option to show the title of the active tab in a Title Bar, which will also include the Vivaldi Menu button as well as window controls for minimizing, maximizing and closing browser windows.
When you’re viewing browser windows side by side, it can be difficult to see, which one you’ve focused on. Fading colors of background windows helps to make it more obvious.
Depending on the window size and the amount of content, you may see scrollbars here and there in the Vivaldi user interface, for example, in Panels, Mail lists and emails, Calendar views, etc. By default, the scrollbars are thicker and have clickable arrows at both ends. To get slimmer and more minimalistic looking scrollbars:
Go to Settings > Appearance > Window Appearance > User Interface Density.
Choose between:
Regular i.e. the more spacious layout, and
Compact layout.
Compact Menu Layout
While you’re deciding on the density of the user interface, you can also make a call on the density of menus.
To switch from spacious menus to compact ones:
Go to Settings > Appearance > Window Appearance > User Interface Density.
Enable Compact Menu Layout.
Restart the browser.
User Interface Zoom
If you have plenty of screen real estate to spare on a large monitor or your vision requires to have larger buttons and texts for comfortable viewing, you can increase (or decrease) the user interface size.
To change the UI zoom level:
Go to Settings > Appearance > Window Appearance > User Interface Zoom.
Use the slider or range control buttons to find a suitable UI size for you.
If you click on the current zoom value, you can also enter the desired zoom value by typing the number.
The Reading List allows you to add web pages to a list to keep for later. It prevents endless tabs from accumulating on your Tab Bar and Bookmarks being filled with entries you only need once.
 Vivaldi menu > Share.