HTML5 Proprietary Media on Linux

HTML5 “proprietary” audio and video includes all media types that are patented, such H.264 (video) and AAC (audio).

Testing support

To test proprietary media support, try and play the following test video.


Installing proprietary media support

If the test video didn’t play, restart Vivaldi once. This will cause a reinstall of the appropriate support files, in cases where they did not get installed alongside Vivaldi with the initial install or upgrade .


Troubleshooting

If the test video above will still not play, file a bug report stating that you run Linux and cannot play proprietary media. Mention your Linux distribution and distribution version. It is also recommended that you create a media log by running the following command in a terminal. Triple click the following line and copy it to your clipboard, paste it into a terminal window (Ctrl+Shift+V), then press Enter:

bash -x -- /opt/vivaldi/update-ffmpeg --user 2> "${XDG_DOWNLOAD_DIR:-$HOME/Downloads}/vivaldi-media-log-$(date '+%Y%V%u%H').txt"

You can attach the generated log (found in your Downloads directory) to the bug you create.

Most audio/video streaming services also require Encrypted Media Extensions to function. If you are able to play the test video above but continue to have issues with streaming services, you should also check out our guide to Widevine CDM (for EME/DRM support).

Was this helpful?

Yes
No
Thanks for your feedback!

Raspberry Pi -Tips for running Vivaldi

Vivaldi for ARM (32bit with hardware floating point) can be found here:

Just select “Linux DEB ARM” from the drop down menu.

Below are some tips to make the most of it.


Installing Vivaldi for ARM on non-Debian based distros

Use “install-vivaldi.sh” : sh install-vivaldi.sh --final (more info)


Widevine and Flash

If you need to access websites using Encrypted Media Extensions (.e.g. Spotify) or sites that use Flash (e.g. Tidal), you can extract Widevine and Flash binaries for Linux ARMhf from ChromeOS recovery images. Simply run this script on a Linux machine to extract the files.

Since these you need to download a very large file (2Gb+ on disk after download) it is recommended that you do the extraction on another machine (you can do it on the Raspberry Pi itself, if you have space).

Netflix

To make this work you will need to have already installed Widevine. Additionally, you will need to alter the browser’s User Agent. To change your User Agent, install the extension User-Agent Switcher for Google Chrome, open the “Options” and configure a new “Custom User-Agent”, like so:

  • New User-agent name: Netflix
  • New User-Agent String:
    Mozilla/5.0 (X11; CrOS armv7l 10895.56.0) AppleWebKit/537.36 (KHTML, like Gecko) Chrome/79.0.3945.131 Safari/537.36
  • Group: Chrome
  • Append?: Replace
  • Indicator Flag: NFX

Enable this User Agent and then proceed to logging into Netflix.

Whilst it is possible to play videos this way, it is not recommended on any recent Raspberry Pi, other than for a bit of fun. The resolution is very poor and you will most likely get a lot of dropped frames.


Increasing the size of the swap file

For smooth running of Vivaldi on Raspberry Pi, we recommend to increase swap space. Open a “Terminal” and use the following command to change the SWAP from 100MB to change it to 2048MB:

echo CONF_SWAPSIZE=2048 | sudo tee -a /etc/dphys-swapfile

Then restart the swap service to apply the changes:

sudo /etc/init.d/dphys-swapfile stop
sudo /etc/init.d/dphys-swapfile start

Making this change may diminish the the life of your SD card.


Stopping the “hiss” when using analog out (Raspberry Pi 3)

If you are using Raspbian on a Raspberry Pi 3 and hear a his when listening to music or watching videos, issue the follow command in a “Terminal” and then restart the Raspberry Pi:

echo audio_pwm_mode=2 | sudo tee -a /boot/config.txt

Was this helpful?

Yes
No
Thanks for your feedback!

Sync browser data on desktop

With the synchronization function, you can synchronize your Vivaldi browser data across multiple devices.

Standalone version of Vivaldi

A standalone version can be used for testing a specific setup or version, without touching the system wide settings (profile). It can also be used to create an almost fully portable installation of Vivaldi that you could store on an external disk, for sharing between computers.

Important! Since passwords and extensions are encrypted with a key which is unique to the user profile on each computer, they cannot be transferred.

The following instructions are for Windows. If you are on Linux or macOS, you can run the Snapshot and Stable versions side by side, without having to take extra steps during installation.


Installing Vivaldi as a standalone on Windows

To install Vivaldi as a standalone version:

  1. Go to:
  2. Open the installer from the Downloads Panel or from the folder you downloaded it to.
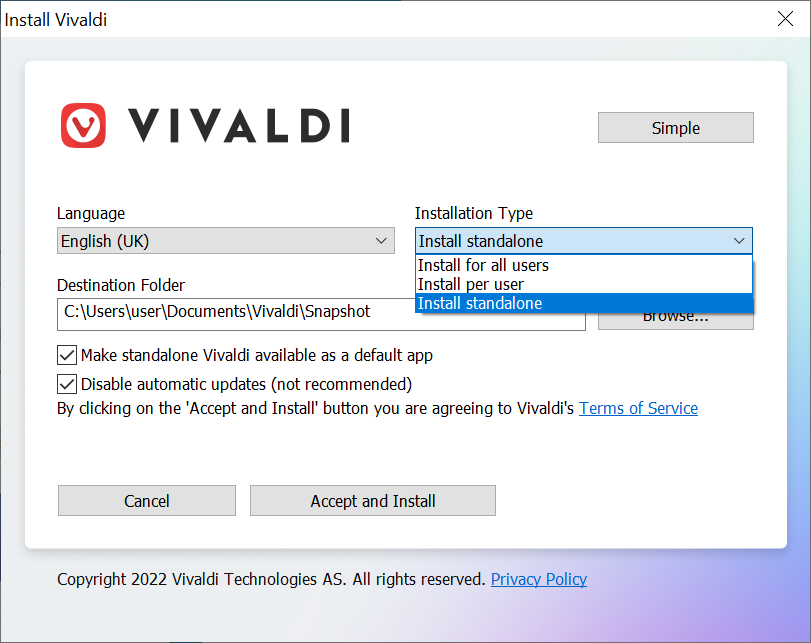
  3. In the installation window select Advanced.
  4. Under Installation type select Install Standalone.
  5. Set a destination folder (anywhere except the Program Files folder)
  6. Click Accept and Install to finish the installation.

To open the browser go to the destination folder > Application > vivaldi. To access the browser easily save a shortcut to your Desktop or pin it to the Start Menu or Task Bar.

Vivaldi browser's installer window.

We recommend that you tick the additional dialogue box “Register standalone Vivaldi” (see above). This will make the standalone version appear in the Default apps list and will be added as an entry in the Registry of the operating system.

Also, we recommend keeping the option for automatic updates enabled, to make sure you get the latest security updates, newest features and most recent bug fixes.


Updating the standalone version

If you have automatic updates enabled in Settings > General > Updates, the update will be downloaded automatically and installed on the next browser restart. Update ready message will also appear on the right side of the Address Bar when an update has been downloaded. Click on it and then on Restart to complete the update. 

To check for updates manually go to Vivaldi menu button  Vivaldi menu > Help > Check for Updates and then Install Update.

You can also download the latest update from the website. Just save it to the same folder to keep the settings or create a new folder to have a clean install.


Uninstalling the standalone version

  1. Go to the folder where you saved the Vivaldi standalone folder. If you can’t remember or can’t find it, go to Vivaldi menu button Vivaldi menu > Help > About and take note of the Executable Path.
  2. Close all Vivaldi windows
  3. Delete the folder containing the Vivaldi standalone.
    • In case you registered the standalone version as a default app, registry keys and update notifiers (if enabled) need to be deleted manually.

Was this helpful?

Yes
No
Thanks for your feedback!

Is Vivaldi Open Source?

Vivaldi is not made available under one unified open source license. It does contain the Chromium source code with changes made to allow the HTML/CSS/JS based UI to run. All changes to the Chromium source code are made available under a BSD license and can be read by anyone on vivaldi.com/source. Details in this regard are explained in the the README and LICENSE files within the package.

In addition, our UI code is written in plain, accessible code for those who read HTML, CSS and JS. This means that for all practical purposes the Vivaldi source code is available for audit.

Vivaldi also contains third party code. Licenses for these parts can be found in the source package and in the installed browser by navigating to vivaldi://credits.

Was this helpful?

Yes
No
Thanks for your feedback!

Read and follow blogs

One of the great perks of the Vivaldi Community is that we’ve given you space where you, our members, can share your thoughts in personal blogs. It’s all free and ad-free! Even if you don’t want to blog yourself, you can read and follow blogs by other Vivaldi Community members. Here’s how.

Reading blogs

To browse through Vivaldi Community posts, go to blogs.vivaldi.net, the homepage of the Vivaldi Community Blogs.

Featured on the homepage, are the posts that have piqued our interest. We hope you like this curated selection.

You can also browse through the numerous categories.

Categories

There are 24 categories in total. Those include:

  • Featured – blog posts highlighted by the Vivaldi Team.
  • Following – blog posts from bloggers you follow.
  • Recent – the latest posts from all categories.
    When you’re logged in, you can find Recent posts also on Dashboard > Reader.
  • 21 different topics from tech related topics to culture to more personal topics.
  • Miscellaneous – includes all uncategorized blog posts.

Searching blogs

To find blogs, use the search box on the right-hand side. Search results can be sorted both in ascending and descending order by Date, Title and Name.

An arrow pointing at the search field on blogs.vivaldi.net.

You can also search for blogs from the top right corner of Dashboard > Reader.


Following blogs

To follow a blog:

  1. Make sure you’re logged in to your Vivaldi account.
  2. Open the blog you want to follow.
  3. Click on the Follow button in the top left corner.

While browsing posts in one of the categories on blogs.vivaldi.net:

  1. Make sure you’re logged in to your Vivaldi account.
  2. Browse through blog posts in the various categories on blogs.vivaldi.net.
  3. Click Follow at the bottom of the post’s entry on the page.

You can find all the posts by the users you follow either:

  1. On blogs.vivaldi.net/following.
  2. On Dashboard > Reader > Following (in the menu on the right side).

Lists

An addition or alternative to following blogs is adding and organizing them into Lists. To create a list and add blogs to it:

  1. On Dashboard > Reader > My lists click Create new list and add blogs manually.
  2. On Dashboard > Reader, locate the Add to lists button at the footer of a blog post, and add the blog to an existing list or create a new list.

Was this helpful?

Yes
No
Thanks for your feedback!

Image Properties

The built-in Image Properties feature lets you find all the information you need about an image right in the browser.

View Image Properties

  1. Right-clicking an image on a webpage.
  2. Select Image Properties from the context menu.
  3. Image Properties view will open in a new tab.
Image Properties in Vivaldi

Available information

Information available in Image Properties is based on the image meta data and can include:

  • File name and URL
  • The model of the camera that took the image
  • Depth of field and sensitivity of the image sensor (ISO)
  • Exposure and focal length
  • Histogram, white balance and color space
  • Dimensions and size
  • Time and date when the photo was taken
  • Copyright
  • Software used to process the image

Copy data to clipboard

  1. Right-click on the image and select Image Properties from the context menu.
  2. In the Image Properties view, click on Copy Data to Clipboard.
  3. Paste copied data into an application of choice – or into Vivaldi Notes.

Was this helpful?

Yes
No
Thanks for your feedback!

Publish blog posts on Vivaldi Social

Posts on Vivaldi Social are limited to 1337 characters. If you need more space to express your ideas, you can create a post on your blog on Vivaldi.net and have it automatically shared on Vivaldi Social.

To start publishing your blog posts on Vivaldi Social:

  1. Log in to your blog’s account on blogs.vivaldi.net.
  2. Go to the blog’s Dashboard.
  3. From the menu on the left side, go to Settings > ActivityPub.
  4. Review and adjust the settings.
  5. Click Save Changes.

Few things to note.

There is a small delay between when a new post gets published on Vivaldi.net and when it shows up on Vivaldi Social. To speed up the process, enter the blog post’s link in Vivaldi Social’s search field and press Enter.

The blog posts are not published from your main Vivaldi account, but they’ll get their own blog account with the user handle @[email protected]. For example, @[email protected] will show posts from tips.vivaldi.net.

Also, blog posts won’t show up in the Local or Federated timelines, so make sure to Boost your blog posts from your main account and ask your followers to follow the blog’s account on Vivaldi Social, so they’d see new posts on their Home timeline.

If you delete a blog post on Vivaldi.net, it will not be deleted from Vivaldi Social


Search and follow Vivaldi Blogs on Vivaldi Social

To see whether your favorite bloggers on Vivaldi.net are sharing their content on Vivaldi Social, search for their user handle (@[email protected]) in Vivaldi Social. When their account shows up in search results, you can follow that account to see their latest posts and engage with them.


Post discussion

Comments left on the blog post on Vivaldi Social will show up below the post both on Vivaldi Social and Vivaldi.net. Your main account on Vivaldi Social will not be notified about any comments, so make sure to check the post or your blog on Vivaldi.net.

Comments left on the blog post on Vivaldi.net will not be displayed on Vivaldi Social.


Was this helpful?

Yes
No
Thanks for your feedback!

Reader View

Vivaldi’s Reader View lets you cut through the noise as you browse. No ads, no pop-ups, just pure content.

Reader View settings in Vivaldi

Enable Reader View

When you’ve found an article that you’d like to read in reader mode:

Once active, the Reader View button on the Address Bar will have a highlighted background.

Below the title you’ll also see a minute counter, estimating how long it will take to read the article.


Reader View Settings

Go to Settings > Webpages > Reader and adjust the Reader View settings, such as font face and size, line height, column width, and color scheme. To enable vertical reader mode, first tick the box for Allow Vertical Text Direction.

Reader View Settings

To access Reader View settings directly on the website:

  1. Make sure Display Settings on Page in Reader Mode has been enabled in Reader settings.
  2. Enable Reader View on the webpage.
  3. Click on the Reader View Forum chat settings button Settings icon at the top right corner of a page.

Reader View icon not showing

If the Reader View button doesn’t show in the Address Bar, the page may not support this feature. Reader View button will only show when the webpage has suitable content.


Exit Reader View

To exit the Reader View:

Was this helpful?

Yes
No
Thanks for your feedback!

How to uninstall Vivaldi

This guide will explain how you can remove Vivaldi from your computer. Choose which operating system you are using and follow the appropriate steps below.

Windows XP

  1. Close all Vivaldi Tabs and Windows.
  2. Click Windows’ Start menu > Control Panel.
  3. Click Add or Remove Programs.
  4. Click Vivaldi.
  5. Click Change/Remove to uninstall Vivaldi.

Windows Vista, 7 & 8

  1. Close all Vivaldi Tabs and Windows.
  2. Open the Start Menu:
    • Windows 7 & Vista: Click the Start menu > Control Panel > Programs.
    • Windows 8: Open the Charms bar by moving your mouse to the right hand corners of the screen. Then click Settings > Control Panel.
  3. Click Uninstall a program or Programs and Features.
  4. Select Vivaldi.
  5. Click Uninstall.
  6. Confirm that you want to uninstall by clicking on the Yes button.

Windows 10

  1. Close all Vivaldi Tabs and Windows.
  2. Open Windows’ Start menu and then go to Settings > Apps.
  3. Select Apps & Features from the left panel.
  4. Select Vivaldi and then click the Uninstall button that appears.
  5. Click the Uninstall pop-up button to confirm.

If you have issues uninstalling Vivaldi while using Windows 10, check out a more in-depth tutorial here.

Silent uninstall on Windows

For a silent uninstall of the browser add --uninstall --vivaldi --force-uninstall after \Installer\setup.exe* to run the uninstall command.

* Locate the full path in Vivaldi’s Application folder.

Was this helpful?

Yes
No
Thanks for your feedback!