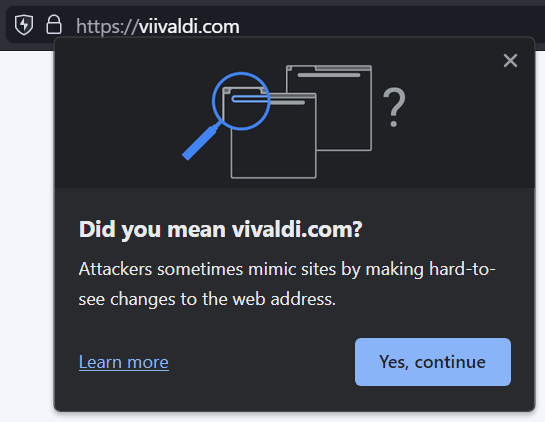
Sometimes spelling mistakes slip in when typing a URL into the Address Field. When navigating to a link with a typo, you might end up nowhere with the message “This site can’t be reached“, but you may also end up on another website. Some of these websites with eerily similar URLs to the one you planned to go to might be legitimate, but it’s not uncommon for malicious people to take advantage of this honest mistake, so you’ll need to be cautious.
If, based on your browsing history and URL variants of a small protected blocklist, Vivaldi suspects that you may have ended up on a website you didn’t plan to visit, it will show a warning dialog, prompting you to be vigilant about the site. For example, if you have somesite.com in History, you might see the warning when you enter smoesite.com in the Address Field.
In that case, double-check the URL in the Address Field to confirm that you are in fact visiting a website you intended to.
Go through the onboarding flow and start browsing!
Vivaldi on iOS is supported on iOS version 17.0 and above.
Updating the mobile browser
The app will be updated silently in the background when you have automatic updates enabled in your iPhone’s/iPad’s Settings > App Store > App Updates. You can tell that the app has been updated to a new version when iOS’ What’s New page is opened in a new tab.
Vivaldi Social, like any social media platform, is full of people posting on a multitude of topics at various intervals. If some accounts post too much or you don’t care for the content of their posts, you have the option to mute the account or block them outright.
Mute an account
To stop seeing posts from a user and posts that mention them:
Click on ⋯ More below one of their posts or on︙Menu on their profile.
Select Mute [@username].
Choose for how long you want to mute them (from 5 minutes to 7 days or indefinitely) and whether you still want to receive notifications from them.
Click Mute.
When you mute someone, you won’t see their content, but they’ll still be able to follow and interact with your account and posts. If you don’t want that, consider blocking the account.
Mute boosts
If you like seeing a user’s own posts, but don’t want to see the content they boost:
Click on︙Menu on their profile.
Select Hide boosts from [@username].
Mute notification
Did you make a post that’s gaining traction and now you’re flooded with notifications about comments and boosts? (Temporarily) muting notifications can let you browse in peace, while the discussion is still ongoing. To mute the notifications for the post:
Click on ⋯ More below your post.
Select Mute conversation.
For additional notification settings, go to the Notifications page and click on Show settings at the top of the page to adjust your preferences.
Block an account
To hide an account’s content and prevent it from following and interacting with you:
Click on ⋯ More below one of their posts or on︙Menu on their profile.
Select Block [@username].
Click Block to confirm your decision.
Block an instance
If you’ve noticed that some Mastodon instance has a lot of users you’d like to block, you can block the whole instance instead of blocking accounts one by one. Blocking an instance will hide all content from all users on that domain and remove all followers you have from that instance. Use this option as a last resort, as you might miss posts from great users, who just happen to be on the same instance.
To block an instance:
Click on︙Menu on one of the profiles.
Select Block domain [domain name].
View muted and blocked accounts
To see who you’ve muted and blocked:
Click on︙Menu on your own profile.
Select Muted users, Blocked users, or Blocked domains.
Create a Mouse Gesture for opening the History Panel.
Browsing the history
Your browsing history is grouped into folders by date. To open or close the date folder, click on the arrow in front of the date. To open or close all folders:
Right-click on the list of entries;
Select either Expand All Folders or Collapse All Folders from the context menu.
To change the displayed history time range, click on the menu next to the search field (label shows the current view) and select between:
Hold down the Shift key to select multiple links in a row or Ctrl/⌘ key to select links that aren’t necessarily next to each other.
Use one of the latter three options listed above for opening links.
You can also open all links from a specific day or days.
Searching through History
To search for a visited link, type either part of the web page title or URL in the search field in the top left corner of the History Panel. Results will be shown as you type.
Filter by domain
To show results only from a specific website:
Right-click on one of the entries from that domain;
Select Filter by “website.com”.
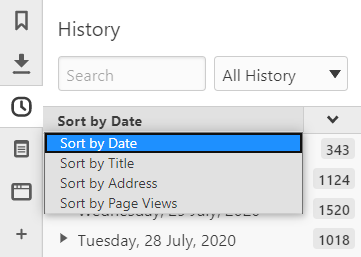
Sorting visited links
To sort the history, click on the menu between the search field and the list of history entries (label shows the current sorting option). You can sort history by:
date,
title,
address, and
number of page views.
Click on the arrow on the right to switch between ascending and descending order.
Saving history entries as Bookmarks
You can save a visited link as a bookmark without having to open the link again. To do that:
Right-click on the link;
Select Save as bookmark from the context menu.
Use the Ctrl/⌘ or Shift key to select and save multiple links as bookmarks.
You can also save all links you’ve visited in a single day by right-clicking on the date and selecting Save as bookmarks from the context menu.
Deleting history
To delete a single entry:
Right-click on the history entry you want to delete;
Select Delete from the context menu or press Delete on your keyboard.
To delete multiple entries at once, select them by holding down the Ctrl/⌘ or Shift key.
To delete all history:
Click on Clear Browsing Data in the top right corner of the panel.
Select the time range you want to delete the data for and the data types you want to clear.
Click Delete.
To change how long your browsing history is saved for, go to Settings > Privacy > Save Browsing History.

 Downloads.