Preventing Vivaldi profiles from being uploaded to Git repositories
There was a recent news report that showed that thousands of people had accidentally uploaded their home directories/folders to public Git repositories that they were working on, and that included the profile directories for other browsers. You can read more about this here: https://www.theregister.com/2021/11/18/firefox_cookies_github/
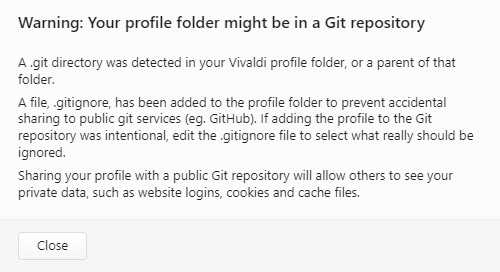
We added a detection and protection to the latest release of Vivaldi, to prevent you from having the same thing happen to your Vivaldi profile.
The detection checks if there is a .git folder either in the Vivaldi profile folder, or a parent folder of the Vivaldi profile folder and will show a warning message when .git folder has been detected.
For example, on Windows, the default Vivaldi profile folder is:
C:\Users\<your_username>\AppData\Local\Vivaldi\User Data\DefaultSo you would need to check for the following folders:
C:\Users\<your_username>\AppData\Local\Vivaldi\User Data\Default\.git
C:\Users\<your_username>\AppData\Local\Vivaldi\User Data\.git
C:\Users\<your_username>\AppData\Local\Vivaldi\.git
C:\Users\<your_username>\AppData\Local\.git
C:\Users\<your_username>\AppData\.git
C:\Users\<your_username>\.git
C:\Users\.git
C:\.git
On Linux, the default Vivaldi profile folder is:
/home/<yourusername>/.config/vivaldi/DefaultSo you would need to check for the following folders:
/home/<yourusername>/.config/vivaldi/Default/.git
/home/<yourusername>/.config/vivaldi/.git
/home/<yourusername>/.config/.git
/home/<yourusername>/.git
/home/.git
/.git
For snapshot releases, the default profile folder is /home/<your_username>/.config/vivaldi-snapshot. Note that these folders could be placed somewhere else on some distros.
On Mac, the default Vivaldi profile folder is:
/Users/<yourusername>/Library/Application Suppert/Vivaldi/DefaultSo you would need to check for the following folders:
/Users/<yourusername>/Library/Application Support/Vivaldi/Default/.git
/Users/<yourusername>/Library/Application Support/Vivaldi/.git
/Users/<yourusername>/Library/Application Support/.git
/Users/<yourusername>/Library/.git
/Users/<yourusername>/.git
/Users/.git
/.git
For snapshot releases, the default profile folder is /Users/<yourusername>/Library/Application Suppert/Vivaldi Snapshot/Default.
Check your profile folder location to work out where to start. You can see this using ![]() Vivaldi menu > Help > About, or Vivaldi application menu > About Vivaldi on Mac.
Vivaldi menu > Help > About, or Vivaldi application menu > About Vivaldi on Mac.
Note that any .git folder is hidden on most systems by default. On Windows, you need to tell Windows Explorer (My Computer) to show hidden files and folders, in the folder options. On Mac, open the Finder and press Cmd Shift . to show or hide hidden files and folders. On Linux, use your favourite terminal/console application, and use the following command to see all files and folders, including hidden ones:
ls -aAlternatively, on Mac or Linux, you could use your favourite terminal/console application, and use the following command to search for .git folders:
find ~/ -name '.git'You can also use / instead of ~/ to search the entire filesystem, but be aware that it might show a lot of errors when there are folders that you do not have access to.
Once you find the folder containing the .git folder, you may wish to note that everything from that folder and below, might be in a Git repository. The “git status” command can give more details.