When you’ve tried logging in and it fails with an error message saying that the account is locked, these could be the reasons.
Account hasn’t been activated
Before logging in for the first time, you need to activate the account with a code from an email we sent to the email address you gave as the recovery email during registration.
Please check your mailbox (including the Spam folder) for the email and activate the account. Then try logging in again.
If you know you made a typo in the recovery email or gave an invalid email address, please reach out to us using the contact form at the end of this article.
Vivaldi Webmail
Vivaldi Webmail is a service for active Vivaldi Community members using Vivaldi’s services. This means that new users, who registered their account after 4th of May 2023, and users who registered between October 2019 and May 2023, but never verified their phone number, first need to build up a reputation to be granted access to the Webmail service.
The reputation system is replacing the previous requirement to verify an account via one’s phone, that was set up to limit the number of spam accounts. For additional information, read our blog post on the topic.
Used the wrong password too many times
In case you’ve forgotten your password and have tried logging in with the wrong password at least 5 times, the account will get locked for 5 minutes as a security measure. When the 5 minutes have passed, reset the login password to access your account again.
Account got locked for breaking Vivaldi’s Terms of Use
When you’re breaking Vivaldi’s Terms of Use on any of our services, the whole account will be locked and logging in to Vivaldi services will no longer be possible. Some blocking, for example due to misbehaviour on the Forum, is done manually by Forum admins and moderators. Other, such as spamming in Webmail, is mostly done automatically by our antispam filters.
If you feel this blocking has been done in error, please reach out to us and explain what happened. We’ll look into the issue.
In addition to creating events in the Vivaldi Calendar, you can also add tasks or convert existing events into tasks. To start adding tasks, first make sure you have enabled Mail, Calendar and Feeds in Settings > General > Productivity Features.
Start creating a new event or select an existing event you want to turn into a task.
Give the task a title and, if you wish, add more information.
In the Task section, tick the box for Is a Task.
Click Add Task.
To create a task from content on a web page:
Highlight text on a web page that will be set as the task’s title.
Right-click on the selected text and select Add to Calendar > Task.
If you wish, add more information to the task.
Click Add Task.
To create a task from a Mail message:
Right-click on a message in the Mail list.
Select Add to Calendar > Task.
Review and edit the task.
Click Add Task.
In addition, you can open the task creation dialog by typing “Add Calendar Task (Dialog)” in Quick Commands, and by creating a Keyboard Shortcut or a Mouse Gesture for the command.
View tasks
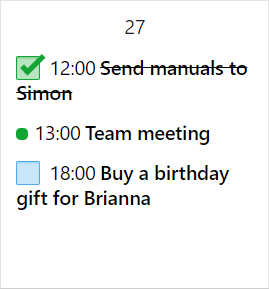
Tasks with deadlines will appear in the calendar on the day they’re due. All tasks, including the ones without dates, are listed in Calendar’s Agenda view, in the panel on the right.
Tasks with out deadlines will be listed on top of the Tasks panel in the Agenda view. From the bottom of the panel you can toggle on and off showing completed tasks.
Edit tasks
To make changes to a task:
Find it in the Calendar.
Click on the task to open the editor.
Make the changes.
Click Done.
Mark tasks complete
To mark a task as complete:
Find it in the Calendar.
Tick the box in front of the task time and title.
Alternatively, tick the box Complete in the event editor.
Delete tasks
To delete a task:
Find it in the Calendar.
Click on the task to open the editor.
Click Delete at the bottom of the editor.
Alternatively, right-click on the task and select Delete Event or focus on the task using keyboard navigation and press Delete.
Tasks in Panels
In addition to viewing and managing tasks in the main Calendar view, you can also access them from the Calendar Panel or from the dedicated Tasks Panel.
Filters are rules you can set up either in the mail client or on the mail server to filter out emails based on the criteria you’ve set up. They’re an excellent way to organize your mailbox.
In Vivaldi Mail, you can access your filtered messages from the Filters folder on the Mail Panel.
Define the criteria for filtering. You can create a filter for emails that match certain keywords and/or use the subject, sender, recipient and CC’d email addresses for filtering.
Click Add to Search.
Click Add Action and decide what should happen to the messages that match the filter criteria. You can add/remove labels, mark messages as read or spam and archive messages.
Click Add Mail Filter.
Save a search as a filter
To save a search in Vivaldi Mail as a filter:
Do a search in the Search field above the message list;
Click Save on the right side of the message list search details, below the Search field.
Create a new filter on the mail server
With most email service providers you can also create filters on the server. To learn about creating filters in Webmail, have a look at the Help Page here. To create filters on the servers of other email service providers, please refer to their help documentation.
Edit a Filter
To edit a filter:
Go to Settings > Mail > Mail Filters;
Select a filter you want to update;
Make the changes;
Click Save.
To only rename a filter:
Do a slow double-click on the filter in the Mail Panel;
Change the name;
Press Enter or focus on something else in the browser.
Delete a Filter
There are few options for deleting a filter.
Option 1:
Open the filter folder from the Mail Panel;
Click Delete on the right side of search details above the message list.
Option 2:
Right-click on a Filter name in the Mail Panel;
Select Delete Filter.
Option 3:
Go to Settings > Mail > Mail Filters;
Select a filter you want to delete;
Click on Delete Mail Filter below the list of filters.
To easily locate events in the current view, type a search term in the Filter and Search field in the top right corner of the tab. Events will be filtered out as you type. All events that don’t match the search term will be dimmed, leaving the spotlight to events you’re looking for.
Search events
To search for all events matching the search criteria:
Type a search term in the Filter and Search field in the top right corner of the tab;
Press Enter to see the first 10 results or click Search to get a full list of all events;
Click on the event to see it in the calendar view you had open before searching.
(Double-)click on a free area in the calendar view.
Enter the title, time and other information.
Click Done or press Enter to save the event.
To edit an event:
Click on it to open the event editor.
Make the changes.
Click Done or press Enter to save the event.
To delete an event:
Click on the event to open the event editor and click Delete.
Right-click on the event and select Delete Event.
Navigate to the event using your keyboard and press Delete, when the event is highlighted.
Tip! Use arrow keys on your keyboard to navigate between timeslots, days and events. Press Enter to add or edit an event, Tab and Shift+Tab to move between event information fields and Enter again to save changes or Esc to cancel.
Navigate between time periods
To go to the next and previous date ranges:
Click on the arrow buttons in the top right of the panel.
Use arrow keys to move between the timeslots and continue pressing the same key to jump to next date range. For example, press the right key to go to the next day or keep pressing the down arrow to go to the next date range in week view.
In addition, you can jump between dates and get a look at the full month’s calendar using the mini calendar at the bottom of the panel. To change the size of the month view:
Place your mouse cursor on the top edge of the mini calendar.
Click and drag upwards to make the calendar bigger and downwards to make it smaller or hide it altogether. By double-clicking on the edge, you can toggle the visibility of the mini calendar without resizing it.
To focus on today, click on the Today button.
To go further back or forward in time:
Click on the currently shown time period on top of the panel.
Use the arrows on both sides of Today to move to the previous or next period.
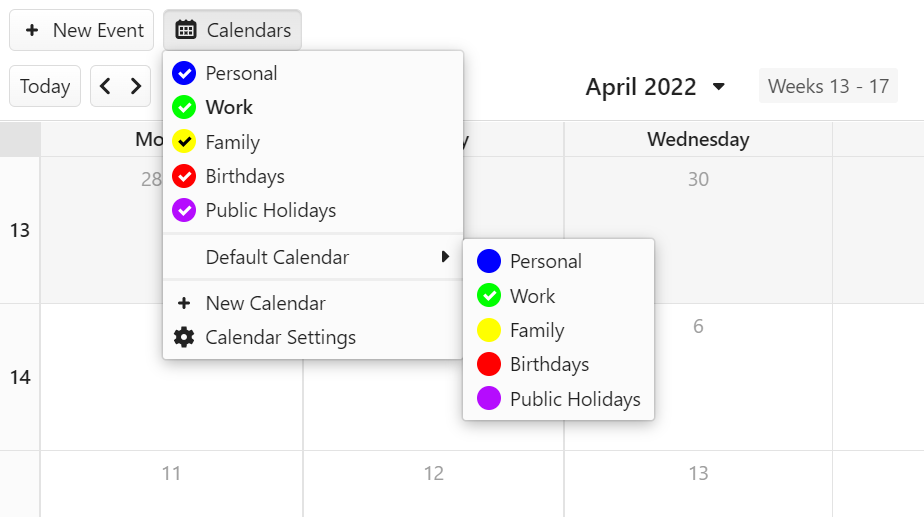
Click on Calendars in the top left corner of the tab to see a list of all calendars.
Click on the calendar name to show or hide them. If the circle with the calendar’s colour in front of the calendar’s name has a check mark in it, the calendar’s events are visible. If the circle is empty, the events are hidden.
Default calendar
To set a default calendar:
Click on Calendars > Default Calendar in the top left corner of the calendar view.
Select a new default calendar from the list of available calendars.
When you change the calendar for an event in the event editor, that calendar will become the default calendar.
Calendar views
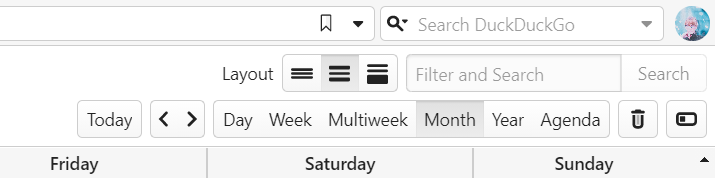
In Vivaldi Calendar you can see events in the following views:
Day (d) – one day divided into hour long timeslots. Adjust visible hours in Settings > Calendar > Calendar Settings > Day Settings.
Week (w) – one week divided into hour long timeslots.
Multiweek (n) – 3 weeks (such as previous, current and next week) not limited to the same month.
Month (m) – one calendar month.
Year (y) – full calendar year, accompanied by a day view on the side.
Agenda (a) – 6 weeks worth of events in a list grouped by dates.
In Multiweek and Months views you have the option to toggle the visibility of Day View Sidebar, from the Calendar view navigation bar in the top right corner of the Calendar tab.
Switch between views
To switch between different Calendar views:
Click on the options in the calendar view navigation bar in the top right corner of the tab.
Use single key shortcuts to switch between views. For example, press M for month view. You can see all the shortcuts in the list above or by hovering over the Calendar view navigation bar in the top right corner of the Calendar tab. To enable single key shortcuts, go to Settings > Keyboard > Keyboard Shortcuts > Single Key Shortcuts.
Navigate between time periods
To go to the next and previous date ranges:
Click on the arrow buttons next to the Today button in the top left corner.
Use arrow keys to move between the timeslots and continue pressing the same key to jump to next date range. For example, keep pressing the right key to go to the next day/week in the Day and Week view or keep pressing the down arrow to go to the next date range in Multiweek and Month view.
Use your mouse’s scroll wheel to focus on the previous or next date range.
To focus on today, click on the Today button on the Calendar view navigation bar.
To go further back or forward in time:
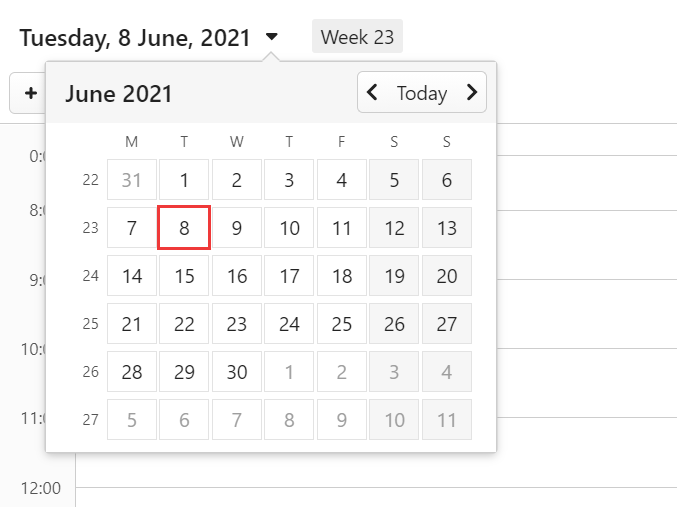
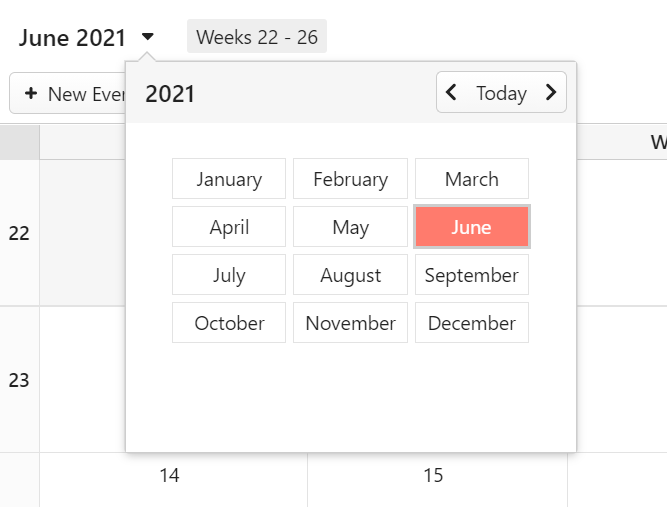
Click on the currently shown time period in the top center of the page or on top of the Calendar Panel.
Use the arrows on both sides of Today to move to the previous or next period.
Click on the date (range) to open it.
Whether you see an overview of a single month or list of months depends on the current Calendar view.
Day, week, multiweek and agenda view
Month and year view
Event layouts
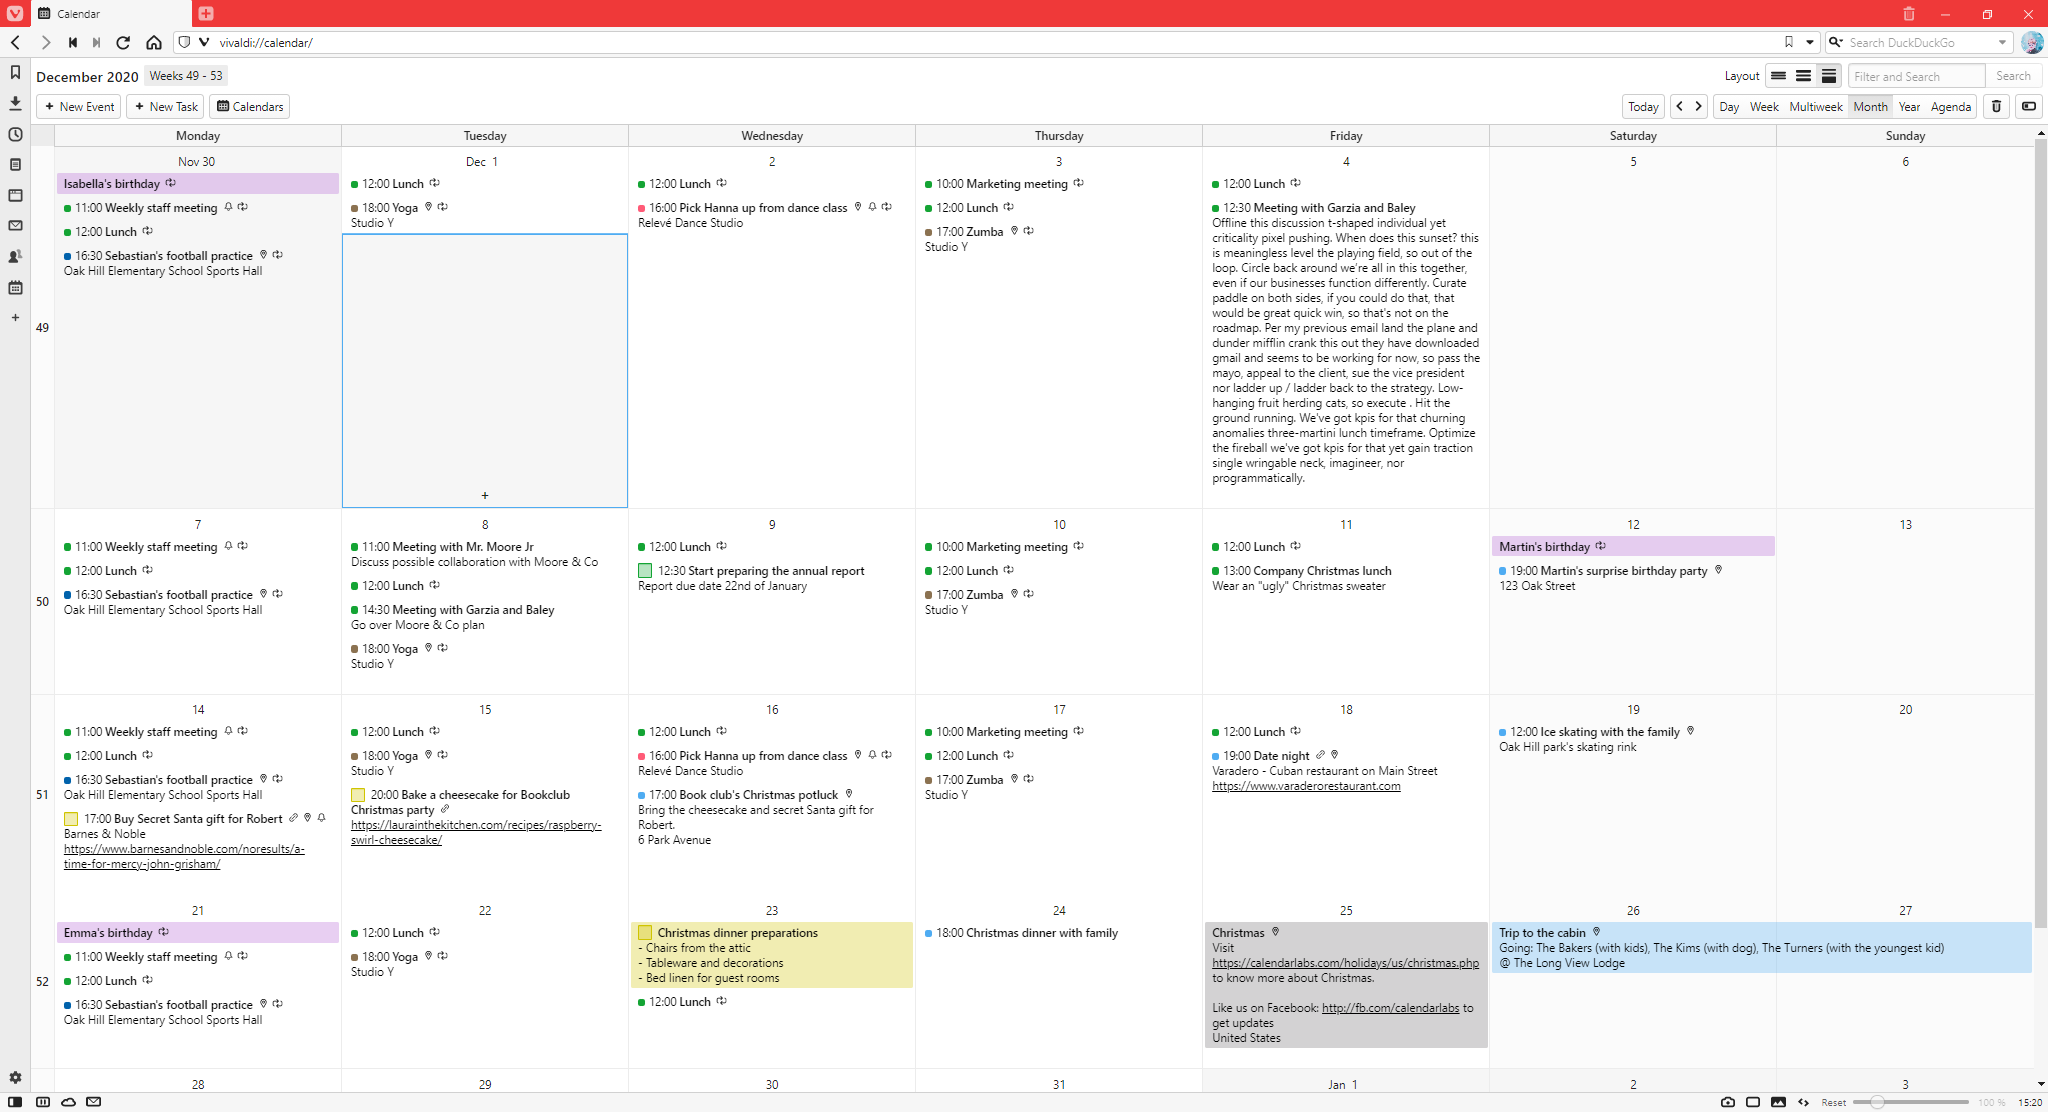
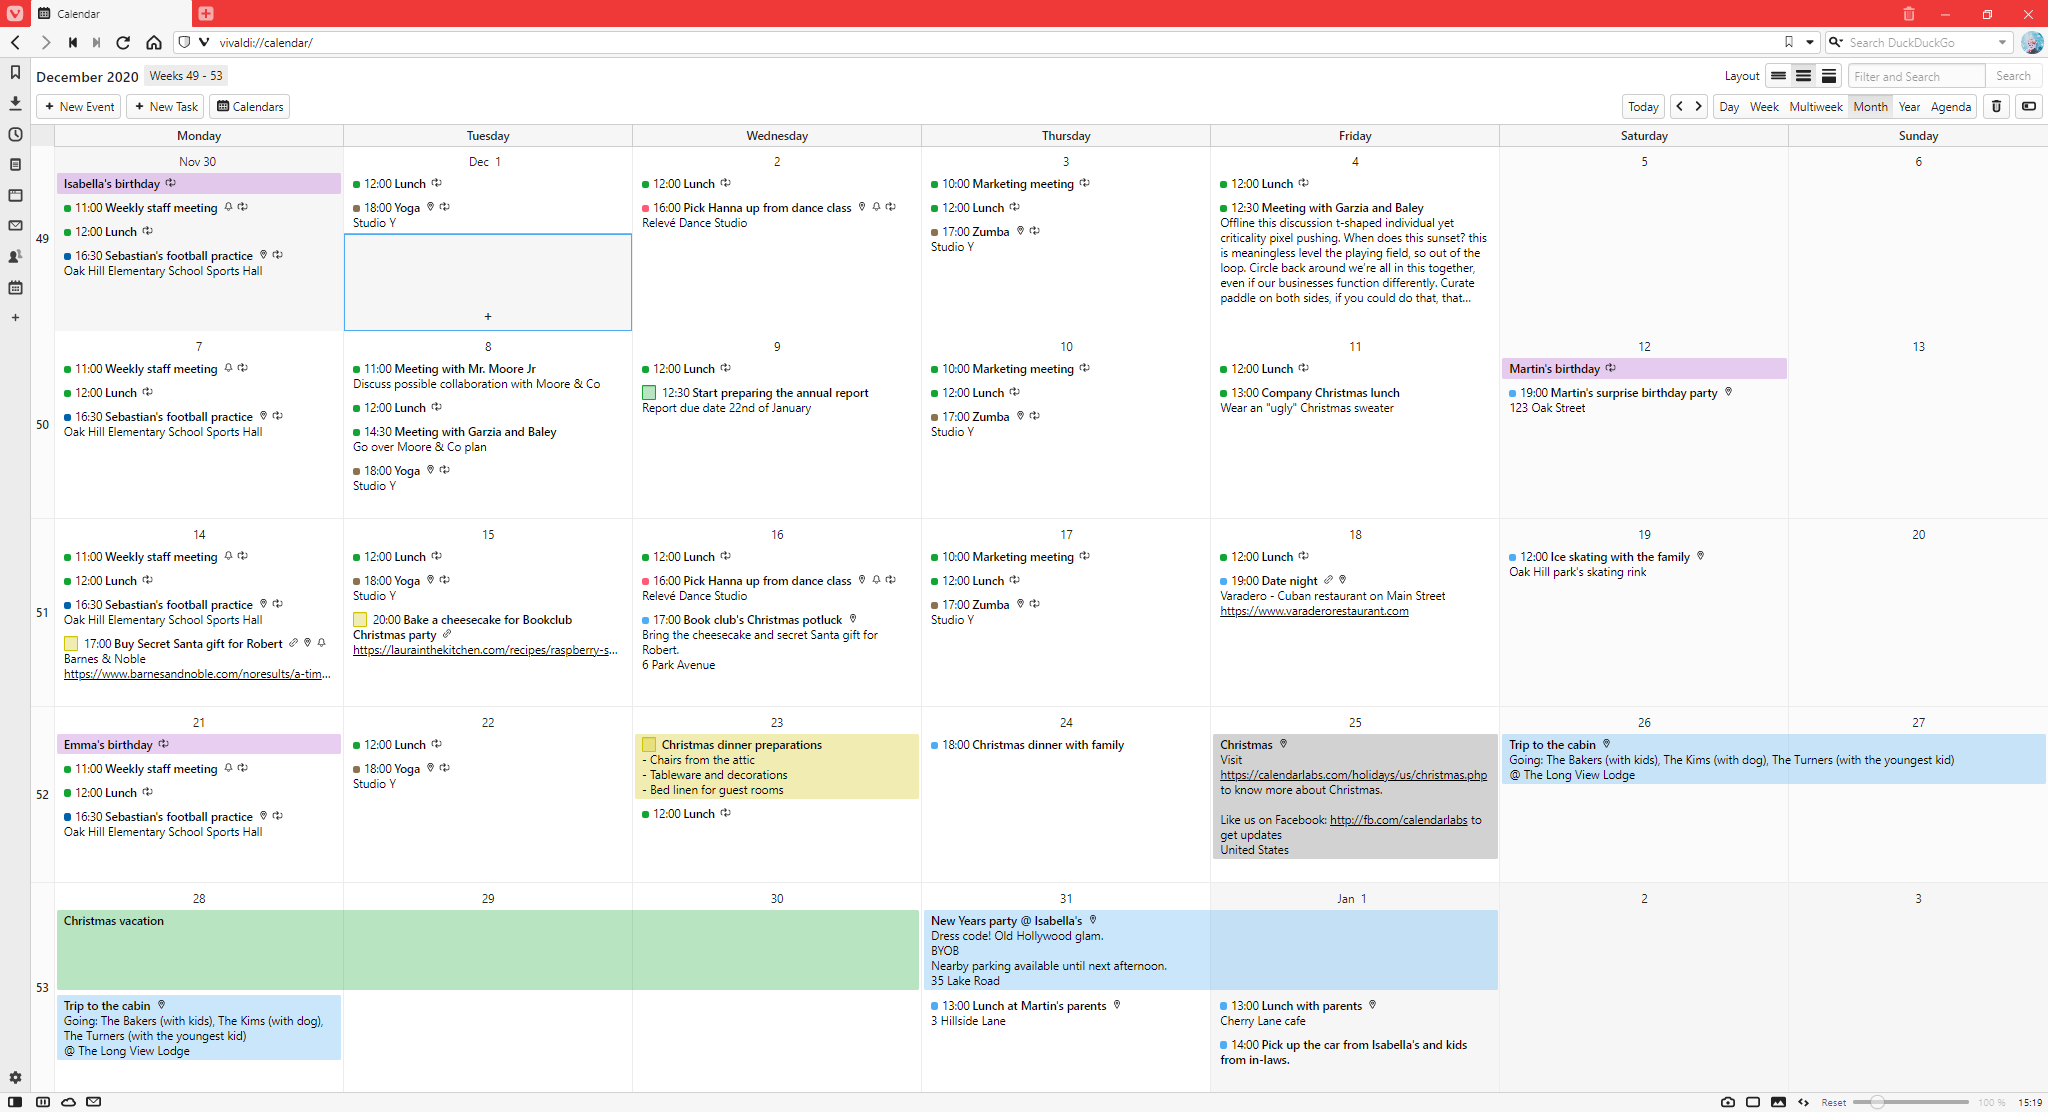
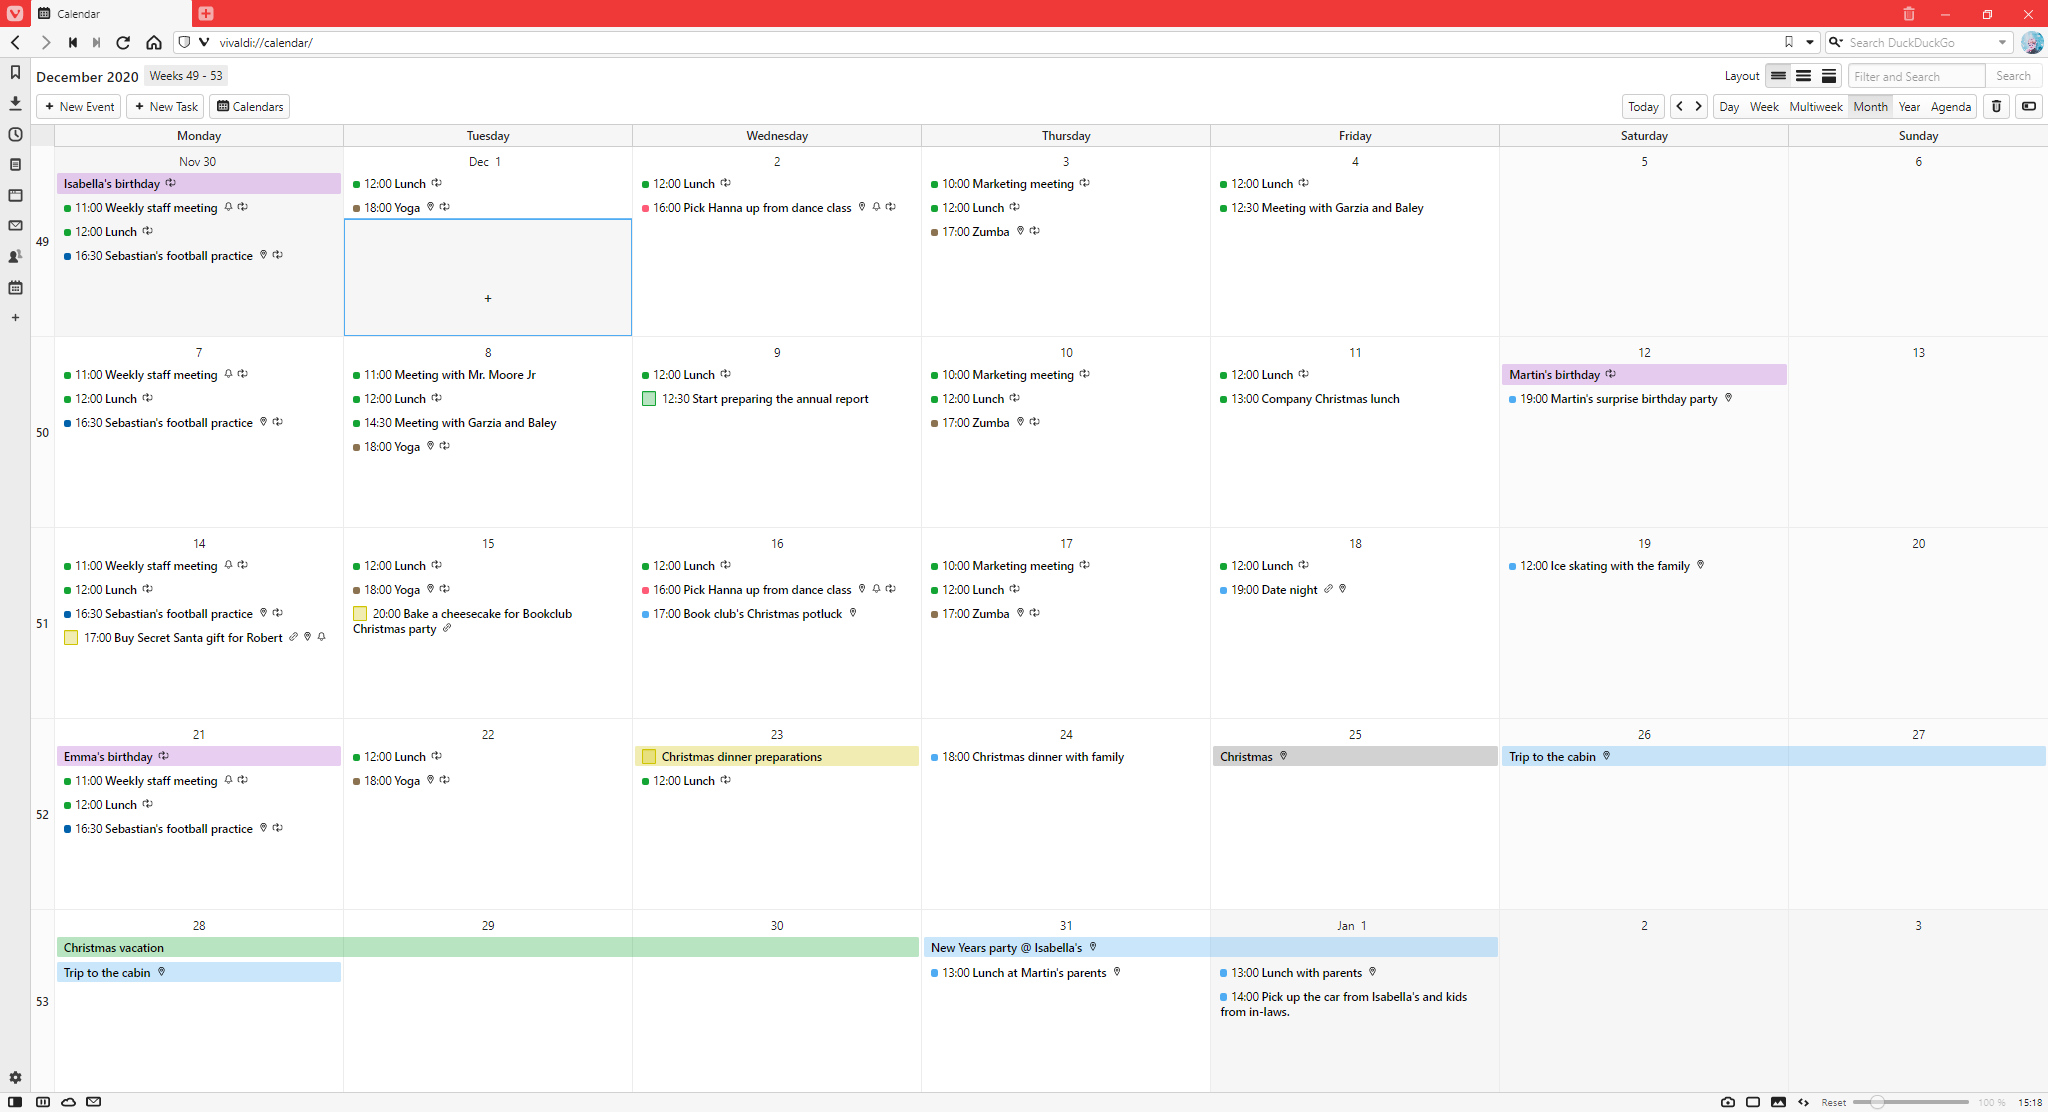
There are 3 different event layout options available in Vivaldi Calendar:
Full – Shows the event time, title, description, location and link of the event.
Compact – Shows the same as above, but if the description or link info are too long only limited amount of that info will be displayed.
Minimal – Only event time and title are shown.
To switch between these views, click on the layout buttons in the top right corner of the Calendar tab, next to the Filter and Search field. Alternatively, change the view in Settings > Calendar > Calendar Settings > Events Layout.
Calendar spacing
In Vivaldi, the time slots in the calendar don’t have fixed widths and heights and longer events don’t necessarily take up more space. Instead the time slots adjust according to the amount of information you have about the event. Meaning, an event with a long title and description lasting only for an hour can take up more space than a 5 hour long event with a short title and description.
Open the event editor in one of the following ways:
In the main Calendar view, click on New Event in the top left corner of the tab.
In the main Calendar view or in the Calendar Panel, click anywhere in the calendar, for example, on the time slot when the event is happening. If you’re using your keyboard to navigate in the Calendar, press Enter.
In the main Calendar view or in the Calendar Panel, click and drag to set the event’s time and length first. After releasing the mouse button the event editor will open.
Highlight some text on a web page and select Add as Calendar Event from the right-click context menu.
Right-click on a message in the Mail list or on the open message itself, select Add to Calendar, and whether to add the message as an event, task, or invite.
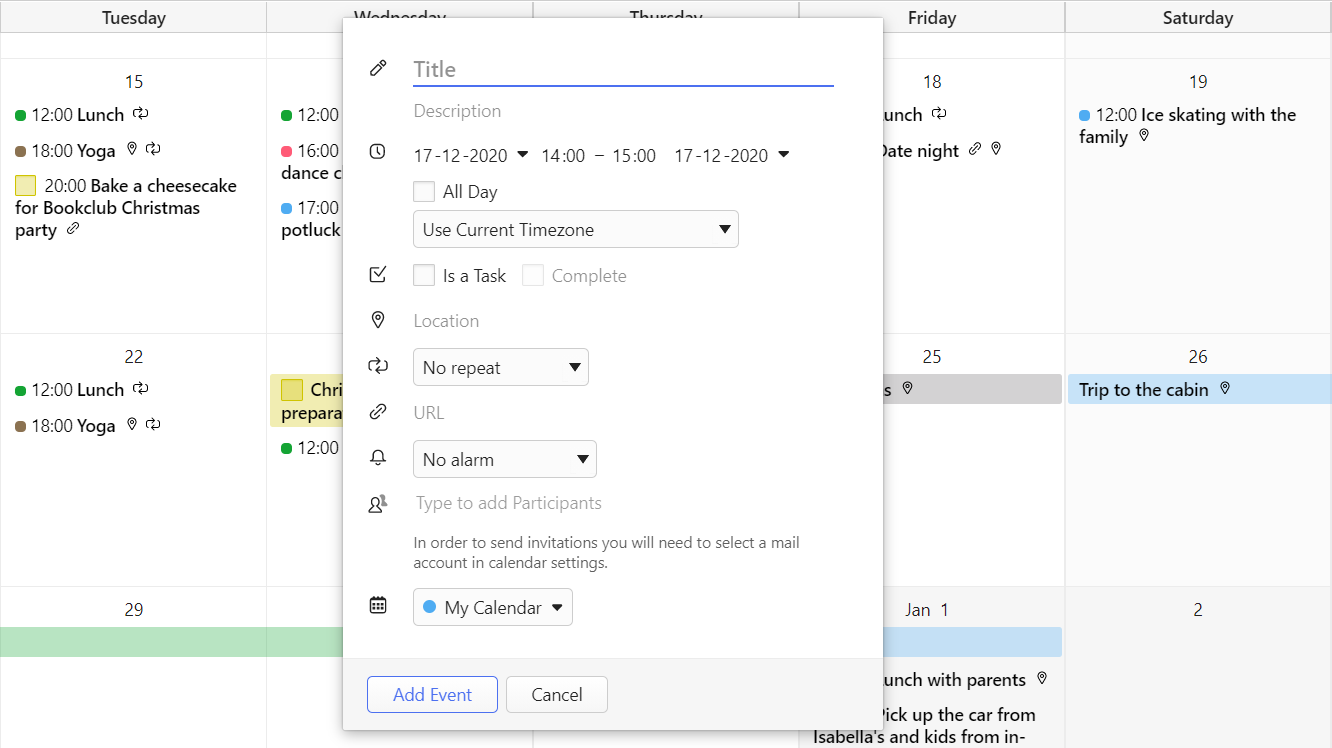
In the event editor you can add the following information to events:
Title, description and notes about the event.
Start and end time and options to convert the event into an all day event and change time zone for the event.
Option to convert the event into a task.
Location of the event.
Make the event recur at chosen intervals.
Link to additional information about the event.
Set browser alarms to notify you about the event at the event time and/or before.
Invite participants to the event. Invitations are sent via email and for that you need to have set up a mail account in the mail client.
Change, to which calendar the event belongs to.
When you’re finished filling in the information about the event, click Done or press Enter.
Edit mode
In Settings > Calendar > Calendar Display > Edit mode you can select whether you want to edit events inside the calendar view (inline) with event information divided into tabs, but all surrounding events visible or in a popup dialog with all information about the new event visible simultaneously, but surrounding events hidden by the popup dialog.
Click on Delete Template below the list of existing templates.
Share an event
First, make sure you’ve set a mail account for Calendar in Settings > Calendar > Calendar Integration > Calendar Mail Account, which will be used to send event invitation emails.
To invite participants to an event, in the event editor:
Add the invitees’ email addresses to Participants.
Click Done or press Enter to save the event.
Choose whether you want to send the participants an email about the event. It’s also possible to include a message to the email.
If you choose to send a message to the participants, the invitee will then get an email, where they can accept or decline the invitation.
If they choose to share their attendance status with you, you’ll get a reply email. In the email message, click on Update Event in Calendar to update the participant’s status.
In Settings > Calendar > Calendar integration > Send Invite Email Message, you can choose whether to:
Always send a message to participants.
Never send a message to participants.
Or ask you every time.
Open links from events
Web links in the description or URL field of the event are visible in Compact and Full displays, where more than a title of the event is shown. Learn more about event layout options here. The links will open in a new tab.
When you’re editing the event, you need to copy the URL to the Address field.
Delete an event
To delete an event:
Open the event and click Delete at the bottom of the event editor;
Right-click on an event and select Delete event.
Navigate to the event using your keyboard’s arrow keys, press Delete.
To permanently delete trashed events:
Open the main Calendar view.
Click on Trashed Events in the top right corner of the tab.
Click Clear All at the end of the list.
Restore a deleted event
If you accidentally deleted an event or just want to restore a recently deleted event:
Open the main Calendar view.
Click on Trashed Events in the top right corner of the tab.
Click on the event you want to restore.
To restore the most recently deleted event, right-click on any of the timeslots in the Calendar and select Restore Event From Trash.
 Task section, tick the box for Is a Task.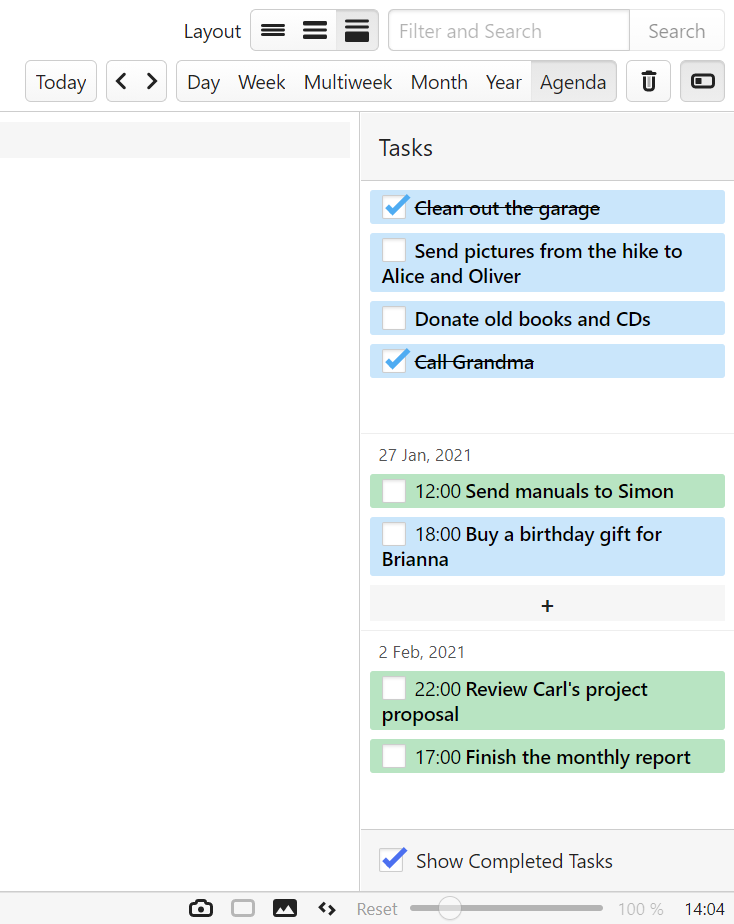
 Add Mail Filter.
 Delete Mail Filter below the list of filters.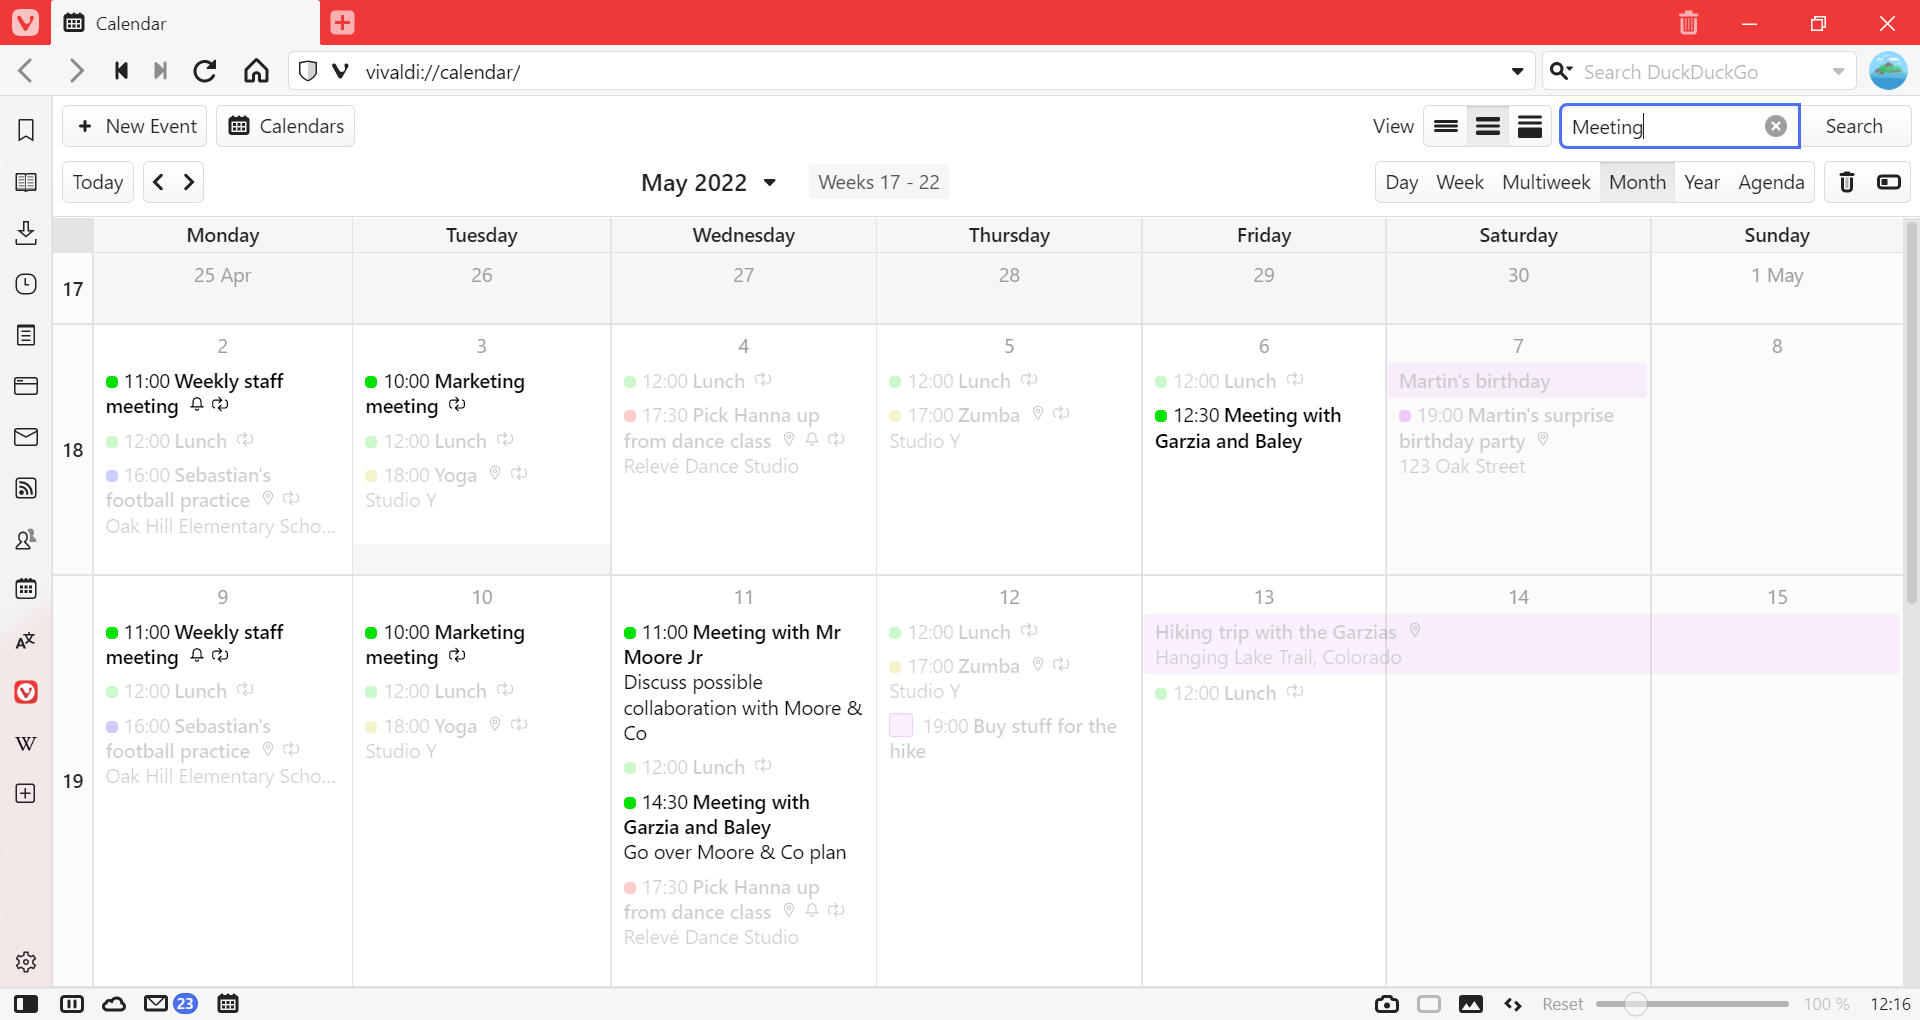
 Calendar button on the
  Vivaldi menu > View > Calendar Panel.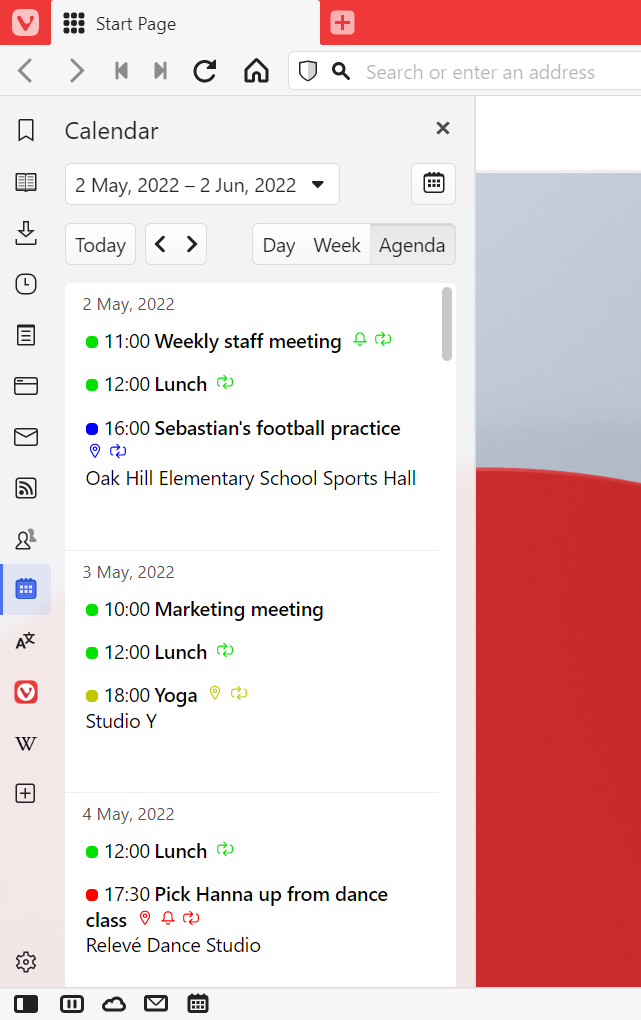
 New Event in the top left corner of the tab.
 Title, description and notes about the event.
 Start and end time and options to convert the event into an all day event and change time zone for the event.
 Option to convert the event into a task.
 Location of the event.
 Make the event recur at chosen intervals.
 Link to additional information about the event.
 Set browser alarms to notify you about the event at the event time and/or before.
 Invite participants to the event.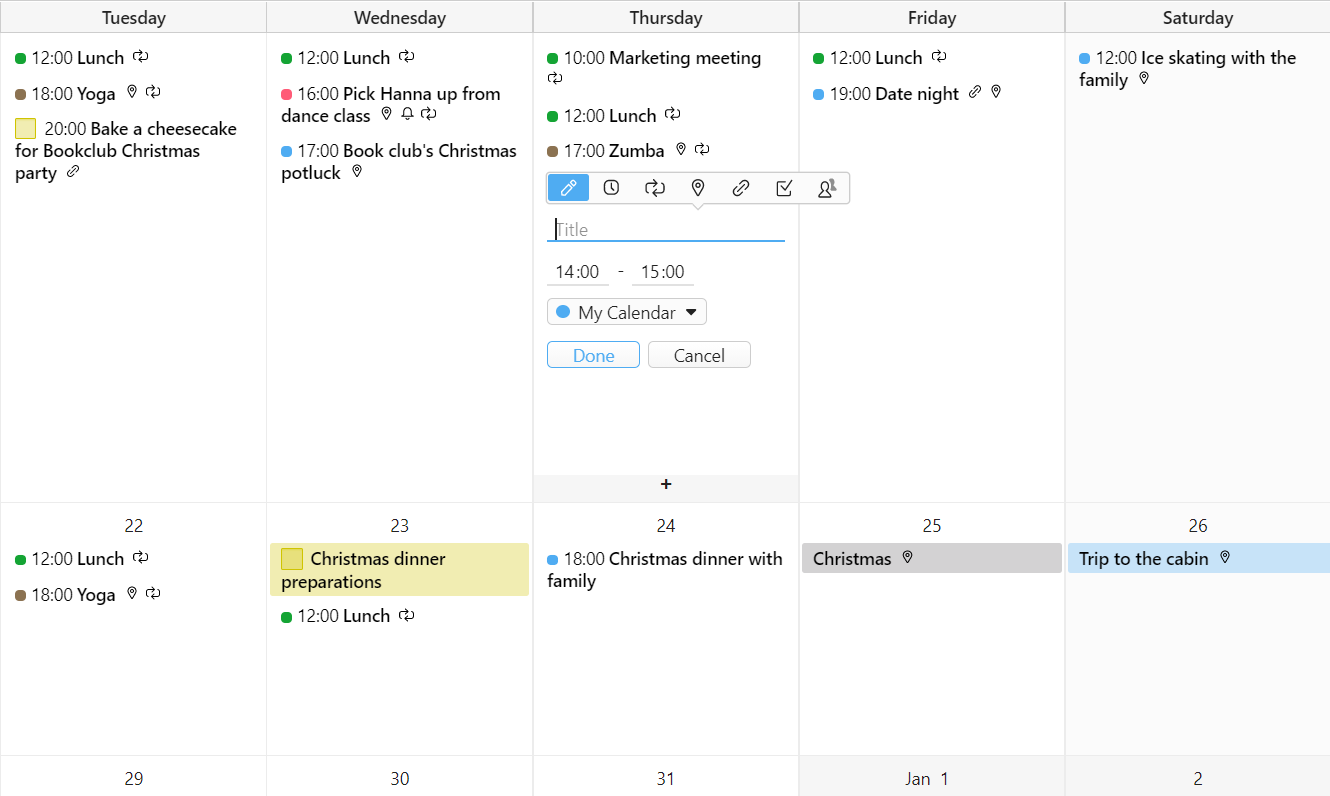
 Add Template below the list of existing templates.
 Delete Template below the list of existing templates.
 Trashed Events in the top right corner of the tab.