Troubleshooting issues on Android

When you encounter an issue and you’re trying to determine whether you can fix it yourself or need to report a bug, follow the steps below. Remember that in many cases it’s important to reload the web page for any changes to take effect.

Restart the app

Sometimes the simplest things help, so exit the browser, and hopefully on restart the issue will be gone.

To exit Vivaldi on Android, open the Vivaldi menu and select Exit. Closing the app via the phone’s home button or from the app switcher menu does not fully exit the app.

If you’ve kept your mobile device on for a long time, restarting the device may help as well.


Update the app

In case you’ve turned off automatic updating of apps, check for updates manually from the Play Store or from the app store you installed Vivaldi from.

In case you installed the .apk version of Vivaldi, download the latest version of the browser from Vivaldi.com.


Reset flags

Experiments are a great way to test new features that are being developed. But these features are hidden behind flags for a reason – they can still be buggy. If you’ve experimented with flags and suddenly Vivaldi doesn’t work as it should or crashes altogether, go back to the default settings.

To reset flags:

  1. Go to vivaldi://flags;
  2. Tap on Reset all in the top right corner;
  3. Tap on Relaunch at the bottom of the window to restart the browser.

On rare occasions, the browser needs to be restarted twice for the experiments to be fully reset.


Disable Tracker and Ad blocker

Website functionality may depend on elements with trackers that are blocked by the Tracker and/or Ad blocker. Click on blocker shield button Content Blocker on the left side of the address bar to disable blockers and test the website.

To change blocking settings globally, go to Vivaldi menu > Settings > Privacy > Tracker and Ad Blocking > Default blocking level.


Enable (Third-Party) Cookies

Cookies are used for a lot more than tracking users’ browsing habits. Sometimes websites require Third-Party Cookies to display content that was originally posted on a different site. For example, embedded videos or Vivaldi Blog’s comment section.

To check your cookie settings:

  1. Go to Vivaldi menu > Settings > Site Settings > Cookies;
  2. Select Allow cookies;
  3. Test the website where the issue occurs.

Delete Browsing Data

Websites get updated all the time, but information about the old version of the site is still stored in cache files and Cookies. This may cause discrepancies in the displayed website and occasionally even break functionality.

In addition, storing old browsing data for a long time will use up your device’s memory space, so deleting it every now and then can have a positive effect on the browser’s speed as well.

To delete browsing data in Vivaldi on Android:

  1. Go to Vivaldi menu > Settings > Privacy > Clear browsing data.
    Alternatively, go to Panels > History panel and tap on Clear Data at the bottom right corner of the screen.
  2. Select the data you want to delete;
  3. Tap on Clear data.

Check Android settings

Android operating system’s settings may effect, how Vivaldi functions. Check and change the settings that might affect Vivaldi and test the issue again.


Disable other apps

In case you’re using apps that can affect Vivaldi (e.g. VPN), try browsing with them disabled to see if the bug is still there.


Test the Snapshot version of Vivaldi

Sometimes the bug you’re encountering has already been fixed and is being tested in the Snapshot version of the browser. In that case, you just need a little patience until the fix is released in the Stable version.

On Android, you can install the Snapshot version of the app from Google Play Store.

Since Vivaldi is based on Chromium, we sometimes inherit bugs from upstream. If that’s the case, you’ll likely be able to reproduce the bug in other Chromium-based browsers. In that case, please report the bug to the Chromium team.


Found a bug?

When you’ve followed the steps listed above and you can consistently reproduce the issue, please discuss it on our Forum. There, our Community members can test on their devices and either confirm the bug or suggest a fix for the issue. Some of them can also tell you whether the devs are already aware of the bug or a new bug report should be created.

To report a bug first check our bug reporting guidelines and then go to vivaldi.com/bugreport to file it.

Share links with QR codes

In Vivaldi you can easily create a QR code linking to a web page and share it with others.

Start using the QR code generator

To show the QR code generator button on the Address Bar:

  1. Go to Settings > Address Bar > Address Field Options;
  2. Enable QR Code Generator.

Create a new QR code

Option 1

  1. Open the web page you want to share;
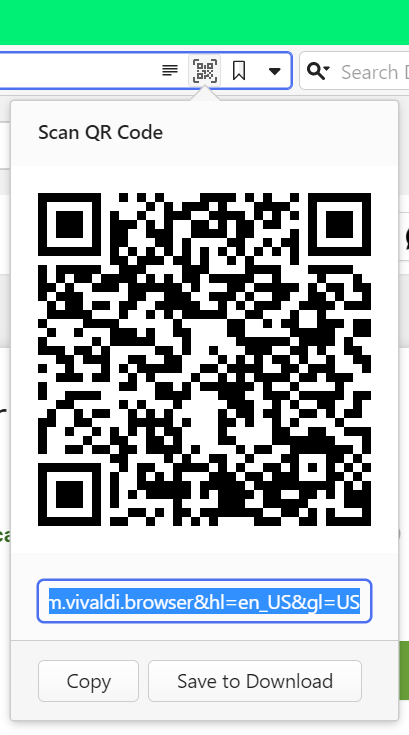
  2. Click on Share page with QR Code button on the right side of the address field, between the Reader View (if available on the page) and Add Bookmark button.

Option 2

  1. Click on Share page with QR Code button on the right side of the address field, between the Reader View (if available on the page) and Add Bookmark button.
  2. Type or paste the URL you want to create the QR code for.

Option 3

  1. Open the web page you want to share;
  2. Right-click on the page to open the context menu;
  3. Select Create QR Code for This Page.

Option 4

  1. Open the web page you want to share;
  2. In Quick Commands type “Create QR Code for Active Page“.

Option 5

Create a Keyboard Shortcut or a Mouse Gesture for the action.


Share the QR code

Once you’ve created the QR code:

  • Scan the image with a QR code reader, for example, with the QR code reader feature on Vivaldi on Android.
  • Click on Copy below the generated code to share the image of the code.
  • Click on Save to Download to store the image with the QR code on your computer.

Locked Vivaldi account

With your Vivaldi account you can use the following services:

When you’ve tried logging in and it fails with an error message saying that the account is locked, these could be the reasons.

Account hasn’t been activated

Before logging in for the first time, you need to activate the account with a code from an email we sent to the email address you gave as the recovery email during registration.

Please check your mailbox (including the Spam folder) for the email and activate the account. Then try logging in again.

In case the code has expired or you can’t find the email, send yourself a new account activation email.

If you know you made a typo in the recovery email or gave an invalid email address, please reach out to us using the contact form at the end of this article.

Vivaldi Webmail

Vivaldi Webmail is a service for active Vivaldi Community members using Vivaldi’s services. This means that new users, who registered their account after 4th of May 2023, and users who registered between October 2019 and May 2023, but never verified their phone number, first need to build up a reputation to be granted access to the Webmail service.

The reputation system is replacing the previous requirement to verify an account via one’s phone, that was set up to limit the number of spam accounts. For additional information, read our blog post on the topic.


Used the wrong password too many times

In case you’ve forgotten your password and have tried logging in with the wrong password at least 5 times, the account will get locked for 5 minutes as a security measure. When the 5 minutes have passed, reset the login password to access your account again.


Account got locked for breaking Vivaldi’s Terms of Use

When you’re breaking Vivaldi’s Terms of Use on any of our services, the whole account will be locked and logging in to Vivaldi services will no longer be possible. Some blocking, for example due to misbehaviour on the Forum, is done manually by Forum admins and moderators. Other, such as spamming in Webmail, is mostly done automatically by our antispam filters.

If you feel this blocking has been done in error, please reach out to us and explain what happened. We’ll look into the issue.


Need help with your Vivaldi account?

Send us a message

Please note that replies to support messages will mostly be in English.

Maximum file size (8MB). Authorized files extensions: txt, dmp, jpg, png.

How do we handle your data?

We use Jira Software hosted on our servers in Iceland to manage messages sent to us via this form. Once you submit your message, our support team will review it and get back to you as soon as possible (normally within 2 to 3 business days).

If you’d like to know more about our privacy policy and the 3rd party software we use, check our privacy resources page: vivaldi.com/privacy

Tasks in Vivaldi Calendar

In addition to creating events in the Vivaldi Calendar, you can also add tasks or convert existing events into tasks. To start adding tasks, first make sure you have enabled Mail, Calendar and Feeds in Settings > General > Productivity Features.

Add tasks

To add a new task to the Calendar:

  1. Open the main Calendar view, the Calendar Panel, or the Tasks Panel.
  2. Start creating a new event or select an existing event you want to turn into a task.
  3. Give the task a title and, if you wish, add more information.
  4. In the Task section, tick the box for Is a Task.
  5. Click Add Task.

To create a task from content on a web page:

  1. Highlight text on a web page that will be set as the task’s title.
  2. Right-click on the selected text and select Add to Calendar > Task.
  3. If you wish, add more information to the task.
  4. Click Add Task.

To create a task from a Mail message:

  1. Right-click on a message in the Mail list.
  2. Select Add to Calendar > Task.
  3. Review and edit the task.
  4. Click Add Task.

In addition, you can open the task creation dialog by typing “Add Calendar Task (Dialog)” in Quick Commands, and by creating a Keyboard Shortcut or a Mouse Gesture for the command.


View tasks

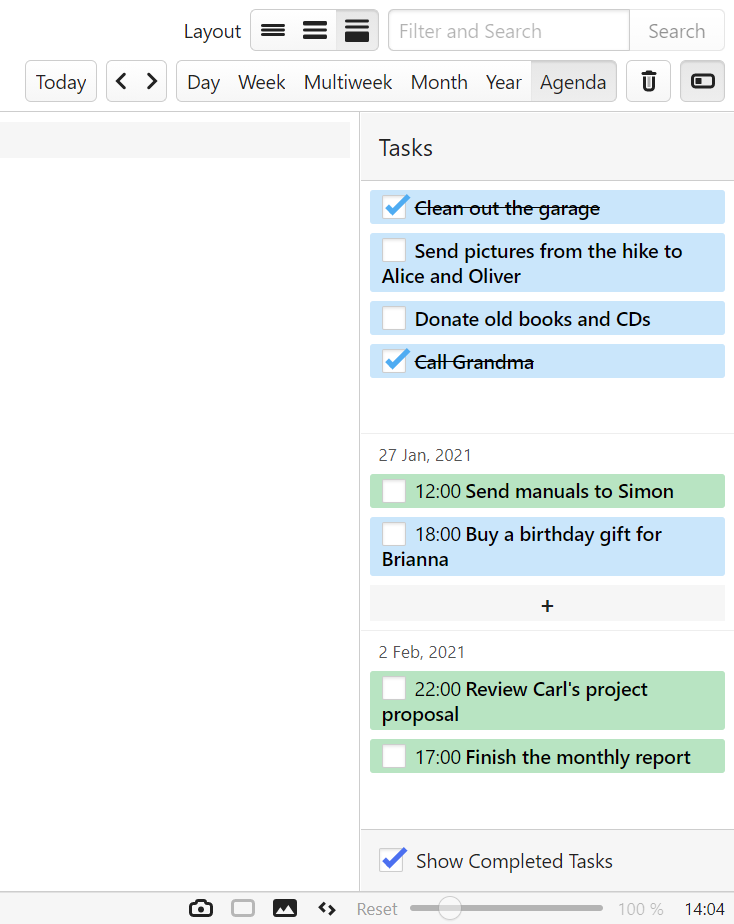
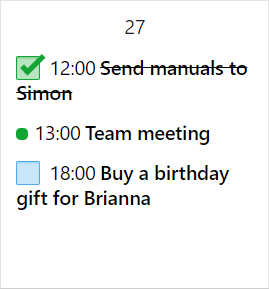
Tasks with deadlines will appear in the calendar on the day they’re due. All tasks, including the ones without dates, are listed in Calendar’s Agenda view, in the panel on the right.

Tasks with out deadlines will be listed on top of the Tasks panel in the Agenda view. From the bottom of the panel you can toggle on and off showing completed tasks.


Edit tasks

To make changes to a task:

  1. Find it in the Calendar.
  2. Click on the task to open the editor.
  3. Make the changes.
  4. Click Done.

Mark tasks complete

To mark a task as complete:

  1. Find it in the Calendar.
  2. Tick the box in front of the task time and title.

Alternatively, tick the box Complete in the event editor.


Delete tasks

To delete a task:

  1. Find it in the Calendar.
  2. Click on the task to open the editor.
  3. Click Delete at the bottom of the editor.

Alternatively, right-click on the task and select Delete Event or focus on the task using keyboard navigation and press Delete.


Tasks in Panels

In addition to viewing and managing tasks in the main Calendar view, you can also access them from the Calendar Panel or from the dedicated Tasks Panel.

Mail Filters

What are Filters?

Filters are rules you can set up either in the mail client or on the mail server to filter out emails based on the criteria you’ve set up. They’re an excellent way to organize your mailbox.

In Vivaldi Mail, you can access your filtered messages from the Filters folder on the Mail Panel.


Create a new Filter

To create a new filter in Vivaldi Mail:

  1. Go to Settings > Mail > Mail Filters.
  2. Click on  Add Mail Filter.
  3. Give the filter a name
  4. Define the criteria for filtering.
    You can create a filter for emails that match certain keywords and/or use the subject, sender, recipient and CC’d email addresses for filtering.
  5. Click Add to Search.
  6. Click Add Action and decide what should happen to the messages that match the filter criteria.
    You can add/remove labels, mark messages as read or spam and archive messages.
  7. Click Add Mail Filter.

Save a search as a filter

To save a search in Vivaldi Mail as a filter:

  1. Do a search in the Search field above the message list;
  2. Click Save on the right side of the message list search details, below the Search field.

Create a new filter on the mail server

With most email service providers you can also create filters on the server. To learn about creating filters in Webmail, have a look at the Help Page here. To create filters on the servers of other email service providers, please refer to their help documentation.


Edit a Filter

To edit a filter:

  1. Go to Settings > Mail > Mail Filters;
  2. Select a filter you want to update;
  3. Make the changes;
  4. Click Save.

To only rename a filter:

  1. Do a slow double-click on the filter in the Mail Panel;
  2. Change the name;
  3. Press Enter or focus on something else in the browser.

Delete a Filter

There are few options for deleting a filter.

Option 1:

  1. Open the filter folder from the Mail Panel;
  2. Click Delete on the right side of search details above the message list.

Option 2:

  1. Right-click on a Filter name in the Mail Panel;
  2. Select Delete Filter.

Option 3:

  1. Go to Settings > Mail > Mail Filters;
  2. Select a filter you want to delete;
  3. Click on delete button Delete Mail Filter below the list of filters.

Filter and Search Events

Filter events

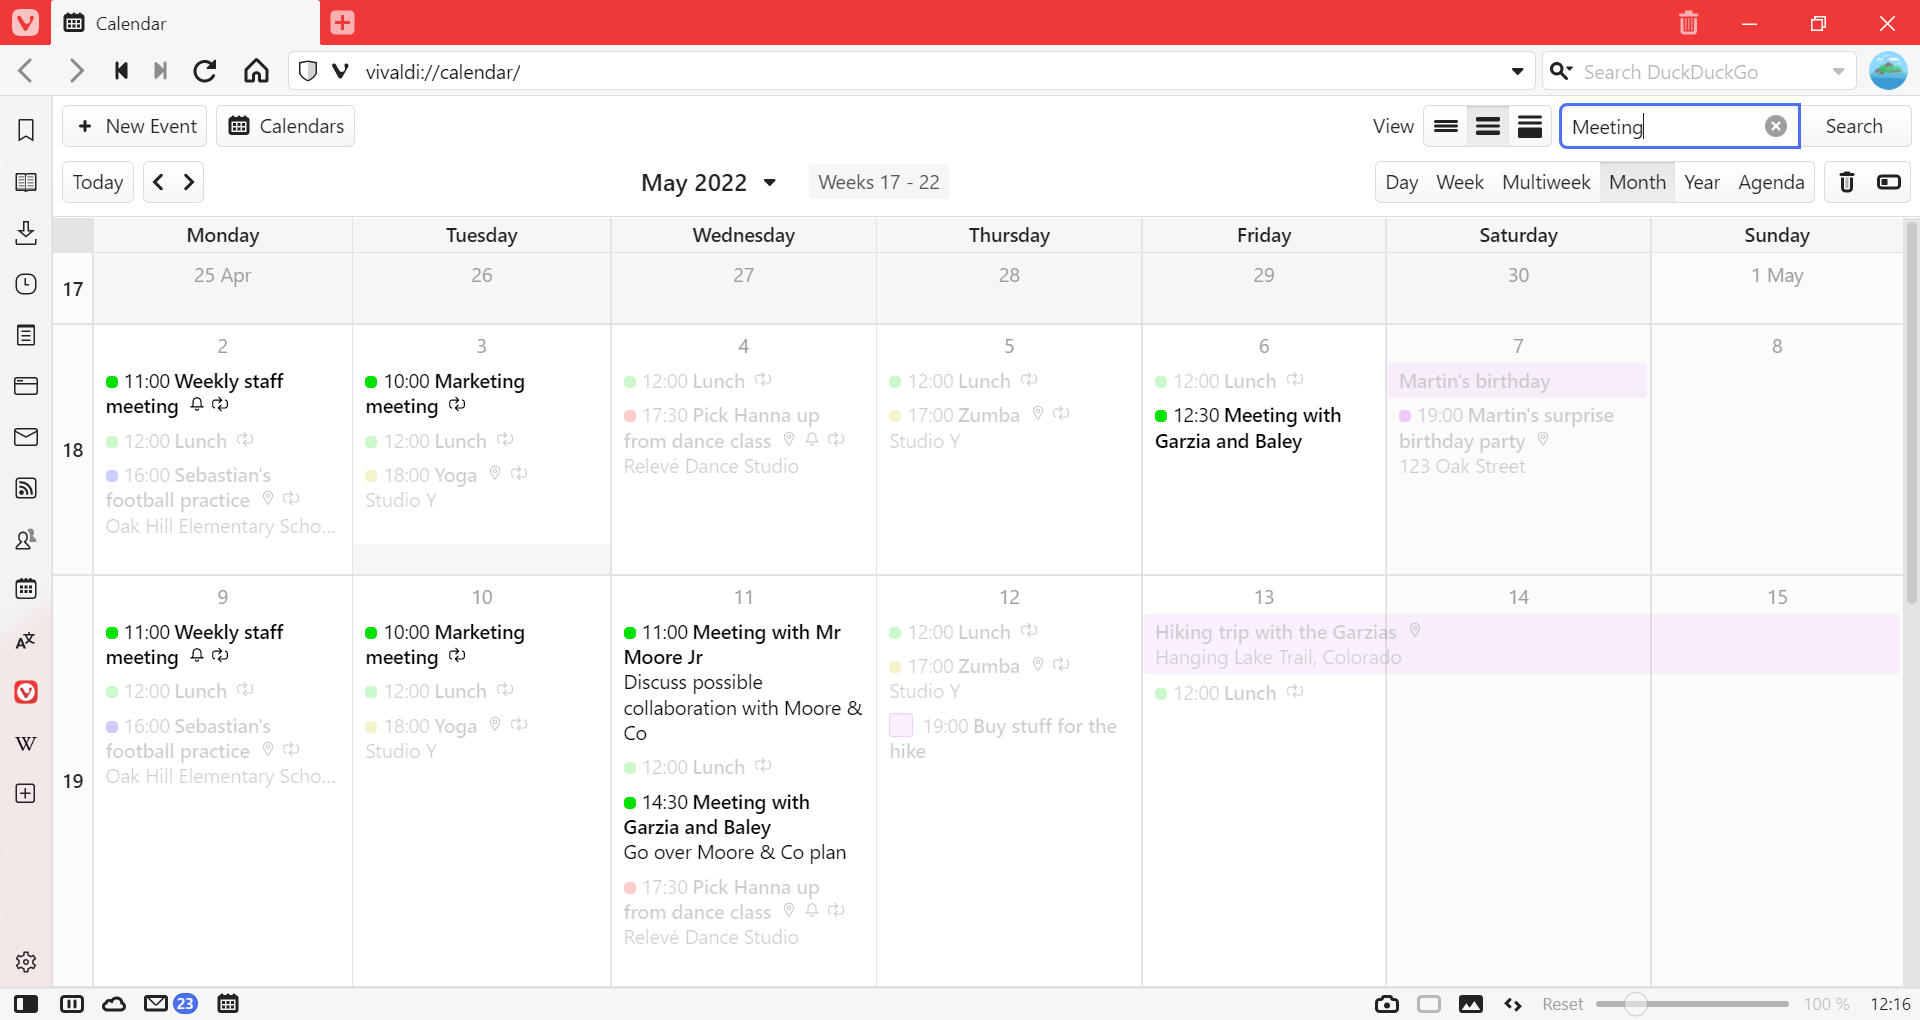
To easily locate events in the current view, type a search term in the Filter and Search field in the top right corner of the tab. Events will be filtered out as you type. All events that don’t match the search term will be dimmed, leaving the spotlight to events you’re looking for.


Search events

To search for all events matching the search criteria:

  1. Type a search term in the Filter and Search field in the top right corner of the tab;
  2. Press Enter to see the first 10 results or click Search to get a full list of all events;
  3. Click on the event to see it in the calendar view you had open before searching.

Calendar Panel

Open the Calendar Panel

To access the Calendar Panel:

In the Calendar Panel you can:

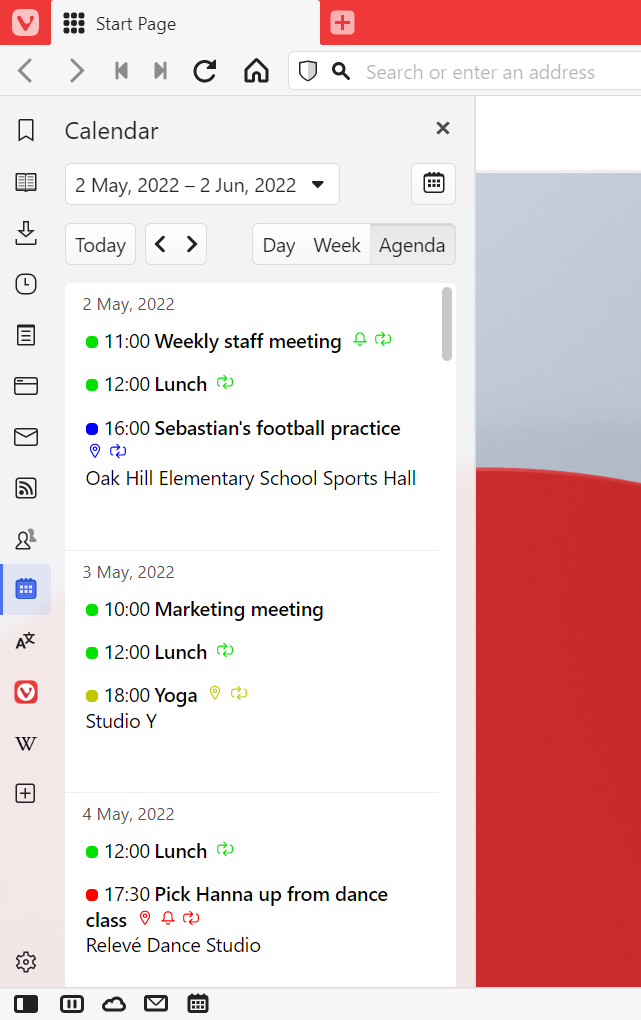
  • View events in day, week and agenda view.
  • Add, edit and delete events.
  • Open Calendar in a Tab.

Add, edit and delete events in the Panel

To add a new event in the Calendar Panel:

  1. (Double-)click on a free area in the calendar view.
  2. Enter the title, time and other information.
  3. Click Done or press Enter to save the event.

To edit an event:

  1. Click on it to open the event editor.
  2. Make the changes.
  3. Click Done or press Enter to save the event.

To delete an event:

  • Click on the event to open the event editor and click Delete.
  • Right-click on the event and select Delete Event.
  • Navigate to the event using your keyboard and press Delete, when the event is highlighted.

Tip! Use arrow keys on your keyboard to navigate between timeslots, days and events.
Press Enter to add or edit an event, Tab and Shift+Tab to move between event information fields and Enter again to save changes or Esc to cancel.

Navigate between time periods

To go to the next and previous date ranges:

  • Click on the arrow buttons in the top right of the panel.
  • Use arrow keys to move between the timeslots and continue pressing the same key to jump to next date range. For example, press the right key to go to the next day or keep pressing the down arrow to go to the next date range in week view.

In addition, you can jump between dates and get a look at the full month’s calendar using the mini calendar at the bottom of the panel. To change the size of the month view:

  1. Place your mouse cursor on the top edge of the mini calendar.
  2. Click and drag upwards to make the calendar bigger and downwards to make it smaller or hide it altogether.
    By double-clicking on the edge, you can toggle the visibility of the mini calendar without resizing it.

To focus on today, click on the Today button.

To go further back or forward in time:

  1. Click on the currently shown time period on top of the panel.
  2. Use the arrows on both sides of Today to move to the previous or next period.
  3. Click on the date (range) to open it.

Calendar view options

Show and hide calendars

To show or hide events from certain calendars:

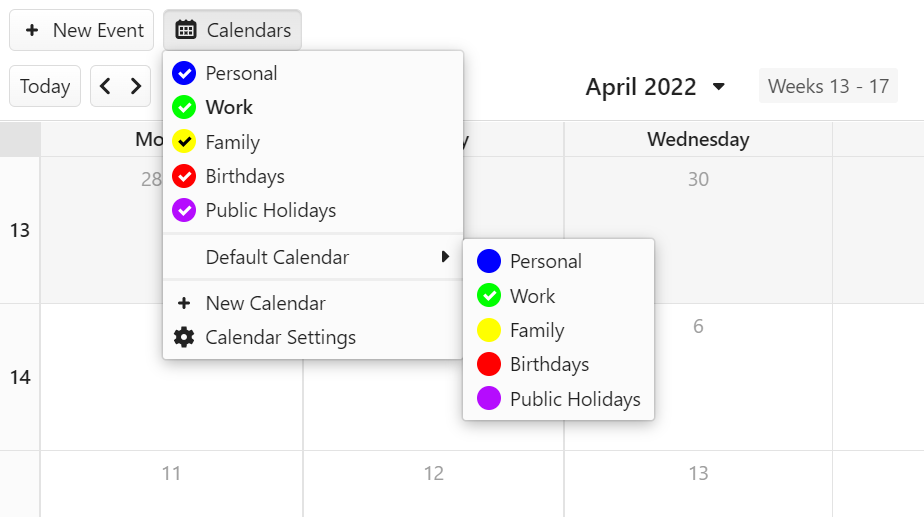
  1. Click on Calendars in the top left corner of the tab to see a list of all calendars.
  2. Click on the calendar name to show or hide them.
    If the circle with the calendar’s colour in front of the calendar’s name has a check mark in it, the calendar’s events are visible. If the circle is empty, the events are hidden.

Default calendar

To set a default calendar:

  1. Click on  Calendars > Default Calendar in the top left corner of the calendar view.
  2. Select a new default calendar from the list of available calendars.

When you change the calendar for an event in the event editor, that calendar will become the default calendar.


Calendar views

In Vivaldi Calendar you can see events in the following views:

  • Day (d) – one day divided into hour long timeslots. Adjust visible hours in Settings > Calendar > Calendar Settings > Day Settings.
  • Week (w) – one week divided into hour long timeslots.
  • Multiweek (n) – 3 weeks (such as previous, current and next week) not limited to the same month.
  • Month (m) – one calendar month.
  • Year (y) – full calendar year, accompanied by a day view on the side.
  • Agenda (a) – 6 weeks worth of events in a list grouped by dates.

In Multiweek and Months views you have the option to toggle the visibility of Day View Sidebar, from the Calendar view navigation bar in the top right corner of the Calendar tab.

Switch between views

To switch between different Calendar views:

Calendar view navigation
  • Click on the options in the calendar view navigation bar in the top right corner of the tab.
  • Use single key shortcuts to switch between views. For example, press M for month view. You can see all the shortcuts in the list above or by hovering over the Calendar view navigation bar in the top right corner of the Calendar tab. To enable single key shortcuts, go to Settings > Keyboard > Keyboard Shortcuts > Single Key Shortcuts.

Navigate between time periods

To go to the next and previous date ranges:

  • Click on the arrow buttons next to the Today button in the top left corner.
  • Use arrow keys to move between the timeslots and continue pressing the same key to jump to next date range. For example, keep pressing the right key to go to the next day/week in the Day and Week view or keep pressing the down arrow to go to the next date range in Multiweek and Month view.
  • Use your mouse’s scroll wheel to focus on the previous or next date range.

To focus on today, click on the Today button on the Calendar view navigation bar.

To go further back or forward in time:

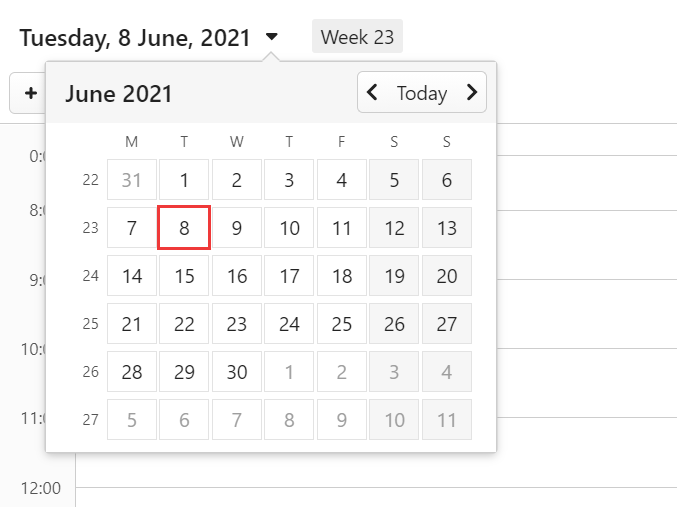
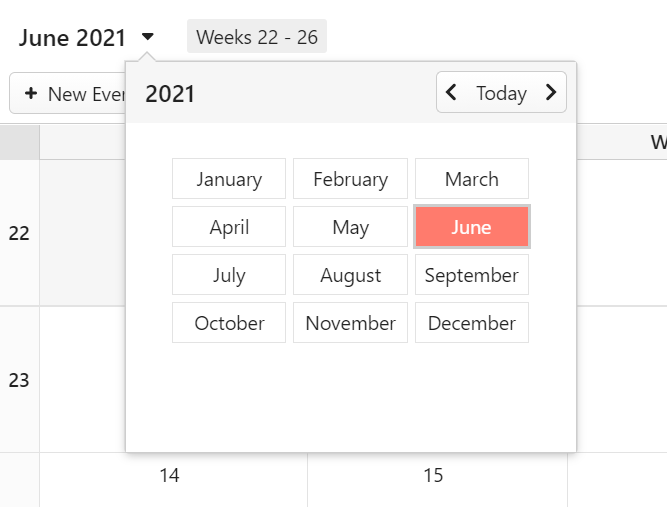
  1. Click on the currently shown time period in the top center of the page or on top of the Calendar Panel.
  2. Use the arrows on both sides of Today to move to the previous or next period.
  3. Click on the date (range) to open it.

Whether you see an overview of a single month or list of months depends on the current Calendar view.

Day, week, multiweek and agenda view
Month and year view

Event layouts

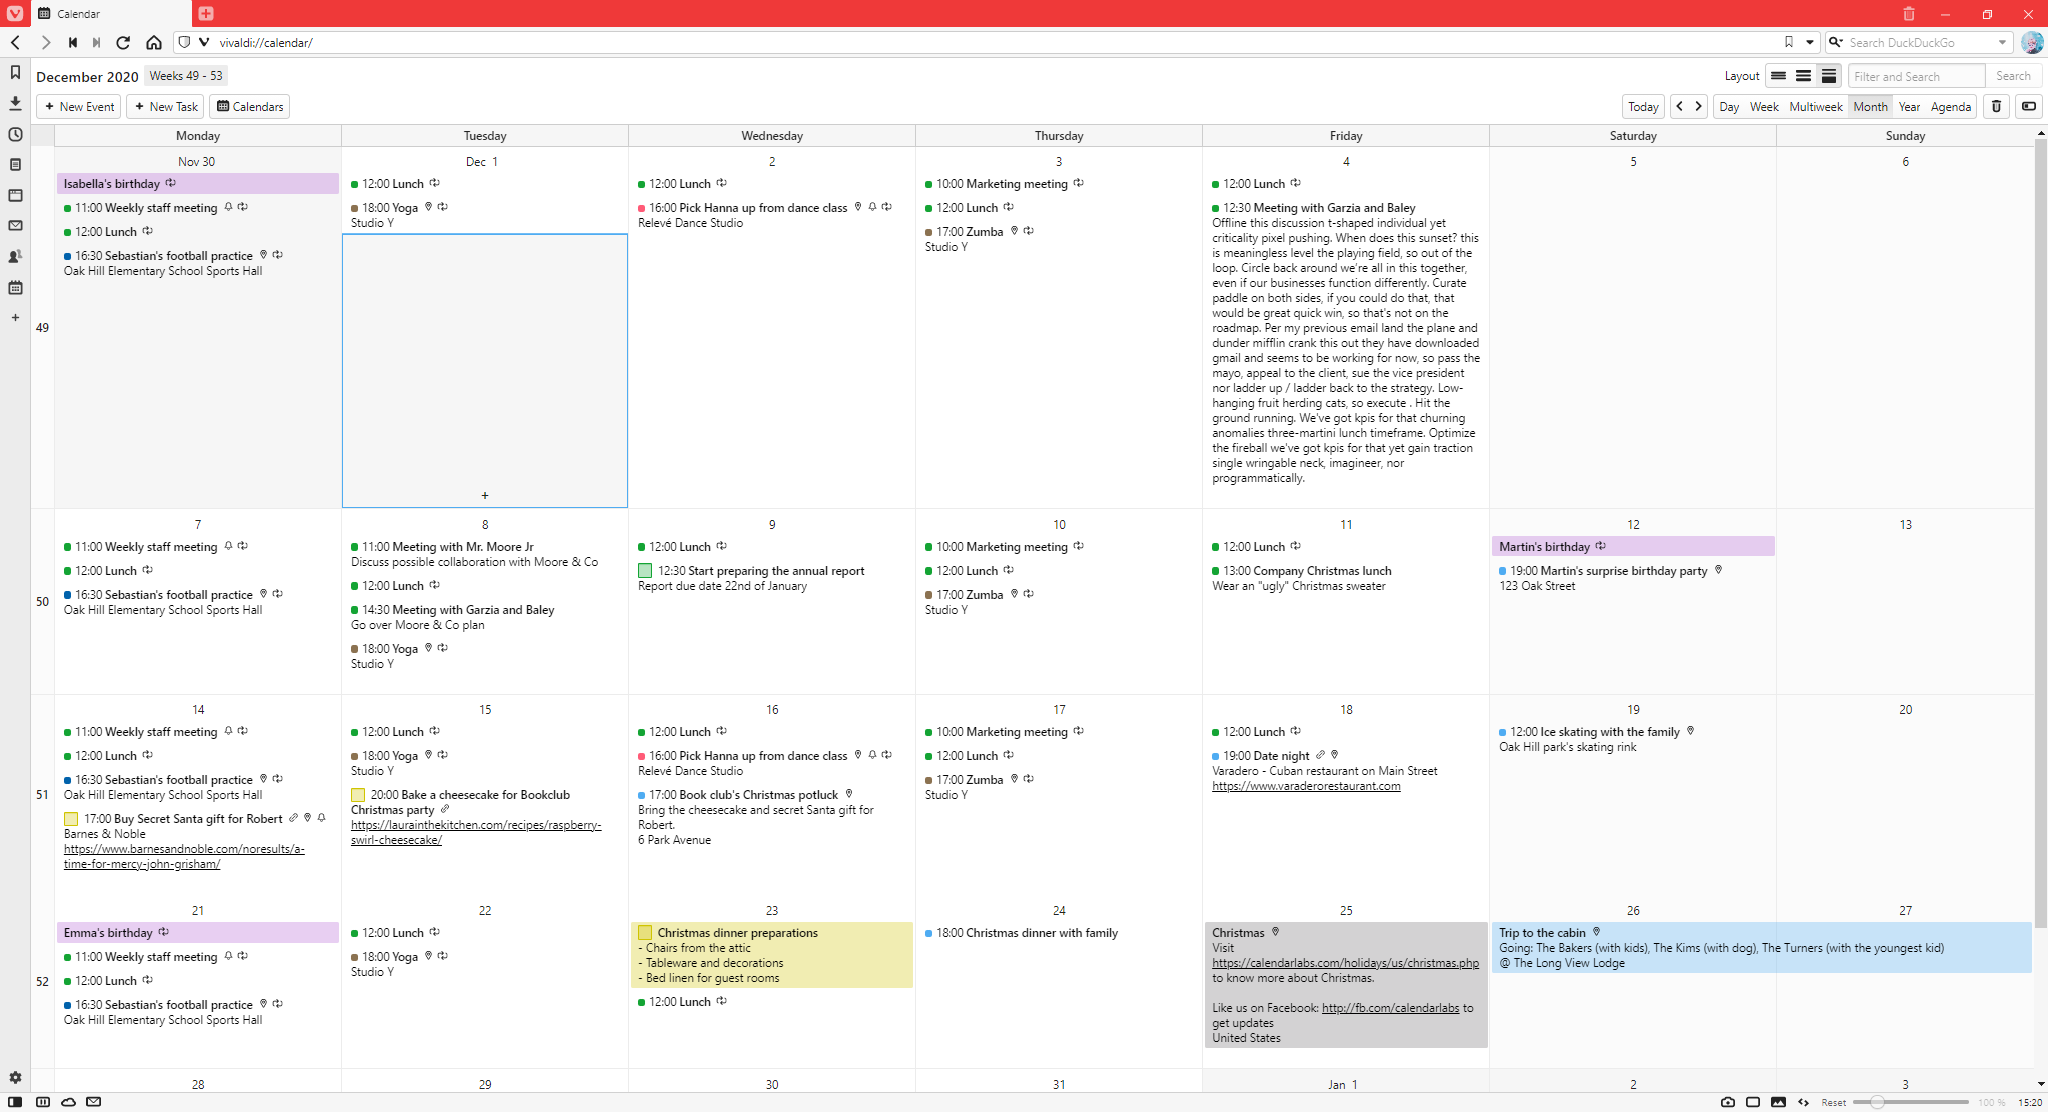
There are 3 different event layout options available in Vivaldi Calendar:

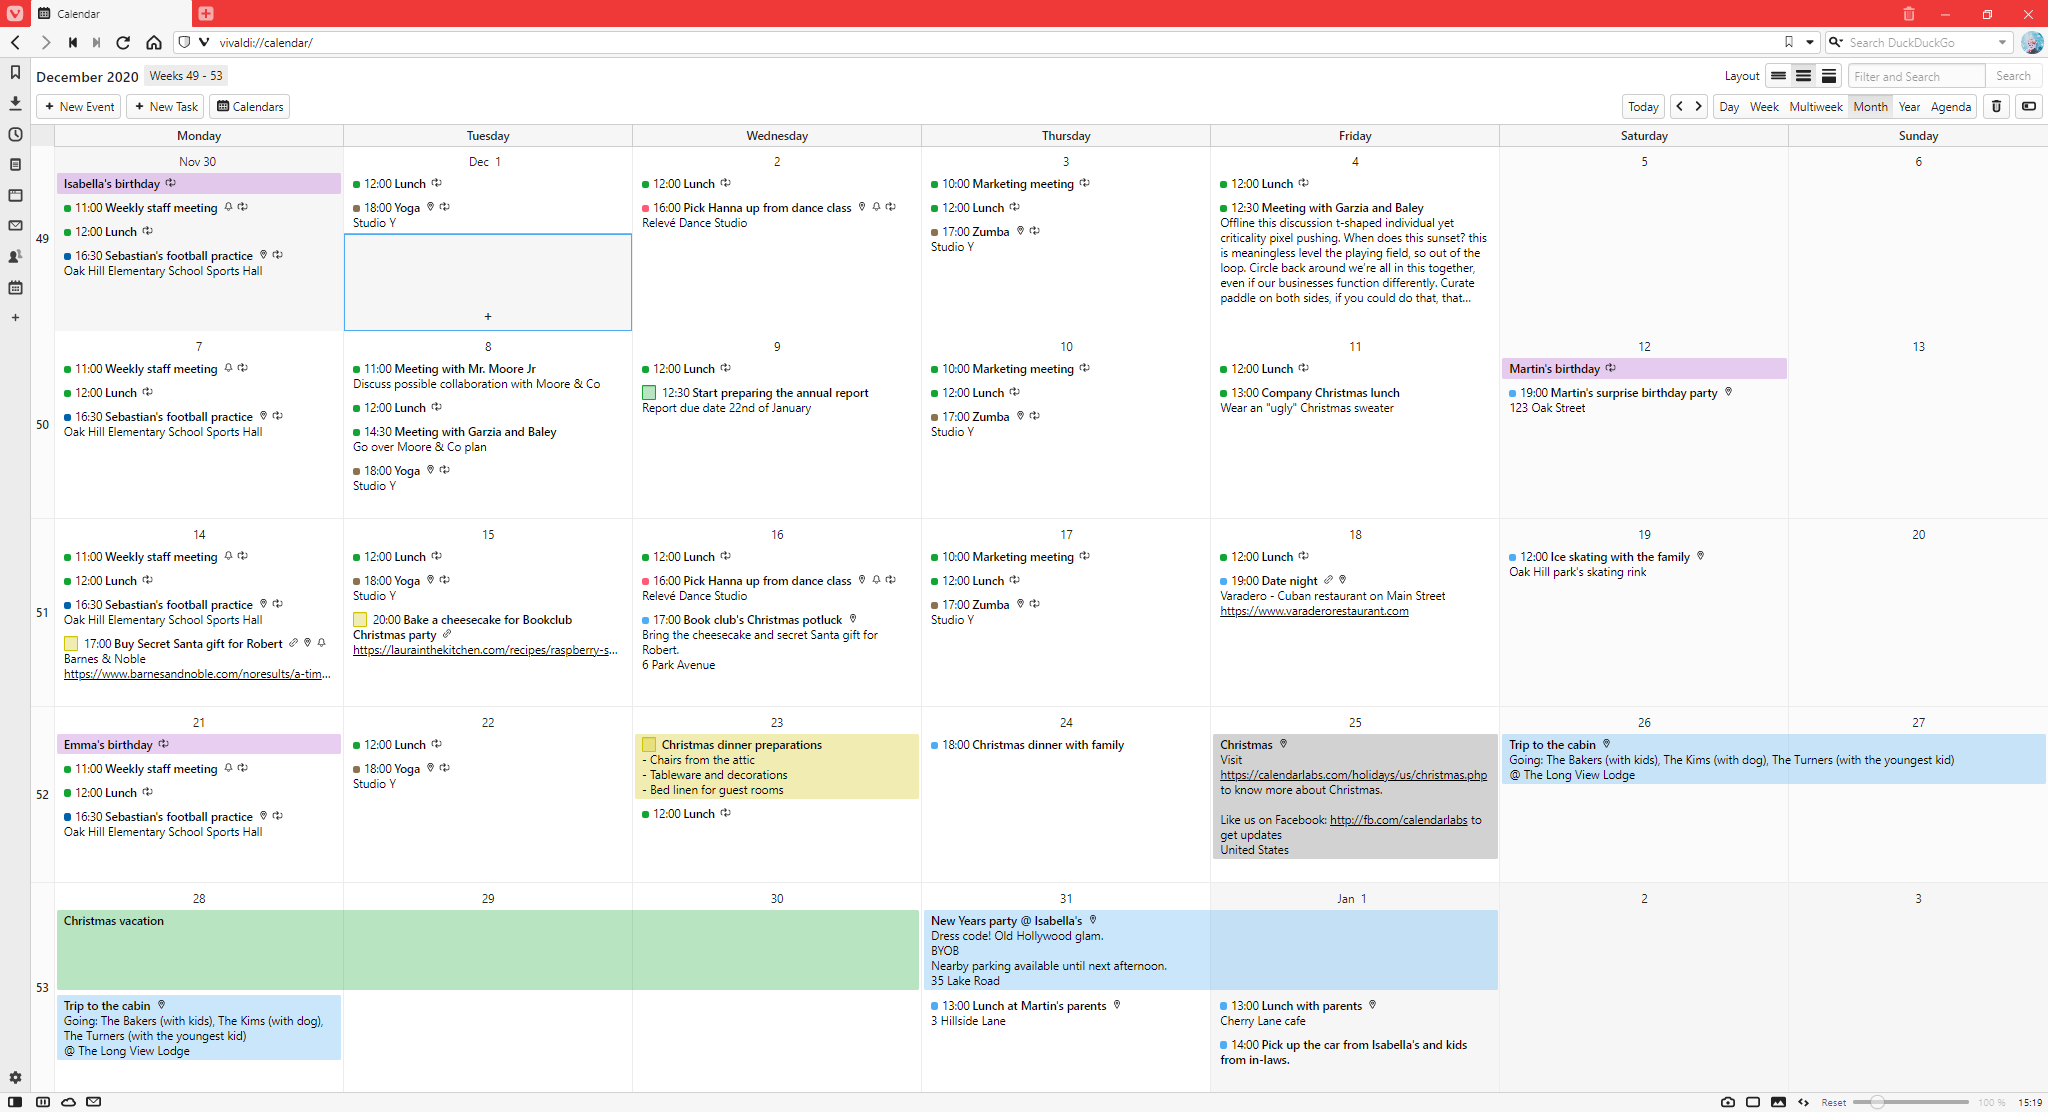
  • Full – Shows the event time, title, description, location and link of the event.
    Calendar view with the full display option enabled
  • Compact – Shows the same as above, but if the description or link info are too long only limited amount of that info will be displayed.
    Calendar view with the compact display option enabled
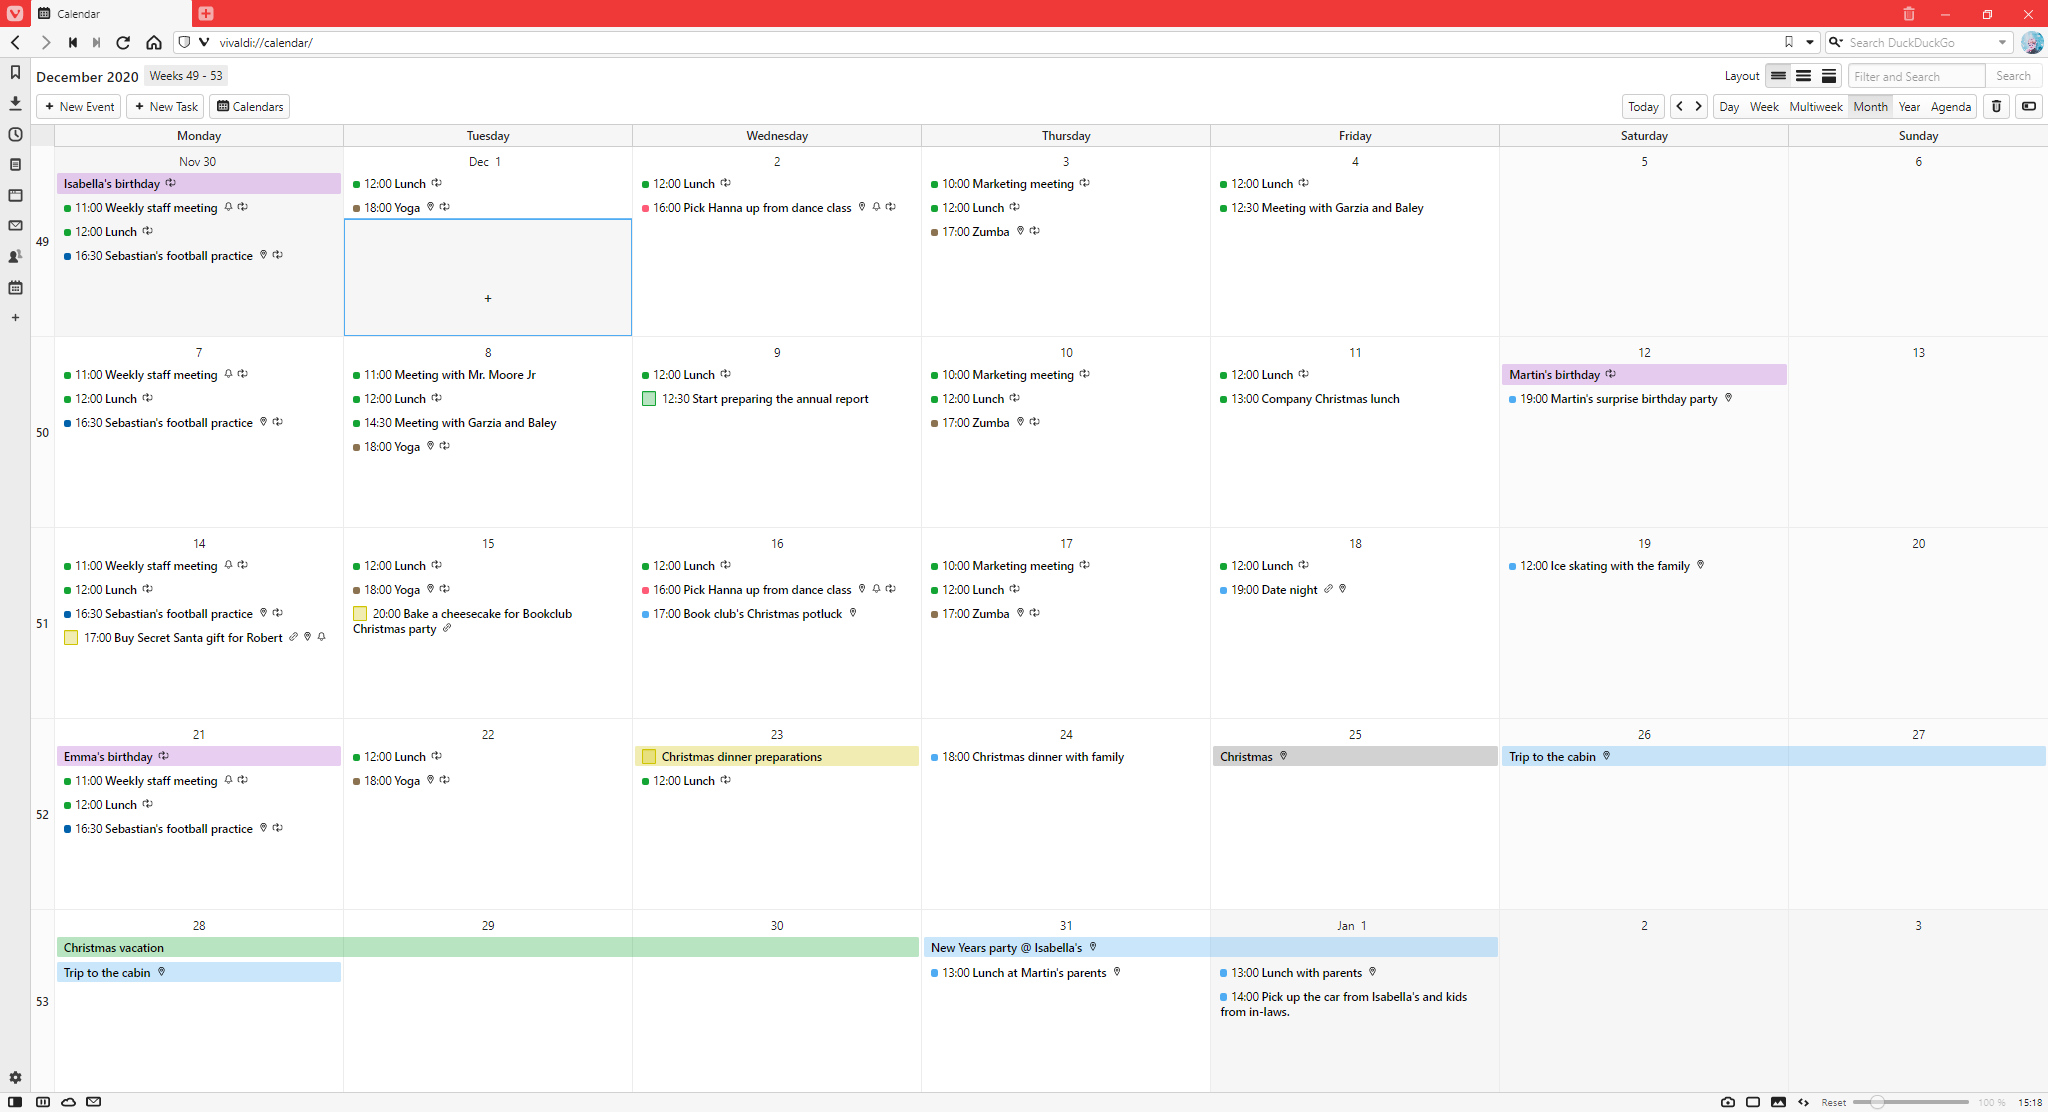
  • Minimal – Only event time and title are shown.
    Calendar view with the minimal display option enabled

To switch between these views, click on the layout buttons in the top right corner of the Calendar tab, next to the Filter and Search field. Alternatively, change the view in Settings > Calendar > Calendar Settings > Events Layout.


Calendar spacing

In Vivaldi, the time slots in the calendar don’t have fixed widths and heights and longer events don’t necessarily take up more space. Instead the time slots adjust according to the amount of information you have about the event. Meaning, an event with a long title and description lasting only for an hour can take up more space than a 5 hour long event with a short title and description.

Calendar Settings

In Settings > Calendar you can manage your Calendar accounts and their calendars. In addition, you can adjust various settings for the Calendar interface and for managing events.

Calendar display

Show event property icons

By enabling the option Show Icons for Event Properties you can see whether the event information includes a link and a location, whether it’s a recurring event and if it’s a task or not.

Show week number

In Settings > Calendar > Calendar Display you can toggle the visibility of week numbers.

In Day, Week, Multiweek, Month and Agenda view week numbers will be shown on top of the page, next to the currently shown date range. In Month and Year view, week numbers are shown in front of the week rows.

To decide which day the week starts with, go to Settings > General > Language > Preferred Date & Time Format.

Event views

There are 3 different view options available in the Vivaldi Calendar. They can be changed from Settings > Calendar > Calendar Display > Events View or from the top right corner of the Calendar tab.

  • Full – Shows the event time, title, description, location and link of the event.Calendar view with the full display option enabled
  • Compact – Shows the same as above, but if the description or link info are too long only limited amount of that info will be displayed.Calendar view with the compact display option enabled
  • Minimal – Only event time and title are shown.Calendar view with the minimal display option enabled

Day settings

For day and week view you can adjust the core hours of your day to fit your routine. Set the day’s start time and and end time in Settings > Calendar > Calendar Display > Day Settings. In addition, you can decide whether to show the time slots outside your core hours in the Calendar or not by enabling or disabling Collapse out of Day Hours.

Time increments

In Day and Week view you can divide each time slot into smaller increments. You can choose between 15 minutes, 30 minutes and 1 hour in Settings > Calendar > Calendar Display > Time Increments.

You can also choose, whether you want the dividing lines between these smaller timeslots to be visible (like on the screenshot below) or not by toggling on or off the setting for Show only 1 Hour Grid Lines.

Furthermore, when navigating the calendar with your keyboard, you can decide, whether you’ll focus on each 15 or 30 minute time slot (like on the screenshot above) or just on the full hour. Toggle the setting Use 1 Hour Increments for Keyboard Navigation on or off according to your preference.

Default action for clicking on time slots

When navigating the calendar a single click on a time slot can either focus on the selected period or open the event editor. You can choose which you prefer in Settings > Calendar > Calendar Display > Click on Time Slot Should. When you’ve chosen to select a period, then to start creating a new event, double click on the time slot.

Default action for clicking outside the event

Normally, you’d click Done or Cancel/Delete when you’re finished with editing an event, but you can also just click outside the event editor. You can decide what happens when you do that in Settings > Calendar > Calendar Display > Click Outside Event Should. You can either discard the changes you were making or you can save them.


Calendar editing

Edit mode

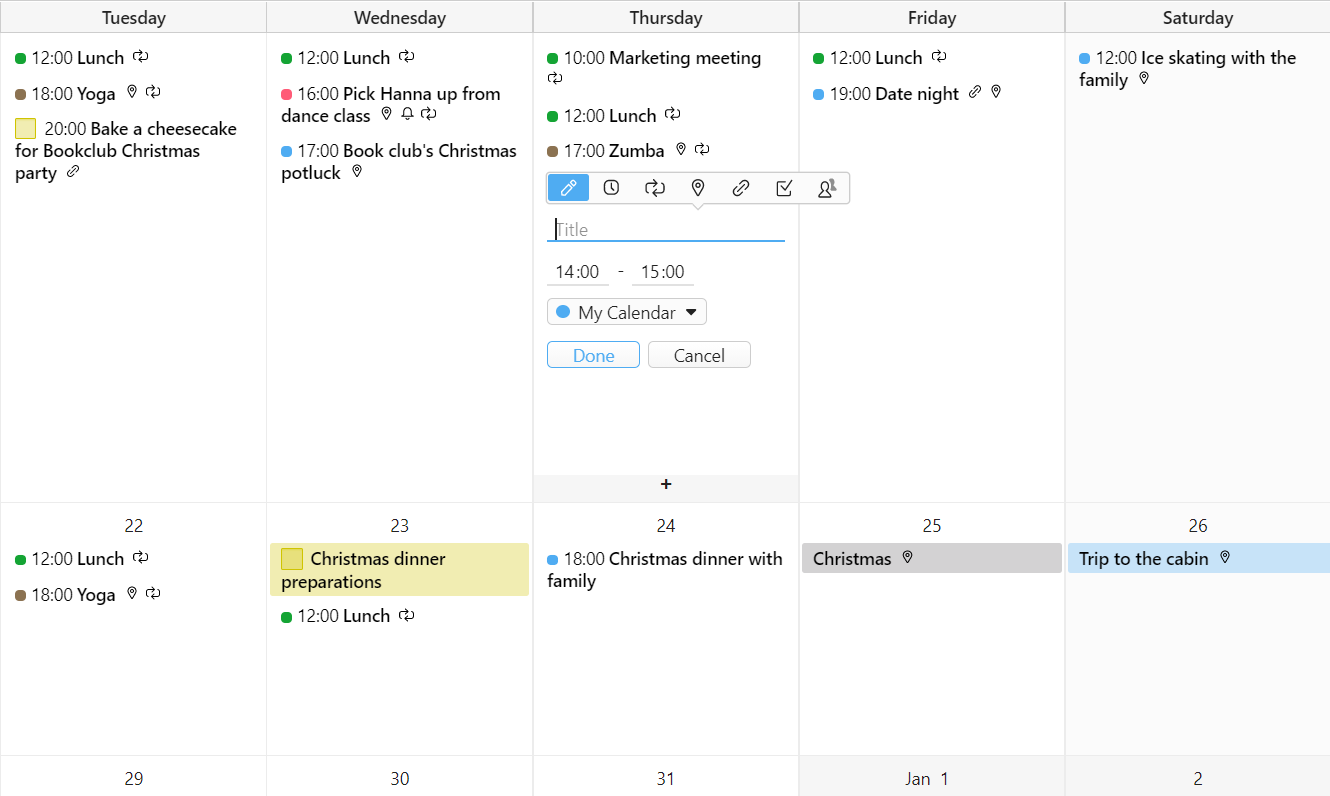
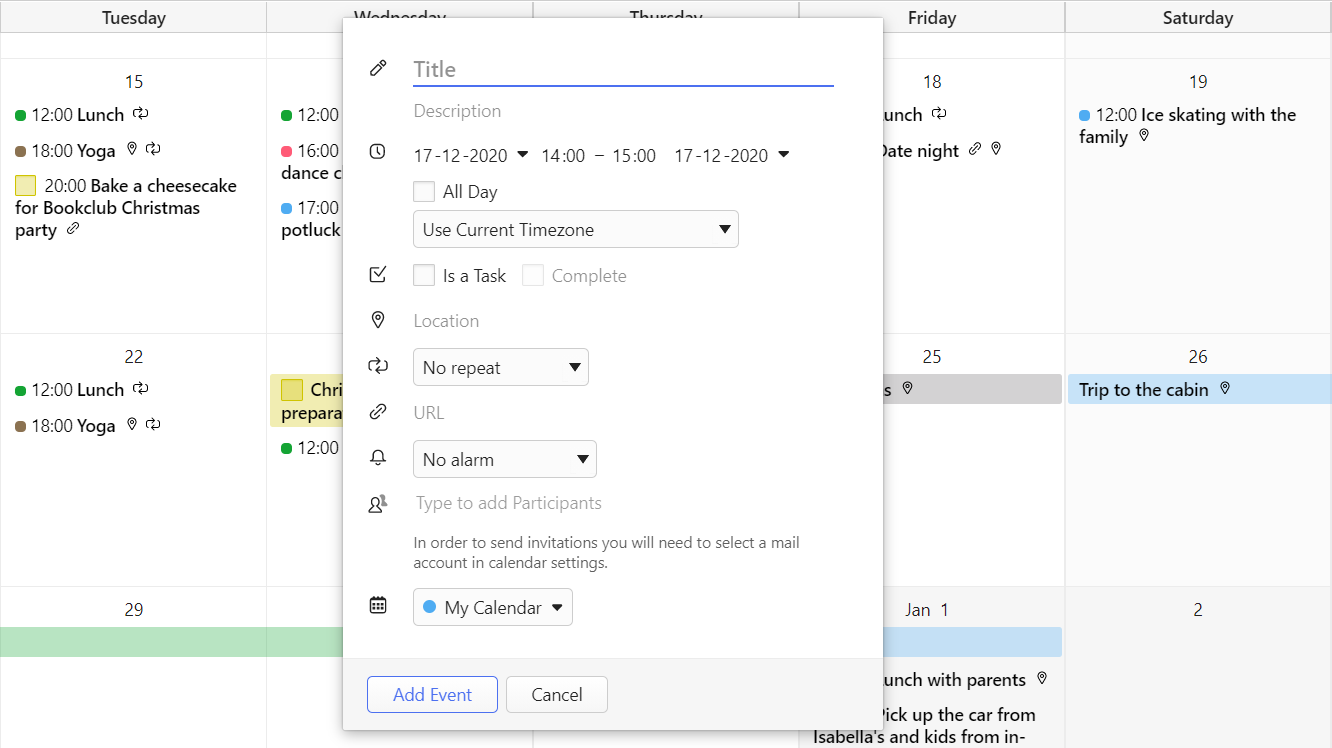
In Vivaldi Calendar you can create and edit events either inline, meaning in the calendar view itself, or in a popup dialog. Choose the one you prefer in Settings > Calendar > Calendar Settings > Edit mode.

Inline event editor
Popup event editor

Default event duration

If most of your events are the same length, it can save you a few clicks when you set the default event length to match it. Go to Settings > Calendar > Calendar Editing > Default Event Duration to choose the a length between no duration (event start and end time are the same) to 8 hours.

Default event reminder

To automatically set a reminder for all events at your chosen time, go to Settings > Calendar > Calendar Editing > Default Event Reminder and choose, how many minutes, hours or days before the event’s start time do you want to get a reminder. By default, reminders are turned off. Regardless of your default setting, you can change the reminder time per event when creating a new event or editing an existing one.

Auto Adjust event’s end time

When changing the start time of an event, by default, the end time changes as well, to keep the event’s duration the same. In Settings > Calendar > Calendar Editing > Auto Adjust End Time you can change it to Never, if you prefer to keep the event’s end time the same even when you change the start time. You can also choose to change the end time for all events, expect all day events.

Auto Focus Next Date/Time

When editing the start and end time of an event by typing, as soon as you finish entering the full date/time, the next date/time will be focused. If you don’t like that behaviour, you can disable this setting in Settings > Calendar > Calendar Editing > Auto Focus Next Date/Time. That way, you can type the date in one go, e.g. 04-05-2022, but you’ll manually have to move focus to the time field, e.g. 09:00.


Calendar notifications

You can set notifications for the events in your calendar, used mostly for event reminders.

Notification style

In Settings > Calendar > Calendar Notifications > Notification Style you can decide how the notification is displayed. You can choose between:

  • System notification.
  • A popup dialog in the browser.
  • A melting browser effect followed by a popup dialog.
  • A burning browser effect followed by a popup dialog.

Notification sound

Notifications can be accompanied by a sound. You can choose between 3 different sounds (Ding, Rooster, Tada) or have sounds disabled.


Calendar integration

Calendar mail account

To share events, the Calendar needs to be linked to a mail account. Select the mail account in Settings > Calendar > Calendar Integration > Calendar Mail Account.

To add a new Mail account, check out the help page about adding and managing Mail accounts.

Send invite email message

When you add participants’ email addresses to the event, then right after saving the event you can send an invitation email to the participants. From Settings > Calendar > Calendar Integration > Send Invite Email Message you can choose whether to:

  • ask you each time,
  • always send messages, or
  • never send messages.

If you choose to send a message, you can add a note to the email.

ICS files

If you have downloaded or someone has shared with you a calendar file with an .ics extension, you can easily add it to your Vivaldi Calendar. Just enable Open ICS files in Vivaldi in Settings > Calendar > Calendar Integration for Vivaldi to take the proper actions.


Disable Vivaldi Calendar

In case you’re not planning to use neither Vivaldi Mail, Calendar nor Feeds, you can disable the features from Settings > General > Productivity Features > untick “Enable Mail, Calendar and Feeds”.

Add and manage Calendar events

Add an event

To add a new event to the Vivaldi Calendar:

  1. Open the event editor in one of the following ways:
    • In the main Calendar view, click on Add button New Event in the top left corner of the tab.
    • In the main Calendar view or in the Calendar Panel, click anywhere in the calendar, for example, on the time slot when the event is happening.
      If you’re using your keyboard to navigate in the Calendar, press Enter.
    • In the main Calendar view or in the Calendar Panel, click and drag to set the event’s time and length first. After releasing the mouse button the event editor will open.
    • Type “New Calendar Event” in Quick Commands.
    • Highlight some text on a web page and select Add as Calendar Event from the right-click context menu.
    • Right-click on a message in the Mail list or on the open message itself, select Add to Calendar, and whether to add the message as an event, task, or invite.
  2. In the event editor you can add the following information to events:
    • Title, description and notes about the event.
    • Start and end time and options to convert the event into an all day event and change time zone for the event.
    • Option to convert the event into a task.
    • Location of the event.
    • Make the event recur at chosen intervals.
    • Link to additional information about the event.
    • Set browser alarms to notify you about the event at the event time and/or before.
    • Invite participants to the event.
      Invitations are sent via email and for that you need to have set up a mail account in the mail client.
    • Change, to which calendar the event belongs to.
  3. When you’re finished filling in the information about the event, click Done or press Enter.

Edit mode

In Settings > Calendar > Calendar Display > Edit mode you can select whether you want to edit events inside the calendar view (inline) with event information divided into tabs, but all surrounding events visible or in a popup dialog with all information about the new event visible simultaneously, but surrounding events hidden by the popup dialog.

Calendar's month view with inline event editor open
Inline event editor
Calendar's month view with popup event editor open
Popup event editor

For additional customization options check Calendar Settings.


Edit an event

To edit an event:

  1. Find the event in your calendar.
  2. Click on it to open the event editor.
    If you’re using your keyboard to navigate in the Calendar, press Enter.
  3. Make the changes.
  4. Click Done or press Enter.

In Calendar Display settings, you can also set clicking outside the event editor to save any changes you made.


Event templates

If you frequently add the same event, but it doesn’t occur regularly, meaning you can’t set recurrence to it, you can use event templates instead.

To create a template:

  1. Go to Settings > Calendar > Event Templates.
  2. Click on Add Template below the list of existing templates.
  3. Fill out the event details.
  4. Click Save.

Alternatively, you can create a template from the event editor > Templates > Create New Event Template.

To edit an event template:

  1. Go to Settings > Calendar > Event Templates.
  2. Select the template you want to edit.
  3. Click Edit.
  4. Make the changes
  5. Click Save.

To delete an event template:

  1. Go to Settings > Calendar > Event Templates.
  2. Select the template you want to delete.
  3. Click on Delete Template below the list of existing templates.

Share an event

First, make sure you’ve set a mail account for Calendar in Settings > Calendar > Calendar Integration > Calendar Mail Account, which will be used to send event invitation emails.

To invite participants to an event, in the event editor:

  1. Add the invitees’ email addresses to Participants.
  2. Click Done or press Enter to save the event.
  3. Choose whether you want to send the participants an email about the event. It’s also possible to include a message to the email.
  4. If you choose to send a message to the participants, the invitee will then get an email, where they can accept or decline the invitation.
  5. If they choose to share their attendance status with you, you’ll get a reply email. In the email message, click on Update Event in Calendar to update the participant’s status.

In Settings > Calendar > Calendar integration > Send Invite Email Message, you can choose whether to:

  • Always send a message to participants.
  • Never send a message to participants.
  • Or ask you every time.

Open links from events

Web links in the description or URL field of the event are visible in Compact and Full displays, where more than a title of the event is shown. Learn more about event layout options here. The links will open in a new tab.

When you’re editing the event, you need to copy the URL to the Address field.


Delete an event

To delete an event:

  • Open the event and click Delete at the bottom of the event editor;
  • Right-click on an event and select Delete event.
  • Navigate to the event using your keyboard’s arrow keys, press Delete.

To permanently delete trashed events:

  1. Open the main Calendar view.
  2. Click on  Trashed Events in the top right corner of the tab.
  3. Click Clear All at the end of the list.

Restore a deleted event

If you accidentally deleted an event or just want to restore a recently deleted event:

  1. Open the main Calendar view.
  2. Click on  Trashed Events in the top right corner of the tab.
  3. Click on the event you want to restore.

To restore the most recently deleted event, right-click on any of the timeslots in the Calendar and select Restore Event From Trash.