The Android version of Vivaldi is available in many of the cars that have the Android Automotive OS (AAOS). For example, Polestar, Renault, Volvo, Wolksvagen, Mercedes, Audi and more.
Install Vivaldi
To install Vivaldi in your car:
Open the Google Play app in the car’s center console.
Search for “Vivaldi Browser”.
Tap on Install.
Launch the app and start exploring.
Using Vivaldi in your car
To ensure the safety of the drivers and passengers, the browser can be used only when the car is parked. Streaming content may continue audio-only if driving commences.
In addition, some functional restrictions may apply, for example, files cannot be downloaded. Other than that, the browser in AAOS has the same features and works the same way as Vivaldi on Android on phones and tablets.
Video
Need help?
In case you have questions for which you haven’t found an answer from the Android section of the Help Pages start a discussion in the Automotive category of the Vivaldi Forum, where the Vivaldi Team and expert users in the Community will answer any of your questions. In case you’ve encountered a bug, please report it on vivaldi.com/bugreport and select the relevant car brand for the affected product.
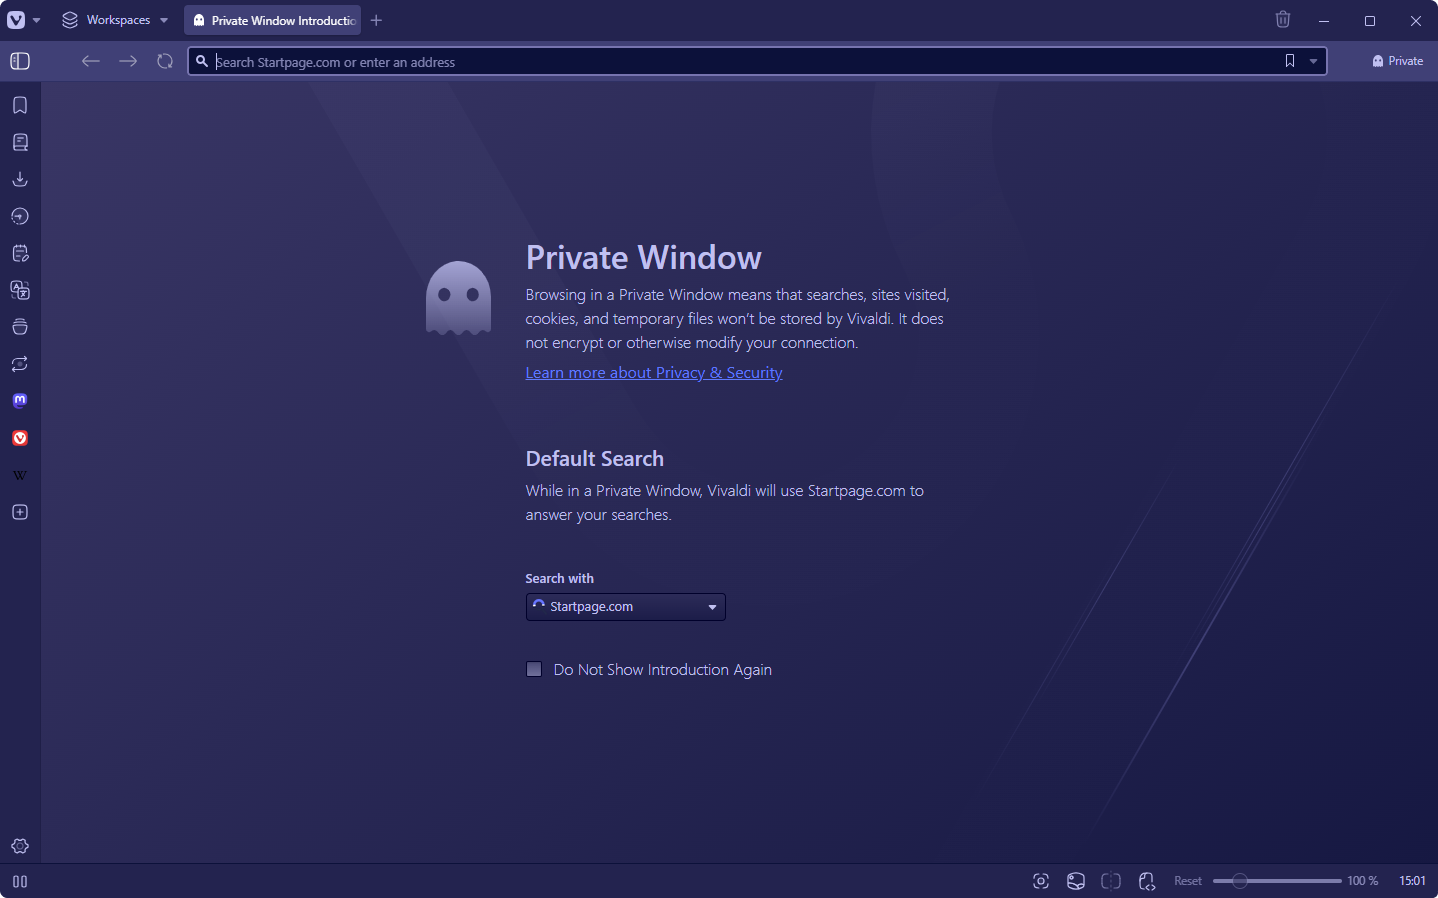
Private browsing mode is intended to protect your privacy from other users of your computer. When you browse using a Private Window, Vivaldi will minimize what is stored locally on your computer so that very few traces are left of what you were browsing once you close all private browsing windows.
To open a Private Window:
Go to the Vivaldi menu (Windows and Linux) > File > New Private Window;
A few things to keep in mind about using Private Windows
Using a Private Window does not encrypt or otherwise modify your connection.
All private windows share the same session while they are open, so you need to close all of them to cause the session data to be deleted.
A Private Window in Vivaldi does not use the same cookie store or cache as for regular browsing.
Third-party cookies are blocked by default. To change it, go to Settings > Privacy > Cookies > Third-party cookies.
It does not store the history of addresses that you visit.
It tries – as much as possible – to only store website cache files in memory instead of on disk, so that disk scanning tools will not find residual traces of the files.
If you intentionally download something, that content cannot be protected. Downloads are downloads, whether they start in private browsing mode or not.
If you have forgotten to use private browsing mode, you can select Delete Browsing Data from the Tools menu to either delete all your browsing history, or just the history for a selected amount of time. Of course, this cannot remove traces from the disk so disk scanning tools may be able to find traces.
Always open Vivaldi in a Private Window
To open a Private Window without opening a normal window first, follow these instructions.
Option 1
Right click on Vivaldi in the Start Menu or Task Bar;
You’ll now have an application called Vivaldi Private, stored in the folder where Terminal is running. You can check the folder location with pwd or open the folder in Finder with Open.
Move Vivaldi Private to your /Applications folder and use Vivaldi Private to launch the browser.
To ensure you have an official version of Vivaldi, type “https://vivaldi.com/download/” and press “Enter”. On visiting this website, you should expect to see a padlocked badge in the URL field stating, “Vivaldi Technologies [NO]”. In almost all browsers, you can click the badge to view more details about the certificate.
Checking signatures
All official installation packages from Vivaldi are signed. You can check the signatures of these packages via the following methods:
Windows
Right-click on the installer package, then choose “Properties → Digital Signatures”. Here, “Vivaldi Technologies AS” should be listed. Selecting this and clicking “Details” should result in a new window that states, “This digital signature is OK”. For even more details, click on “View Certificate”.
macOS
Extract Vivaldi from the .dmg installation package and place it in “Applications”.
Open the “Terminal” application and enter the following:
In the results there should be no errors about lack of signing and the “Authority” lines must include “Apple Root CA”, “Developer ID Certification Authority” and “Developer ID Application: Vivaldi Technologies AS (4XF3XNRN6Y)”.
You can also check if the application bundle is trusted by your system via the following command:
Unlike Windows and macOS, our Linux packages are self-signed. The public signing key is included within the packages and configured automatically during first install, meaning that your system will check it when you attempt to upgrade the application (via our official repositories), and will only proceed it if it is valid. If however, you want to manually check the package signatures, you first need to download and install the public key yourself.
Debian/Ubuntu
Open a terminal window and issue the following to fetch a copy of our public key, securely over https:
We build Vivaldi with the needs of our sizeable community in mind. If you have an idea for a feature you’d like to see in the browser, let us know on the Forum!
Searching for existing feature requests
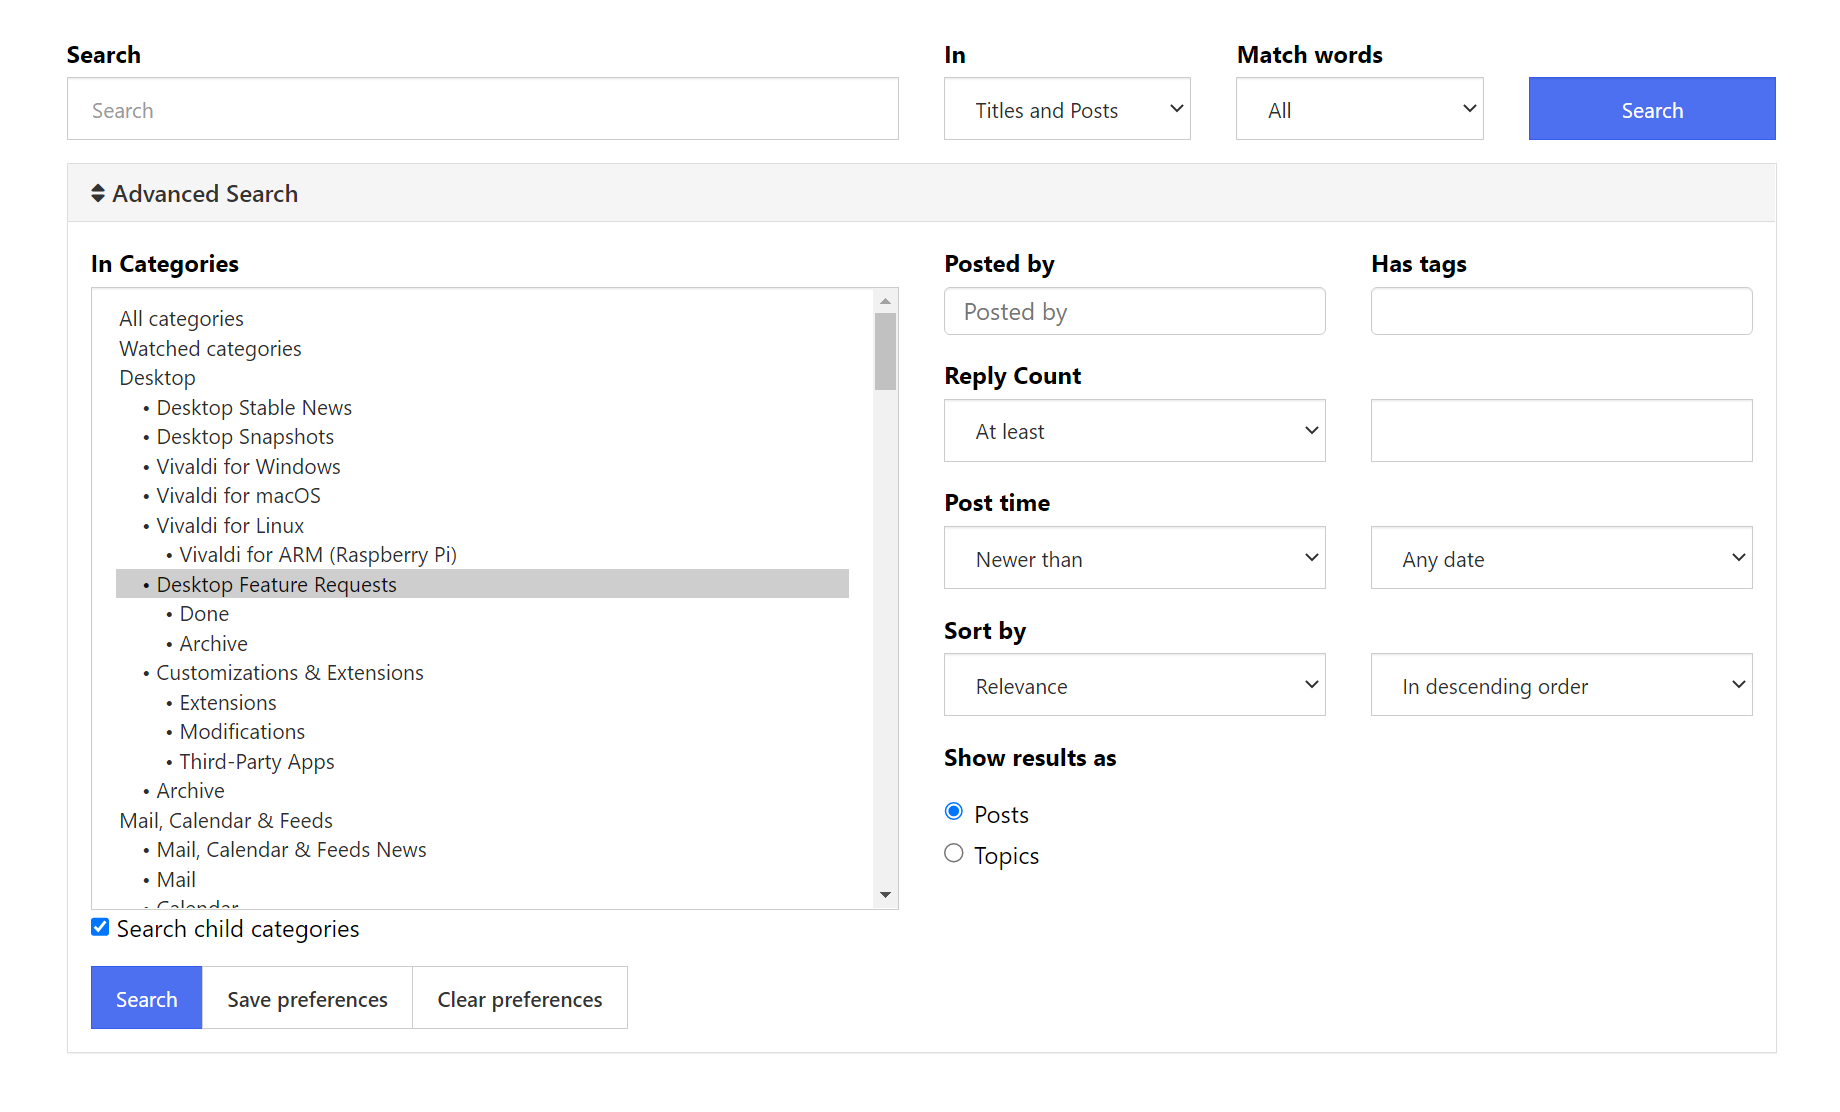
To collect all votes under one post and limit the number of duplicate requests, please look for other feature requests, before posting your own. You can browse through already requested feature topics by logging in to the Forum and going to the relevant feature request category:
Click on the Search for feature requests button in the top right of the feature requests page.
Enter a search term in the search field.
Press Enter or click Search below advanced search options.
Option 2
Enter the search term in the Search filed near the top right corner of the forum.
Select the category or categories you want to search in. Hold down Ctrl or Shift to select multiple categories or tick the box for Search child categories.
Press Enter or click Search below advanced search options.
When you’ve found a feature that you’d like to see implemented, click on the thumbs up button below the first post.
Leave a comment if you have anything to add to the feature request.
Posting a new feature request
If the feature hasn’t been requested, start a new topic. Post only one feature request per topic.
If possible, post in the relevant subcategory. Admins and moderators may move your post, if they feel there’s a better location for your request. You can see all your posts on your profile.
Choose a clear and concise title for the topic and describe the feature in more detail in the body of the post.
Duplicate feature requests will be tagged as such and moved to Archive.
A “crash” occurs when Vivaldi encounters an unrecoverable error and shuts down unexpectedly or a tab’s contents disappear and are replaced with a “dead bird” image. Information pertaining to the crash is logged by Vivaldi.
Enable automatic crash reporting
When you enable automatic crash reporting, we will receive the crash logs automatically. You can enable crash reporting during the welcome flow after installing the browser, or any time in Settings.
Enable Allow Vivaldi to Send Automatic Crash Reports.
Provide additional information
By adding context to the crash, the team will have an easier time fixing the bug that’s causing the crash. You can do that by filing a bug report that gets linked to your crash log.
To file a bug report about the crash:
Go to vivaldi:crashes.
Look for a crash log that was created around the time you witnessed the crash.
Click on Provide additional details. You’ll be taken to our bug report page, where the crash’s ID is already prefilled in the Summary field.
Fill out the form with information you think is relevant to the crash, such as steps to trigger the crash.
Submit the bug report.
Manual crash reporting
If you don’t want to report all crashes to us automatically, you can still forward individual crash logs to us manually.
To report crashes:
Go to vivaldi:crashes.
Look for a crash log that was created around the time you witnessed the crash.
Click “Send now”.
In case the crash occurs as you’re opening Vivaldi and you’re not able to visit vivaldi:crashes, you can locate the crash logs following these instrcuctions:
Open the “Run” dialog—[Windows Key]+R
Copy the following text (triple click to select) and paste it in the dialog "%UserProfile%\AppData\Local\Vivaldi\User Data\Crashpad\reports"
Look for a crash log that was created around the time you witnessed the crash—sort by “Date”.
As an alternative, use the Windows batch file contained within this archive to automate all of the above. Extract the batch file from the archive, run it and it will create a compressed archive for you, containing crash logs from your most recently installed Vivaldi version.
Then, go to vivaldi.com/bugreport and fill out the form with details about the crash and attach the crash log file to the report.
HTML5 “proprietary” audio and video includes all media types that are patented, such H.264 (video) and AAC (audio).
Testing support
To test proprietary media support, try and play the following test video.
Installing proprietary media support
If the test video didn’t play, restart Vivaldi once. This will cause a reinstall of the appropriate support files, in cases where they did not get installed alongside Vivaldi with the initial install or upgrade .
Troubleshooting
If the test video above will still not play, file a bug report stating that you run Linux and cannot play proprietary media. Mention your Linux distribution and distribution version. It is also recommended that you create a media log by running the following command in a terminal. Triple click the following line and copy it to your clipboard, paste it into a terminal window (Ctrl+Shift+V), then press Enter:
You can attach the generated log (found in your Downloads directory) to the bug you create.
Most audio/video streaming services also require Encrypted Media Extensions to function. If you are able to play the test video above but continue to have issues with streaming services, you should also check out our guide to Widevine CDM (for EME/DRM support).
If you need to access websites using Encrypted Media Extensions (.e.g. Spotify) or sites that use Flash (e.g. Tidal), you can extract Widevine and Flash binaries for Linux ARMhf from ChromeOS recovery images. Simply run this script on a Linux machine to extract the files.
Since these you need to download a very large file (2Gb+ on disk after download) it is recommended that you do the extraction on another machine (you can do it on the Raspberry Pi itself, if you have space).
Netflix
To make this work you will need to have already installed Widevine. Additionally, you will need to alter the browser’s User Agent. To change your User Agent, install the extension User-Agent Switcher for Google Chrome, open the “Options” and configure a new “Custom User-Agent”, like so:
New User-agent name: Netflix
New User-Agent String: Mozilla/5.0 (X11; CrOS armv7l 10895.56.0) AppleWebKit/537.36 (KHTML, like Gecko) Chrome/79.0.3945.131 Safari/537.36
Group: Chrome
Append?:Replace
Indicator Flag: NFX
Enable this User Agent and then proceed to logging into Netflix.
Whilst it is possible to play videos this way, it is not recommended on any recent Raspberry Pi, other than for a bit of fun. The resolution is very poor and you will most likely get a lot of dropped frames.
Increasing the size of the swap file
For smooth running of Vivaldi on Raspberry Pi, we recommend to increase swap space. Open a “Terminal” and use the following command to change the SWAP from 100MB to change it to 2048MB:
echo CONF_SWAPSIZE=2048 | sudo tee -a /etc/dphys-swapfile
Then restart the swap service to apply the changes:
Making this change may diminish the the life of your SD card.
Stopping the “hiss” when using analog out (Raspberry Pi 3)
If you are using Raspbian on a Raspberry Pi 3 and hear a his when listening to music or watching videos, issue the follow command in a “Terminal” and then restart the Raspberry Pi:
echo audio_pwm_mode=2 | sudo tee -a /boot/config.txt
With the synchronization function, you can synchronize your Vivaldi browser data across multiple devices.
Important! Sync is not meant to be used as a data backup service. If the data is not stored locally on any devices, we can’t guarantee you’ll be able to restore the data on a later date.
Access Sync
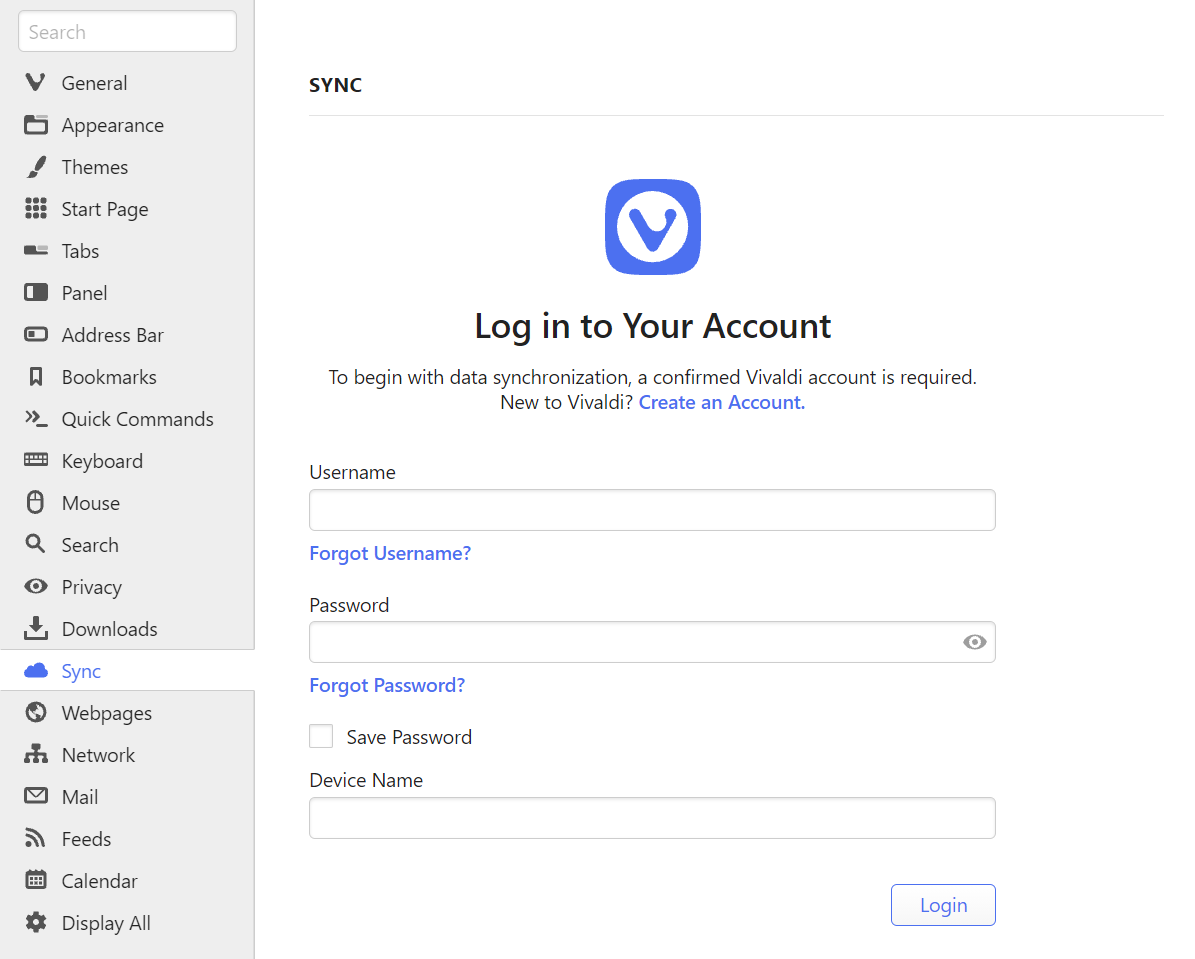
To access Sync settings, either:
Click on the Sync button on the left side of the Status Bar.
Click on the User Profile button on the right side of the Address Bar and then on Create an Account.
First, log in to your Vivaldi account with your account’s username and login password. Your login password is sent to our servers over a secure connection and a hash of it is stored in our database.
In case you don’t have an account yet, create a new Vivaldi account in the Settings window or on Vivaldi.net. With a Vivaldi account, in addition to Sync, you’ll get access to the Forum, Vivaldi Social, Webmail, Themes and Blogs.
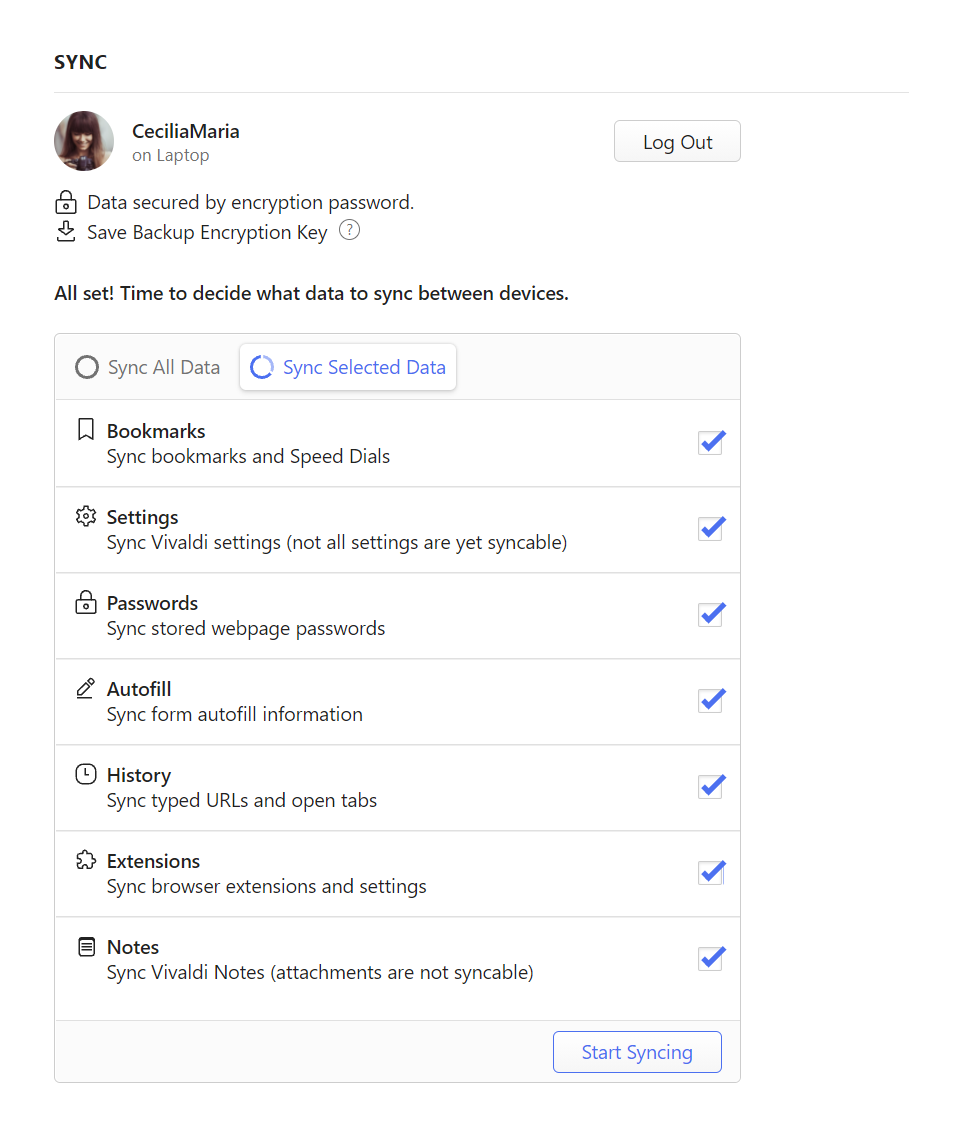
Encryption password
Once you’ve logged in, you also need to pick an encryption password that is used for encrypting your data. The password needs to be at least 12 characters long and you can use any letters, number and characters in it. We recommend using a password that’s different from your login password. Your encryption password is used locally on your computer for encrypting the data you’re about to send to our servers and to decrypt the received data. Your encryption password is never sent to us or any other third party, which ensures that we cannot decrypt your data. This also means that even if someone should get access to your account’s username and login password, it’s impossible for them to find out the encryption password, unless you yourself have shared it with them.
It can happen that you forget the encryption password. When you have the data stored locally and can still access it, forgetting the password isn’t a big deal. You’ll just need to reset the encryption password and upload all the data again. Should you not have access to your browser data on any devices (for example, you used Sync only on one device and had to reset the OS, losing all your data), restoring it requires to have prepared for this beforehand by saving a backup encryption key in a safe place.
Backup Encryption Key
Backup encryption key is an alternative method to the encryption password for decrypting your Sync data. Like with the encryption password, your backup encryption key is never sent to us or any other third party, which ensures that we cannot decrypt your data. For it to be useful, you need to save the key in a safe location, while you can access your Sync settings with the encryption password.
Save the backup encryption key
Log in to your Vivaldi account in Settings > Sync.
Enter the encryption password.
Below your account info, look for Save Backup Encryption Key.
Click on it and save the key file to your device.
The key is valid until you reset the remote Sync data. We recommend storing the key file in a location that can survive something irreparable to your device, such as an external memory drive or a trusted cloud service.
Use the backup encryption key
Log in to your Vivaldi account in Settings > Sync.
When asked for the encryption password, click Load Encryption Key.
Click Load and find the key file.
Click Open.
Start syncing.
Syncing
To start Sync:
Select the data you want to synchronise;
Click Start Syncing.
Currently, Vivaldi supports synchronisation of the following items:
The data you send us is encrypted on your computer using a password that is never sent to us. In addition, the servers on which your encrypted data is stored are well protected from intrusion both physically and from the network.
When syncing, the encrypted data is sent to a central server, from which it can be requested from all other Vivaldi instances only by the same user. When one Vivaldi instance sends new data to the Sync server, a notification is immediately sent to all other Vivaldi instances to let them know that they can download this new information. This means you should see changes reflected within a minute.
Vivaldi stores Sync data on its own servers in Iceland. If you want to know more about how we handle your synced data please visit Sync’s Privacy Page.
Connecting another device
To connect another device to Sync:
Open Sync Settings;
Log in;
Enter the encryption password;
Start syncing.
With bigger profiles, the first sync between newly connected devices can take some time to finish.
Most data, like Bookmarks and Notes, will be put to their respective locations, but to access the tabs that you have open in another Vivaldi instance, look for the Synced Tabs section in the Tab Button menu or Windows and Tabs Panel.
When you log in or enable synchronisation of some data type, your local data is merged and re-associated with what exists on the server. This is done in a way that ensures you won’t lose any data. Some things like Bookmarks can be moved to match the location the server believes they are in.
When you make changes to synced data on one client, Sync will check the servers for updates, download any new data and upload the changes you just made. It will also try to notify all desktop clients about the update, so they could download it.
Send Tab to Device
When you have Tabs sync enabled, you’ll find all your open tabs from the Synced Tabs menu on the Tab Bar or in the Windows Panel. If you want to quickly open a specific tab on another synced device, use the Send Tab to Device feature.
To send a tab from desktop:
Open the tab you want to send.
Right-click on the tab on the Tab Bar or on an empty area on the page.
Select Send to Your Devices.
Choose to which synced device you want to send the tab to.
To open a received tab on desktop:
When you’ve sent a tab from another device to your current desktop/laptop computer, you’ll see a notification on the Synced Tabs menu button.
Click on the Synced Tabs button on the far side of the Tab Bar.
Click on “From [device name]: [page link]”.
Another feature that can be used for accessing websites on multiple synced devices is the Reading List.
Stop syncing
When you choose to stop syncing some types of data, the browser forgets all association between your local data and the data located on the Sync server. All your data remains on the Sync server as it was. When you explicitly log out from Sync, the same happens for all the synced data. Please note that quitting the browser does not log you out from Sync.
Delete synced data
To delete synced data from the servers:
Open Sync Settings;
Make sure you’re logged in;
Click on Reset Remote Data.
You will need to make sure that you have all your data client side before doing this to avoid losing data. Note that the data will be re-uploaded if you choose to run sync again in the future.
If, in addition to clearing the data and logging out of Sync, you’re also thinking of deleting your Vivaldi account, please note that when the account is deleted, you will also lose access to all other Vivaldi Community services such as webmail, forum, and blogs and all the data will be deleted. If you still wish to proceed, follow the instructions on our help page about deleting Vivaldi accounts.
Change or reset your account login password
If you wish to change your login password, log in on Vivaldi.net, go to your profile (top right corner) and change it there. In case you’ve forgotten your password, send yourself a password reset email. Note that if you have chosen to use the same password for login and encryption, changing your login password will not automatically change your encryption password and you will have to do this separately.
Change or reset your encryption password
In case you’ve forgotten your encryption password and don’t have a backup encryption key to decrypt the data or just want to change the encryption password:
Open Sync Settings;
Log into your Vivaldi account;
Click on the Forgot Password? button;
In the pop up, click on Delete Data;
Then Start Sync again and enter a new password.
Your data will be deleted from Vivaldi’s Sync servers and re-uploaded from the computer you’re using once you enter a new password. In case the synced data isn’t stored locally on any devices (e.g. after a OS reset) and you don’t have a backup encryption key to decrypt the data, the synced data will unfortunately be lost when resetting the encryption password.
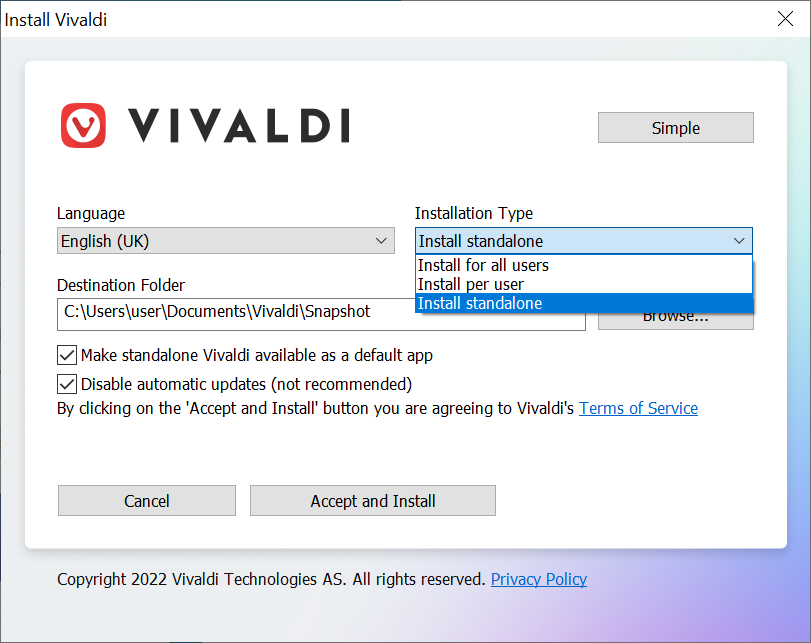
A standalone version can be used for testing a specific setup or version, without touching the system wide settings (profile). It can also be used to create an almost fully portable installation of Vivaldi that you could store on an external disk, for sharing between computers.
Important! Since passwords and extensions are encrypted with a key which is unique to the user profile on each computer, they cannot be transferred.
The following instructions are for Windows. If you are on Linux or macOS, you can run the Snapshot and Stable versions side by side, without having to take extra steps during installation.
Open the installer from the Downloads Panel or from the folder you downloaded it to.
In the installation window select Advanced.
Under Installation type select Install Standalone.
Set a destination folder (anywhere except the Program Files folder)
Click Accept and Install to finish the installation.
To open the browser go to the destination folder > Application > vivaldi. To access the browser easily save a shortcut to your Desktop or pin it to the Start Menu or Task Bar.
We recommend that you tick the additional dialogue box “Register standalone Vivaldi” (see above). This will make the standalone version appear in the Default apps list and will be added as an entry in the Registry of the operating system.
Also, we recommend keeping the option for automatic updates enabled, to make sure you get the latest security updates, newest features and most recent bug fixes.
Updating the standalone version
If you have automatic updates enabled in Settings > General > Updates, the update will be downloaded automatically and installed on the next browser restart. Update ready message will also appear on the right side of the Address Bar when an update has been downloaded. Click on it and then on Restart to complete the update.
To check for updates manually go to Vivaldi menu > Help > Check for Updates and then Install Update.
You can also download the latest update from the website. Just save it to the same folder to keep the settings or create a new folder to have a clean install.
Uninstalling the standalone version
Go to the folder where you saved the Vivaldi standalone folder. If you can’t remember or can’t find it, go to Vivaldi menu > Help > About and take note of the Executable Path.
Close all Vivaldi windows
Delete the folder containing the Vivaldi standalone.
In case you registered the standalone version as a default app, registry keys and update notifiers (if enabled) need to be deleted manually.
Vivaldi is not made available under one unified open source license. It does contain the Chromium source code with changes made to allow the HTML/CSS/JS based UI to run. All changes to the Chromium source code are made available under a BSD license and can be read by anyone on vivaldi.com/source. Details in this regard are explained in the the README and LICENSE files within the package.
In addition, our UI code is written in plain, accessible code for those who read HTML, CSS and JS. This means that for all practical purposes the Vivaldi source code is available for audit.
Vivaldi also contains third party code. Licenses for these parts can be found in the source package and in the installed browser by navigating to vivaldi://credits.