In case you don’t want to get Vivaldi from an app store, you can download the .apk version of Vivaldi from Vivaldi.com/android (click Don’t have Google Play? below the Google Play button).
Important! Updates via .apk install are not automatic. To ensure you are aware of the latest fixes and security updates, we strongly advise subscribing to our Newsletter or RSS feed.
Updating the mobile browser
The app will be updated silently in the background when you have automatic updates enabled in Play Store > account menu (top right corner) > Settings > Network Preferences > Auto-update apps. You can tell that the app has been updated to a new version, when Android’s What’s New page is opened in a new tab.
Widevine is a “Content Decryption Module” (CDM) that provides Vivaldi with support for Encrypted Media Extensions (EME). EME are a form of Digital rights management (DRM) that are required by many, popular audio/video streaming services (Netflix, Amazon Prime, Spotify, Tidal, etc.).
Testing support
To test Widevine support, go to demo.castlabs.com and attempt to play the videos that are tagged with “DRM”.
Installing Widevine
If DRM videos will not play:
Open vivaldi://components
Locate: “Widevine Content Decryption Module”
Click “Check for updates”
Troubleshooting
If the DRM test video will still not play, file a bug report stating that you cannot play proprietary media. Mention your Operating System (including architecture and version).
By default when you close a window, you’ll be asked to confirm your decision. You can disable this option by checking the box Do not show confirmation again next time you see the dialog window or disable/enable it in Settings > General > Close Window > Close Window Confirmation.
Exiting the browser
To close all windows and exit the browser:
On Windows and Linux go to the Vivaldi menu > File > Exit. On macOS Vivaldi > Quit Vivaldi;
On Windows right-click on Vivaldi on the OS toolbar and select Close Window / Close All Windows. On Linux right-click on Vivaldi on the OS toolbar and select Quit / Quit # Windows; On macOS right-click on Vivaldi on the dock and select Quit;
Use a Keyboard ShortcutAlt+F4 (Windows) / Ctrl+Q (Linux) / ⌘ Q (macOS) to close all windows and exit;
On Windows and Linux, there’s also an exit confirmation option, which you’ll see when you’re about to close the last open window. You can also disable this option by checking the box Do not show confirmation again next time you see the dialog window or disable/enable it in Settings > General > Exit > Exit Confirmation.
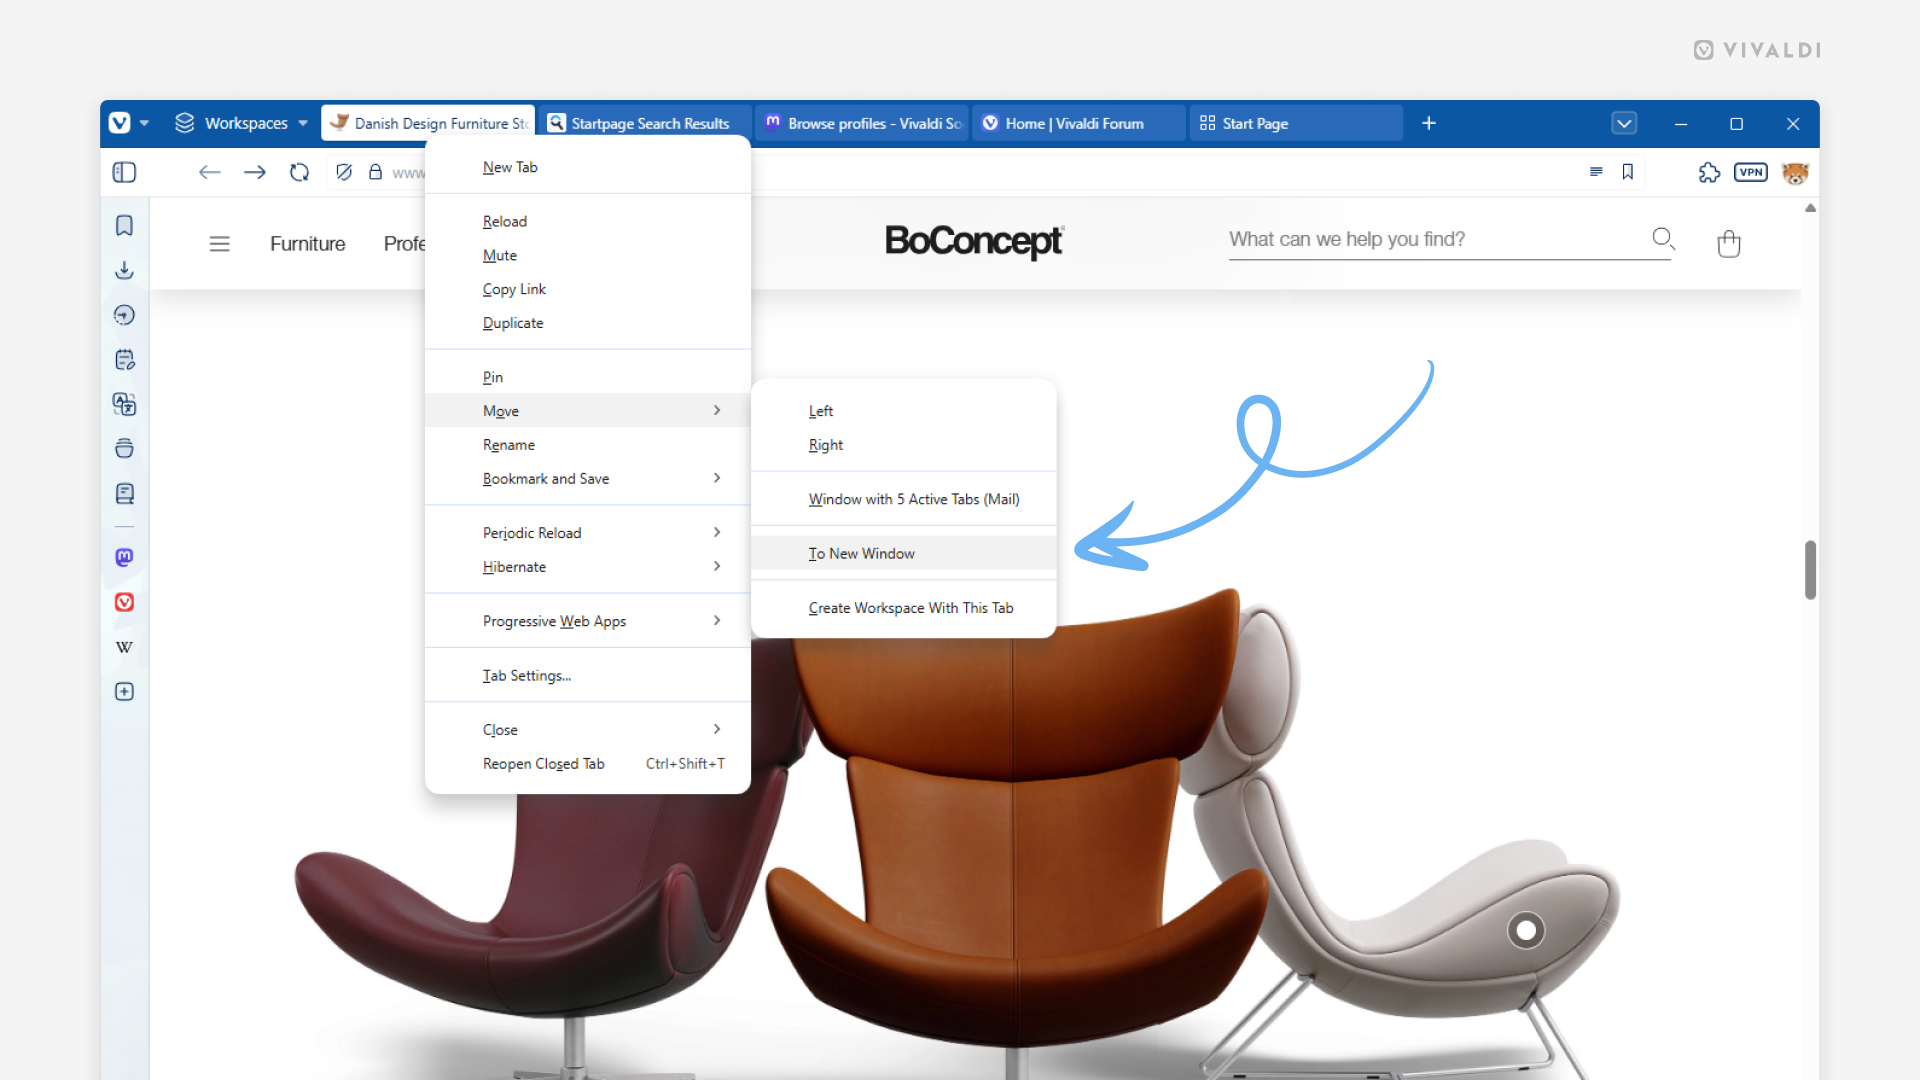
Reopening recently closed windows
The Closed Tabs button, located at the far end of the Tab Bar and in the Window Panel, contains a list of previously closed Tabs and windows within the latest session.
To reopen a window:
Open the Closed Tabs menu;
Select Window with # Tabs and;
Click on Restore All to open all Tabs or on a single Tab on the list to open a specific Tab.
It’s also a good place to look for your Tabs and windows if, for some reason, the browser didn’t open with your previous session (after a crash for example). Please note that multiple browser restarts will erase the Close Tabs history.
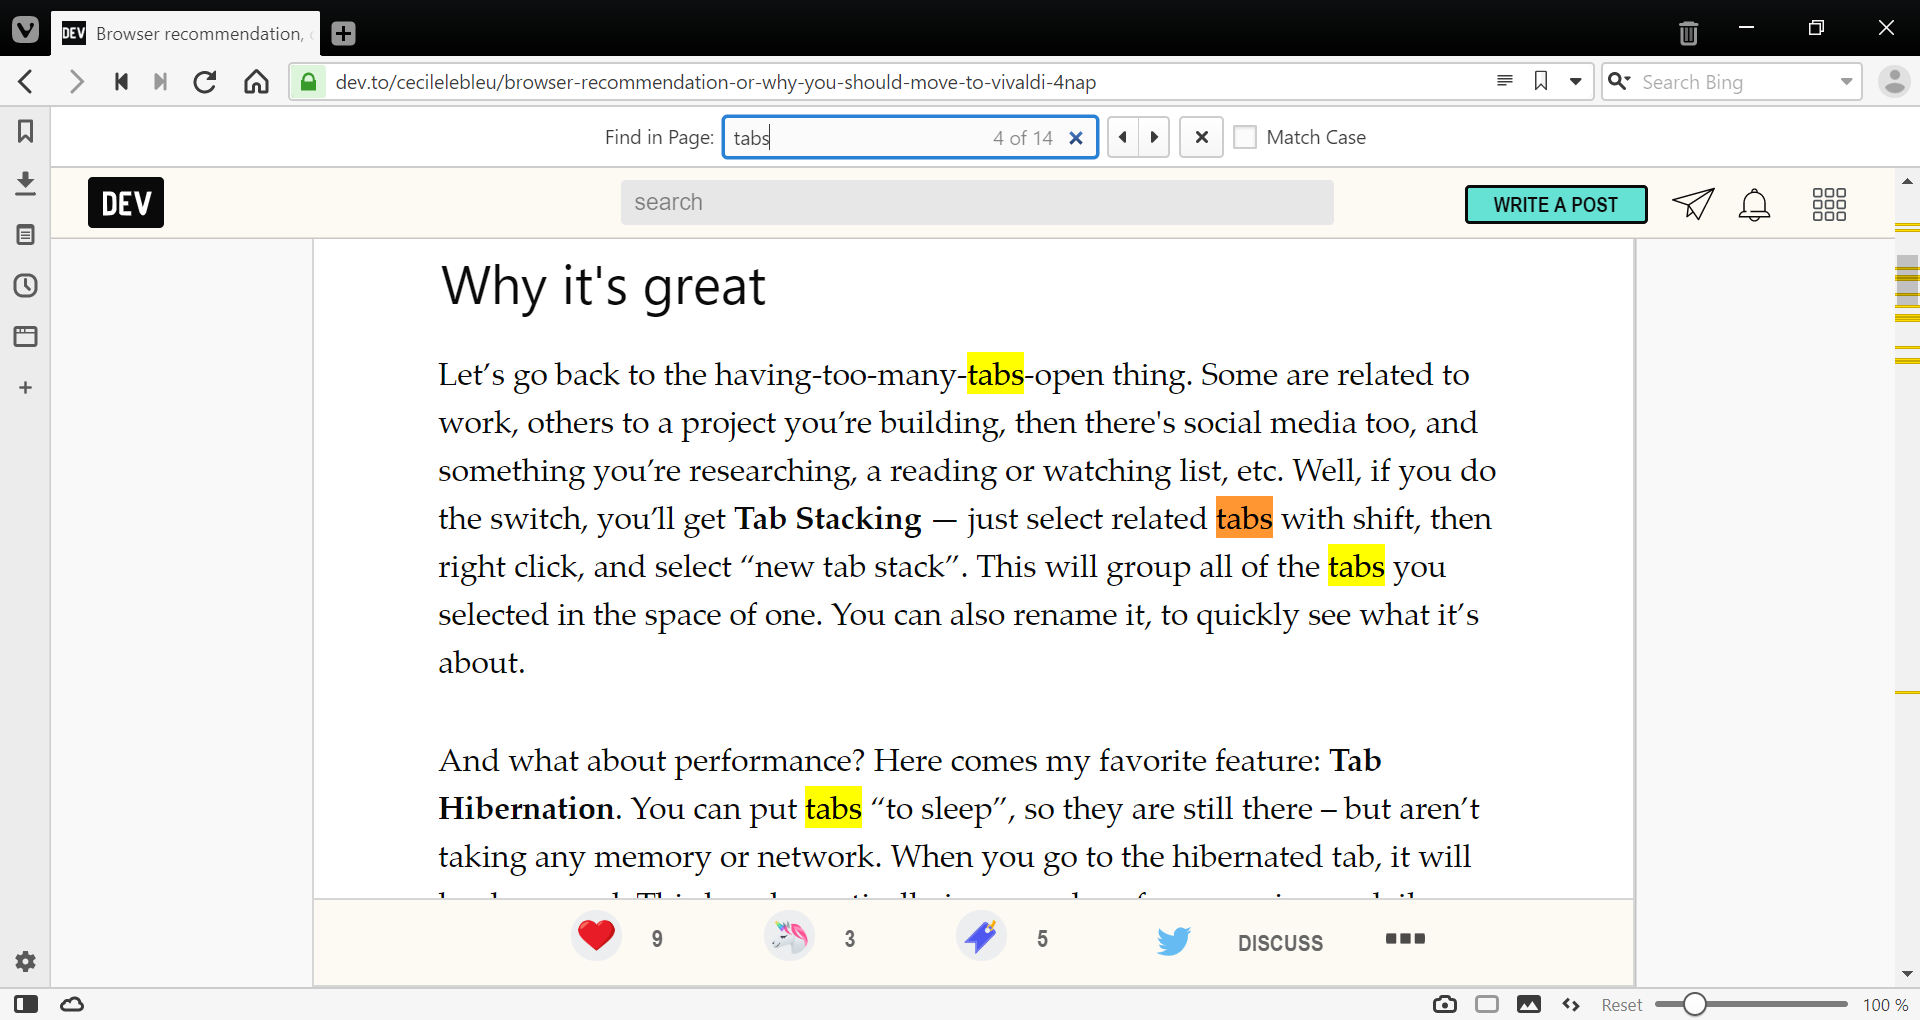
For a complete overview of visited pages, visit History by:
Going to Vivaldi menu > Tools > History menu;
Clicking History on the top menu on the Start Page, or
Integrate Vivaldi with the rest of your operating system’s user interface.
Use OS-based window controls.
Display the Active Tab’s full title.
Make use of macOS’ Split View feature.
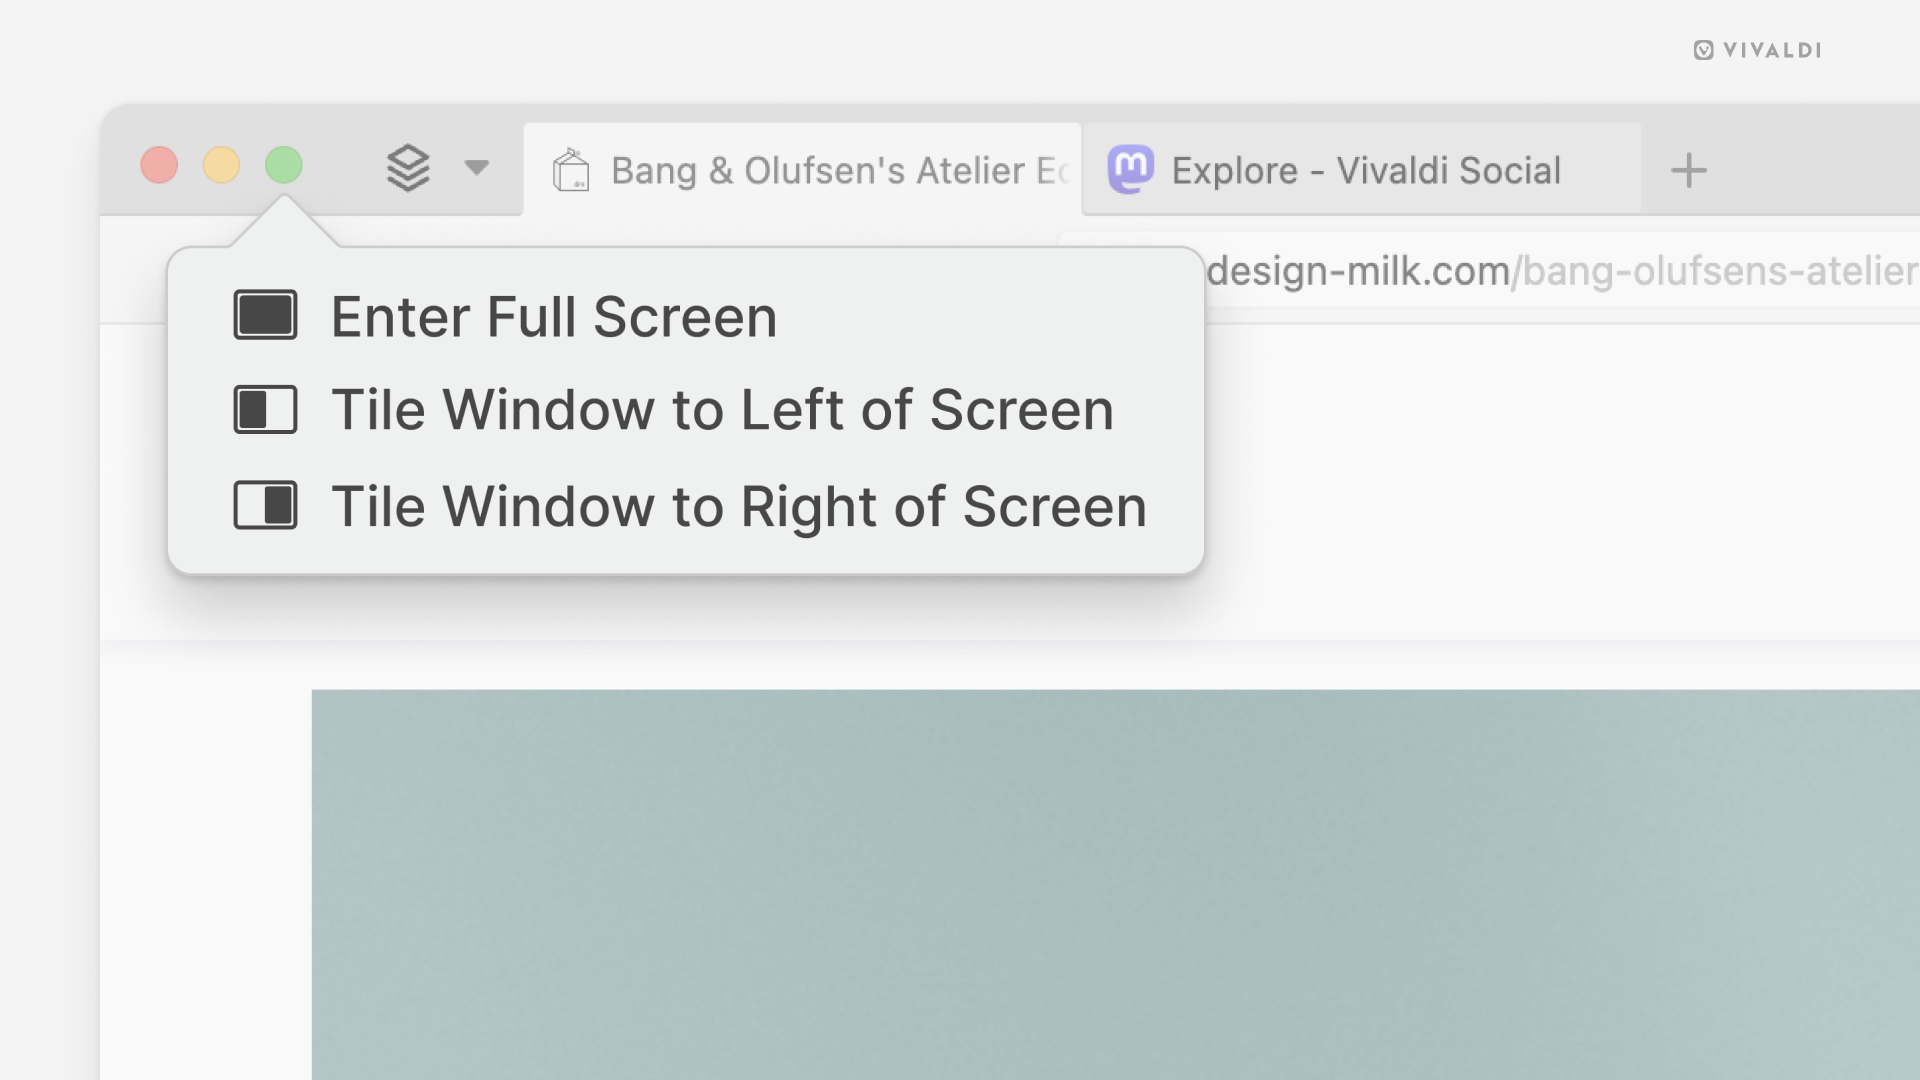
Tile apps with window split view
Many modern operating systems have made it easy to tile different apps and windows on the screen.
To tile Vivaldi with other apps on Windows:
Hover over the maximize button in the top right corner.
Select your preferred tiling option.
You can also click on the Tab Bar or the native window’s title bar and drag the window to different points on the edge of the screen to snap the window to a grid.
To tile Vivaldi with other apps on macOS:
Hover over the maximize button in the top left corner.
Select your preferred tiling option.
On Linux, tiling windows and apps depends on the distro’s window manager, but many allow snapping to a tiled grid by dragging the window or using keyboard shortcuts.
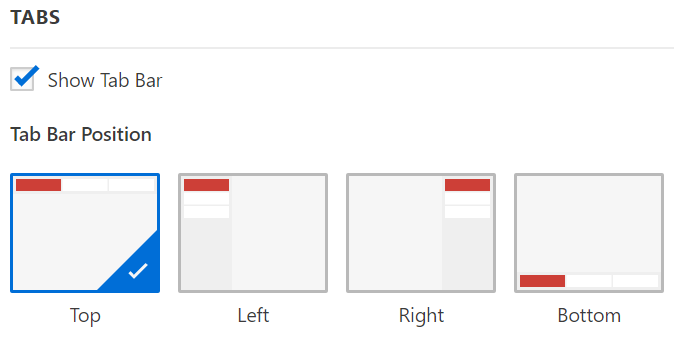
In Vivaldi, you can choose how to display your tabs in a few simple steps.
Tab Bar position
The Tab Bar can be located on any side of the browser window – top, bottom, left, right. To change the position, go to Settings > Tabs > Tab Bar Position.
Toggle Tab Bar visibility
To toggle the visibility of the Tab Bar, either:
Open Settings > Tabs and untick the box for Show Tab Bar to hide it. Tick the box again to show the Tab Bar;
When the Tab Bar is either on the top or bottom of the window, you can assign a minimum tab width for the active tab. In Settings > Tabs > Tab Display, select how many pixels the width should be and then, no matter how many tabs are open, the active tab will always be easily noticeable.
If the Tab Bar is on the side of the browser window, adjust the width of the Tab Bar by placing the mouse on the edge of the Tab Bar and drag in the desired direction.
Scrollable Tabs
When the Tab Bar is placed horizontally on the top or bottom of the browser window, by default, tabs start to shrink in size, the more you open them. That can result in page titles or even favicons becoming invisible. Enabling Scrollable Tabs can prevent that. When enabled, tabs won’t shrink in size. Instead, they’ll go out of view and you can scroll the Tab Bar to browse through the open tabs.
To enable Scrollable Tabs: 1. Go to Settings > Tabs > Tab Display > Tab Bar. 2. Check the box for Enable Horizontal Scrolling.
To scroll through the tabs:
Hover the mouse over the Tab Bar and use the mouse wheel.
Click on the < > buttons on either side of the tabs.
Long click on the < > buttons to display all open tabs as a list.
In case you have enabled switching tabs by scrolling in Settings > Tabs > Tab Cycler, hold down the Shift key to scroll on the Tab Bar without switching tabs.
Loading progress indicator
When a page is loading the Address Field displays the progress. Additional loading indicators are displayed also on the Tab, which is especially useful for Tabs loading in the background.
In Settings > Tabs > Tab Display > Page Load Progress you can pick between 4 options:
Progress Bar
Favicon Progress
Favicon Spinner
None
Window Background Image
In addition to the active tab colour or Theme’s accent colour, you can show your Start Page background image on the Tab Bar. To enable it:
A “crash” occurs when Vivaldi encounters an unrecoverable error and shuts down unexpectedly or a tab’s contents disappear and are replaced with a “dead bird” image. Information pertaining to the crash is logged by Vivaldi.
Enable automatic crash reporting
When you enable automatic crash reporting, we will receive the crash logs automatically. You can enable crash reporting during the welcome flow after installing the browser, or any time in Settings.
Enable Share Crash Reports to Help Us Improve Product Quality.
Provide additional information
By adding context to the crash, the team will have an easier time fixing the bug that’s causing the crash. You can do that by filing a bug report that gets linked to your crash log.
To file a bug report about the crash:
Go to vivaldi:crashes.
Look for a crash log that was created around the time you witnessed the crash.
Click on Provide additional details. You’ll be taken to our bug report page, where the crash’s ID is already prefilled in the Summary field.
Fill out the form with information you think is relevant to the crash, such as steps to trigger the crash.
Submit the bug report.
Manual crash reporting
Copy and Paste the following text into a terminal window and press “Enter”—triple click to select find "${XDG_CONFIG_HOME:-$HOME/.config}/vivaldi/Crash Reports" -mtime -7 -name \*.dmp | sed 's,.*Crash Reports/,,' | tar CvcJTf "${XDG_CONFIG_HOME:-$HOME/.config}/vivaldi/Crash Reports" - /tmp/Vivaldi_Crash_Logs_$(date '+%Y%m%d-%H%M').tar.xz
You will find a dated “Vivaldi_Crash_Logs” tar archive in your /tmp directory, that you can attach to your bug report.
Then, go to vivaldi.com/bugreport and fill out the form with details about the crash and attach the crash log file to the report.
By default, Vivaldi blocks advertisements on sites with abusive ad practices, such as ads which are purposefully misleading users and ads using abusive technologies – for example, pop-ups that prevent you from leaving the site.
The abusive ad-blocker feature can be disabled in Settings > Privacy and Security > Tracking Prevention > Block Ads on Abusive Sites, but we strongly advise you to keep it enabled.
The abusive ad-blocker gives the browser access to a blocklist which is hosted on our end-to-end encrypted servers. It is updated from the server automatically by the browser, and applied to intrusive websites without needing to contact the server each time.
If you’re looking for additional content blocking options, consider enabling Vivaldi’s Tracker and Ad Blocker or using an Extension.
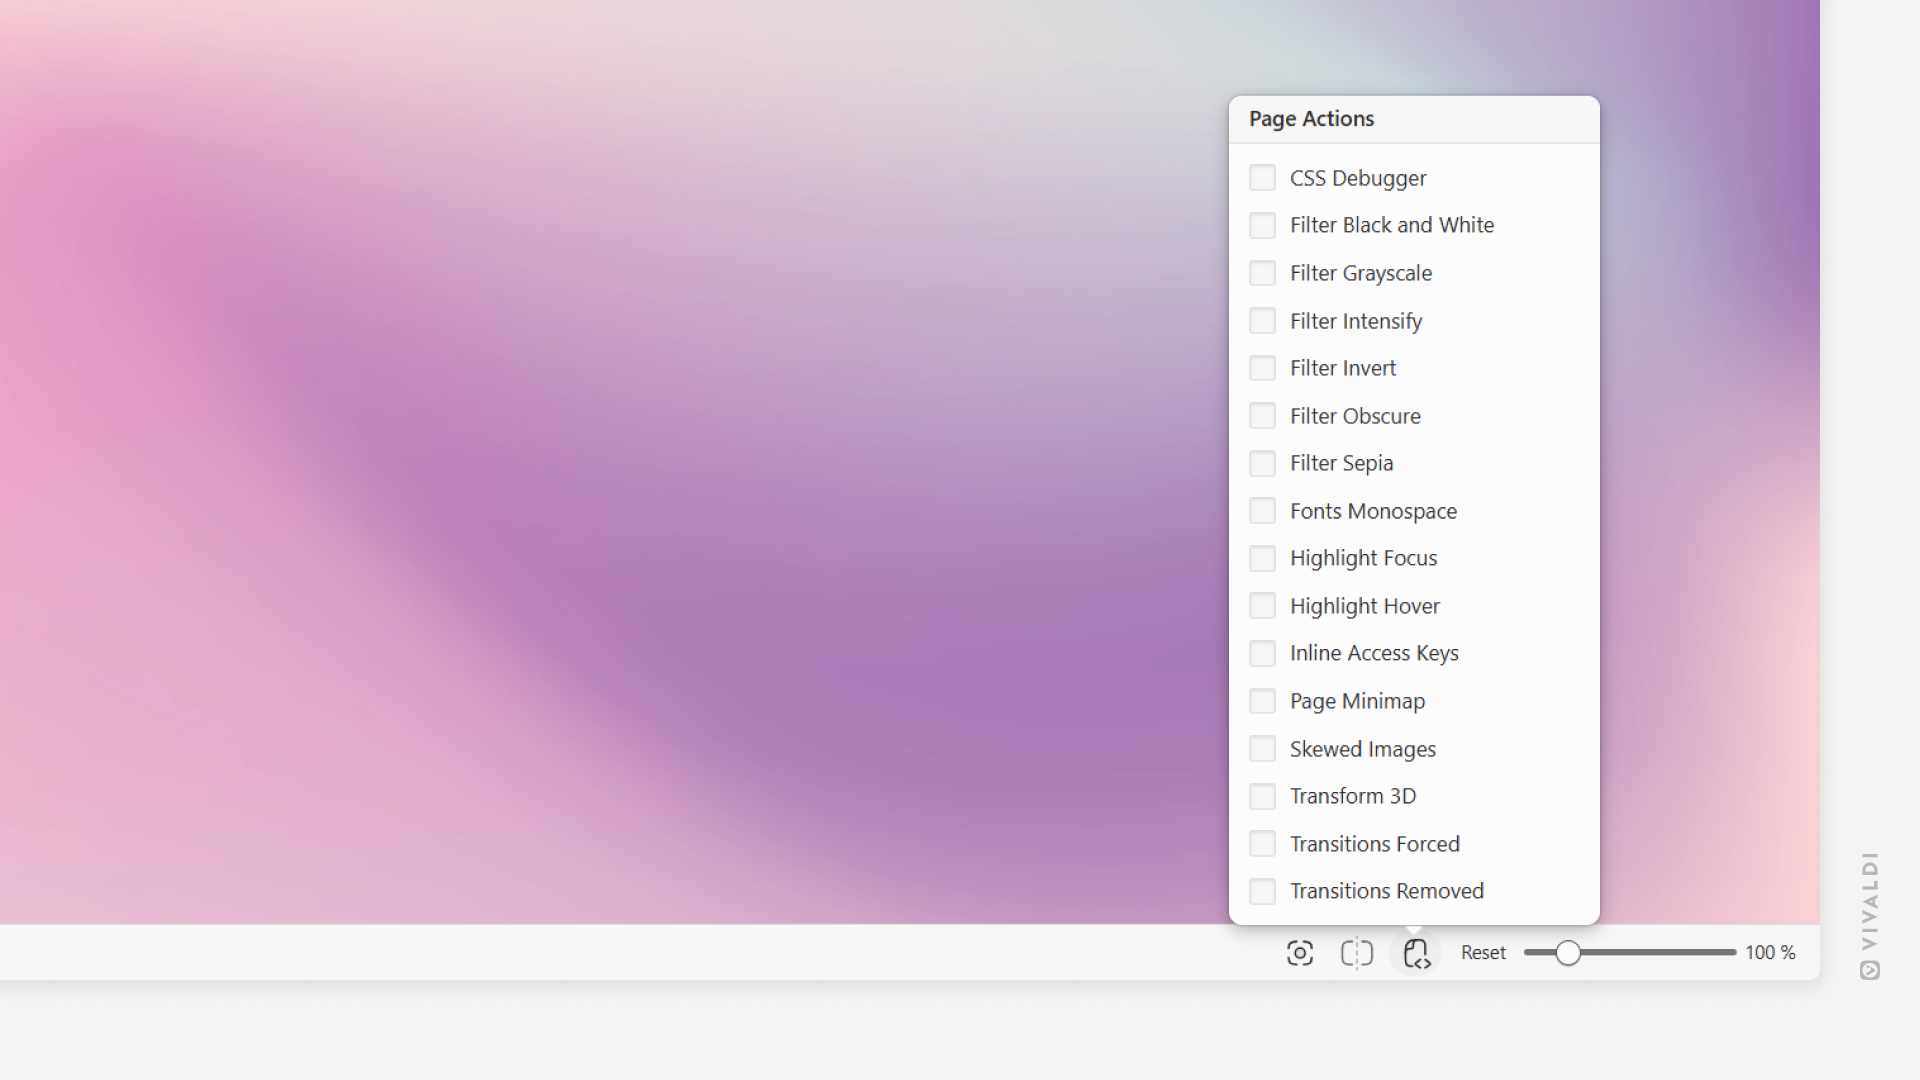
Page Actions are custom filters that modify the look of a page. They allow you to make adjustments to individual webpages, and to make browsing more effective and focused on your individual needs. Page Actions are great for accessibility.
To apply an action, click on the Page Actions button on the right side of the Status Bar and select the one you want to use. Alternatively, type the action’s name in Quick Commands, or create a Keyboard Shortcut or a Mouse Gesture to toggle your favorite actions on and off.
The action will only be applied to the active Tab and won’t be disabled if you navigate to a different website in that tab. In many cases, multiple page actions can be applied simultaneously.
When you turn off a Page Action, the page will reload.
Available Page Actions
CSS Debugger – outlines various element types for a simple CSS inspection;
Filter Black and White – turns the page into black and white;
Filter Grayscale – changes the page’s colors to grayscale;
Filter Intensity – adds saturation and contrast to the images on the site;
Filter Invert – flips the page colors (i.e. turns white to black);
Filter Obscure – hides the content by blurring the page when the mouse cursor is moved outside of the window;
Filter Sepia – changes the page’s color scheme to reddish-brown;
Fonts Monospace – forces the text to be displayed in a monospace font. You can change the used font in Settings > Webpages > Fonts > Monospace;
Highlight Focus – displays a box around the focused content;
HighlightHover – displays a box around the content the mouse cursor is hovering over;
Inline Access Keys – shows the available keyboard shortcuts to interact with the website’s key features;
Page Minimap – shows a miniature schematic of the current page with visible area highlighted. Click or drag on the map to change your location on the page.
Skewed Images – tilts images at an angle;
Transform 3D – distorts the whole page on hover;
Transition Forced – makes transitions more prominent;
Create a Mouse Gesture and use it to open Print Preview.
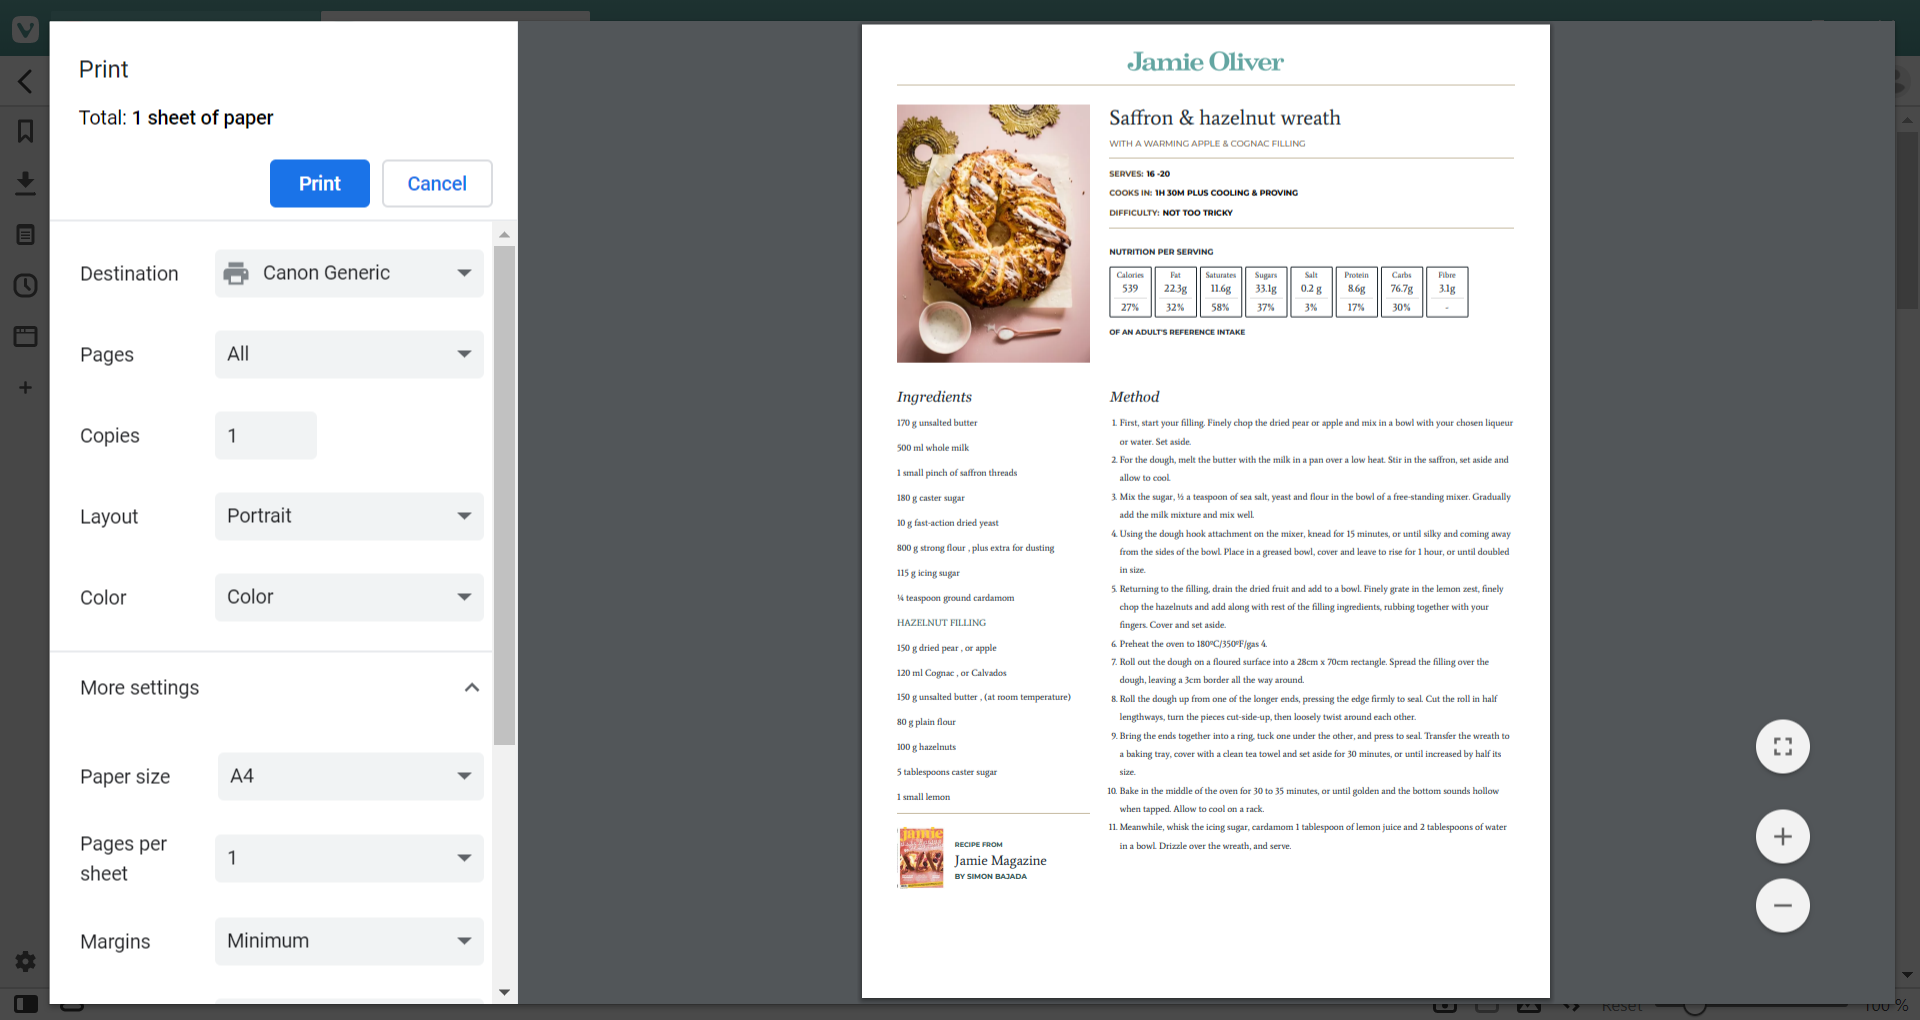
Print Preview
In the print preview window you can make many adjustments for the printable page.
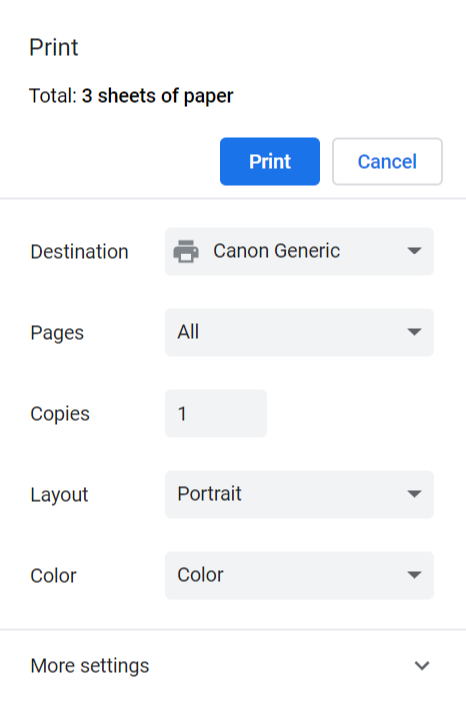
Print destination – Pick which of your connected printers should print the page. Save as PDF is also an option.
Pages – If you don’t want to print everything, select Custom and type the page numbers of the ones you want to print.
Copies – Change the number if you need more than one copy of the page.
Choose layout – Choose between portrait and landscape.
Color – If you have a color printer, but want to print the page in grayscale, select Black and White.
Click on More settings to reveal even more options.
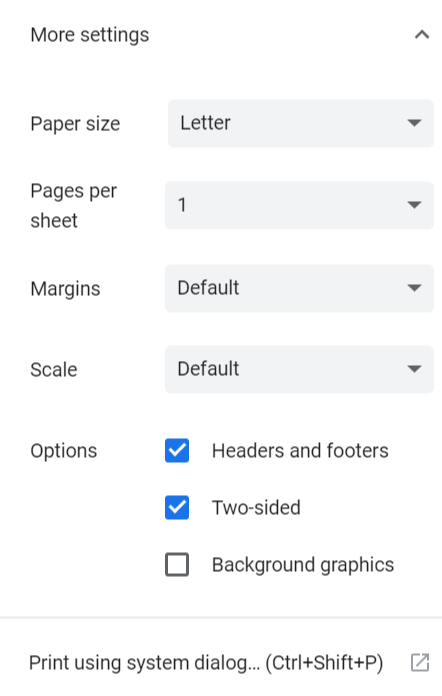
Paper size – To make the print fit perfectly, change the paper size to match the paper you’re printing on.
Pages per sheet – Fit more on less paper.
Margins – Determine, how much space should be between the edge of the paper and printable content. Be careful to leave enough space as most printers won’t print very close to the edge.
Scale – Zoom in for bigger text and zoom out for the opposite.
Headers and footers – Decide, whether you want to print the date, title and URL.
Two-sided – In case your printer can print on both sides of the paper, you can
Background graphics – Tick the box, if you need the page’s background graphics (e.g. color) to be printed as well.
If you prefer the system dialog for printing click on Print using system dialog.
Print with Reader View
Many websites, especially news sites, strip the printable page of irrelevant content. In case the web page you’re trying to print doesn’t do that, you can switch to Reader View, which will remove unnecessary sections and lets you print just the article. In addition, by using Reader View, you can adjust the font, font size, and line height before printing.
Print with Screen Capture
To print the whole website or sections of it, use Vivaldi’s Screen Capture tool to take the screenshot and print the saved file.