If there’s something odd going on in your mail client there are a few things you can do in order to check for errors.
Check the console log for errors
Make sure your Mail tab is open (this is important since you won’t get the right errors otherwise),
In a new tab open vivaldi:inspect#apps,
Look for a long line ending in mail.html (see the following image) and click inspect.
Image 1: Click inspect to open the console
To see any errors the Console tab in the DevTools window should be chosen (has blue underline). See Image 2
Image 2: Make sure the Console tab is chosen in the DevTools window
There’s also an additional background DevTools window that might show more errors. Just follow these similar steps as above:
Again, make sure your Mail tab is open (this is important since you won’t get the right errors otherwise),
In a new tab open vivaldi:inspect#extensions,
Look for a long line ending in _generated_background_page.html (see the following image) and click inspect.
Image 3: The background page Inspect should have a link like this
Quick tip for opening the console
Another way to open the console using the Mail status button.
Open Mail in a tab (this is important since you won’t get the right errors otherwise),
Click on the mail status button. This button can be found in the bottom left of your screen if you haven’t moved it (see image 4).
Click the settings wheel in the top right corner of the pop-up window and pick View Log (see image 5).
Image 4: The mail status button is in the bottom left corner, next to the sync buttonImage 5: Click the settings wheel in the right top corner, and pick View Log
Frequently asked to log in again?
When you’ve chosen to add an account to Vivaldi Mail and/or Calendar using OAuth, occasionally, you can be asked to log in again. This can happen, for example, after you’ve updated your browser to a new version. The login prompt will usually appear after you start the browser as a pop-up window with your service provider’s (Vivaldi.net, Google/Gmail, Outlook, etc.) branding and often, unfortunately, with little to no context as to why you’re being asked to log in.
If you’ve added the email/calendar service provider’s account to Vivaldi Mail and/or Calendar, it’s safe to just log in and carry on with your browsing as normal. Dismissing the prompt without logging in will trigger it again after some time. If you don’t want to log in, you should remove the account altogether in Settings > Mail / Calendar.
Drag it over another tab you want to group it with;
Release the tab to create a new stack.
To create a new Tab Stack with the active tab and a link opened in a new tab from the active tab:
Long-press on the link to open the context menu;
Select Open in new Tab Stack.
Use the above option also when the active tab is already in a Tab Stack and you want to open a link from the active tab in a new tab in the same stack.
To create a new Tab Stack from the Tab Bar:
Have the tab you want to include in the stack open as the active tab.
Long-press on the New Tab button on the right side of the Tab Bar.
Select Create new tab stack.
View and switch tabs
Tab Switcher
On the image below you can see the Tab Switcher with 2 Tab Stacks in the top row and regular tabs below. Tap on the Tab Stack to preview the grouped tabs and open the one you want to view.
No matter your setup, you can access all your tabs from the Tab Switcher. When the Tab Bar is enabled, you can also access all tabs from the Tab Bar.
Tab Stacks pane in the Tab Switcher
To get an overview and manage your grouped tabs in a clean view separate from regular, unstacked tabs, head over to the Stacked Tabs pane.
To view all your Tab Stacks:
Open the Tab Switcher.
Swipe to the Stacked Tabs pane or tap on its icon on the menu bar at the bottom of the screen.
In the Tab Stacks pane, you can find and open one of the stacked tabs, edit your grouped tabs, and delete them.
Tab Stack toolbar
In case you have disabled the Tab Bar, a Tab Stack toolbar will appear just above the bottom toolbar, when you’re viewing one of the grouped tabs.
Tap on the page favicons on the toolbar to switch tabs. Tap on the arrow pointing up on the left side to preview tabs in the stack. To open a new tab in the stack, tap on the New Tab button on the right side of the toolbar.
Two-level Tab Stacks
When the Tab Bar is enabled, grouped tabs will be displayed on the second level of the Tab Bar, just like on desktop. The second level is only displayed when one of the stacked tabs is the active tab.
Locate the Tab Stack you want to rename and tap on it.
In the Tab Stack preview, tap on the current title “# tabs”.
Type a new title.
Tap Done on the keyboard.
Option 2
When you have the Tab Bar enabled, you can:
Long press on the Tab Stack and select Edit Tab Stack.
In the Tab Stack preview, tap on the current title “# tabs”.
Type a new title.
Tap Done on the keyboard.
To remove the name, open the Tab Stack preview again and remove the title.
Add color to Tab Stacks
In addition to renaming Tab Stacks, you can give each stack its own color and make it stand out that way. A little circle with your chosen color will be displayed in front of the stack’s name.
To select a color:
In the Tab Switcher, open the stack you want to add a color to. Alternatively, long-press on the stack on the Tab Bar and select Edit Tab Stack.
A Command Chain is a group of commands executed in a sequence. For example, instead of toggling on first the Reader View and then Fullscreen Mode to focus on what you’re reading, with Command Chains you can do it with a single shortcut in one go.
Change Command 1 to an action you want to execute first.
Click on Add Command on the right side to add the next command in the sequence.
When you’re done adding the commands, click Test Chain to confirm that it works as expected.
Use the command Delay between other commands to give the previous command time to be executed before applying the next command. Delay time is measured in milliseconds and can be adjusted.
To reorder commands in the chain:
Hover over the command.
When you see a Move cursor, drag the command to its new location in the sequence.
Create a new Command Chain from an existing chain
When you want to create a new chain which is very similar to an existing one, you can clone the chain and edit it to make a new Command Chain.
Right-click on the existing chain.
Select Clone Command Chain.
Change the cloned chain’s name.
Edit the commands in the chain.
Use Command Chains
Quick Commands
Once a new Command Chain has been created you can immediately execute it from Quick Commands.
Press Delete on your keyboard or click on Delete Command Chain at the bottom of the list of Command Chains.
Examples of Command Chains
To get some inspiration for what kind of chains you can set up, check out the Command Chains Vivaldi Community members have shared on the Forum – Command Chain Recipes.
With Vivaldi Translate, you can translate full web pages with just a click of a button. No Extensions needed.
Translate a web page
When a website you’re viewing is in a language different from your browser’s user interface language, Vivaldi offers to translate it for you. A banner will be shown just above the bottom toolbar for every language you haven’t made a decision about. The original language of the page is on the left and the translation language on the right. To translate the page to your default language, simply tap on the language on the banner.
To show the page in its original language again, tap on the original language on the banner.
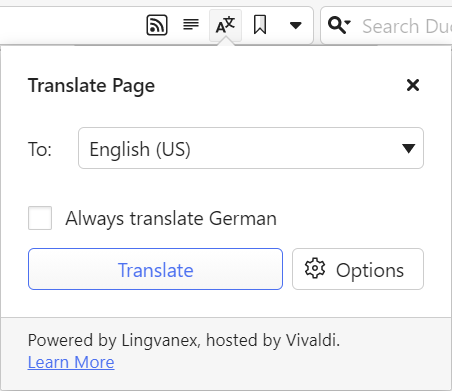
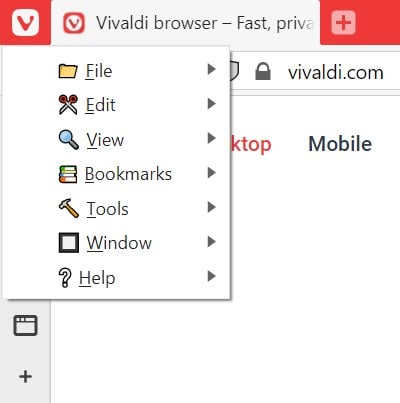
In case, you closed the banner or it didn’t open after the page finished loading, open it from Vivaldi menu > Translate.
Translation options
In addition to translating the page to your browser’s default language, you can choose to translate into any of the supported languages. To change the translation language:
Option 1
Click on the .menu button on the Translation Banner.
Click on More languages.
Select a different language from the menu.
Option 2
Go to Vivaldi menu > Settings > General > Language settings > Translation Settings > Advanced.
Tap on Translate into this language.
Select your preferred language.
To eliminate extra steps for future translations, you can enable or disable translation of certain languages and sites.
To change your preferences:
Click on the .menu button on the Translation Banner.
Change your preferences.
Available options:
Always translate – always translate the current language.
Never translate – never translate the current language.
Never translate this site – never be asked about translation on that particular site again.
Translation Settings
To disable or re-enable the automatic translation banner:
Go to Vivaldi menu > Settings > General > Language settings > Translation Settings.
Toggle on or off Automatically offer to translate pages.
You’ll still be able to translate web pages from Vivaldi menu > Translate.
Advanced settings
To review languages that you’ve chosen always and never to translate:
Go to Vivaldi menu > Settings > General > Language settings > Translation Settings > Advanced.
Click on Automatically translate these languages or Don’t offer to translate these languages, depending on which list you want to review.
Tap on Add language to add a new language to the list or on the menu button next to a language already on the list to remove it.
To reset a setting for a specific language or site:
Type vivaldi://translate-internals in the Address Field;
Go through the list of saved preferences.
Click on X for the ones you want to reset.
Troubleshoot translation issues
When translation doesn’t work as expected, first reset the settings as instructed in the previous paragraph. If that doesn’t help, discuss the issue with the Team and Community on the Forum, to see if others can reproduce the bug or have suggestions for a fix.
With Vivaldi Translate, you can translate full web pages with just a click of a button. No Extensions needed.
Translate a web page
When a website you’re viewing is in a language different from your browser’s user interface language, Vivaldi offers to translate it for you. A pop-up will be shown for every language you haven’t made a decision about. To translate the page to your default language, simply click on Translate in the pop-up dialogue.
In case, you closed the pop-up or it didn’t open after the page finished loading, click on Translate Page on the right side of the Address Field.
To display the content of the web page in its original language again:
Click on Translate Page to open the pop-up.
Click on Revert to (original language).
Translate selected text
To translate just a small block of text:
Highlight the text you want to translate.
Right-click on the selected text.
Click on Translate Selection in the context menu.
Once the text has been highlighted, you can also type “Translate selection” into Quick Commands. In addition, you can create a Keyboard Shortcut or a Mouse Gesture for the action.
In the translation overlay, you can change both the source language and translation language.
Show translation in Translate Panel
To display translations of selected text in the panel instead of the overlay popup:
If you prefer the popup dialog, disable the setting.
To learn more, take a look at the Help page about Translate Panel.
Translation options
In addition to translating the page to your browser’s default language, you can choose to translate into any of the supported languages. To change the translation language:
Click on Translate Page in the Address Field.
In case you already translated the page to another language, click Revert to (original language).
Select a different language from the drop down menu.
Click Translate.
To eliminate extra steps for future translations, you can enable or disable translation of certain languages and sites.
To change your preferences:
Click on Translate Page in the Address Field.
Click on Options.
Change your preferences.
Available options:
Always translate – always translate the current language. Alternatively, tick the Always translate checkbox above the Translate button.
Never translate – never translate the current language.
Never translate this site – never be asked about translation on that particular site again.
Offer to translate pages – disables the automatic translation of pages and pop-ups that show automatically. The button remains in the address field to reverse the action.
Translation Settings
To disable or re-enable automatic translation pop-ups:
Option 1
Click on Translate Page in the Address Field.
Click on Options.
Click on Offer to translate pages. When disabled the option doesn’t have a check mark in front of it.
To reset a setting for a specific language or site:
Type vivaldi://translate-internals in the Address Field;
Go through the list of saved preferences.
Click on X for the ones you want to reset.
Troubleshoot translation issues
When translation doesn’t work as expected, first reset the settings as instructed in the previous paragraph. If that doesn’t help, discuss the issue with the Team and Community on the Forum, to see if others can reproduce the bug or have suggestions for a fix.
To report a bug to the browser developers:
Open vivaldi://translate-internals.
Take a screenshot of the Prefs tab.
Save the content on the Detection Logs tab by clicking on Dump above the table.
Go to https://vivaldi.com/bugreport/.
Fill in the form making sure to include the following information:
Link of the page where translation fails.
Your default user interface language and the language you tried to translate to.
Other information that helps to reproduce the bug.
Attach the files. You can also send the attachments after submitting the bug report in a reply email to the bug tracking system’s autoreply.
On the forum, to view the latest notifications, click on the bell icon in the top right corner of the page.
Notification Settings
To change, which notifications to receive and where, go to your account menu > Settings and apply your preference in the Notifications and Sounds sections.
Forum Digest emails
In addition to notifications, you can receive a Digest email with the latest topics. Adjust the frequency in Settings > Email.
Digest emails will be sent to your account’s recovery email.
When someone has sent you a private message, you’ll get an unread chat message notification in the top right corner of the forum page. Unread messages will have a pale yellow background.
Send a message
To send private messages to a community member:
Click on the Chat button;
Select See all chats;
Pick a discussion from the list of previous chats or start typing a username to search for users.
Alternatively, go to the user’s profile, click on the menu below the cover image and select Continue Chat With… .
Create a group chat
To start a group discussion:
Open a discussion with one user;
Click on Settings (top right) > Manage Chat Room to add more members;
From chat settings, you can also change the chatroom’s name.
Chat window
If you wish to continue browsing the forum while chatting, opt for the pop-up chat window by clicking on the window toggle in the top right corner. Minimise chat windows to browse the forum. Minimised chats (discussion partner’s avatars or chat bubbles for group chats) will appear in the bottom right corner of the page.
Privacy settings
By default, you can only receive chat messages from users that you follow. To be able to receive private messages from everyone, go to your account menu > Settings > Privacy and untick Only allow chat messages from users I follow.
To view your account’s profile, click on the avatar (username’s first letter if you haven’t uploaded an image) in the top right corner of the forum and select your username. You can change your online status and access other pages from the same menu.
Alternatively, go to the following link while you’re logged in – https://forum.vivaldi.net/me or click on your username in one of the topics you’ve posted to.
On your profile, you’ll see various information about your account. To access some of it, click on the circular button on the edge of the profile cover image to open the menu (see image below).
Profile Cover image
To change your profile’s cover image, hover over the image and click on the leftmost button to upload a new image, middle button to reposition the current image and on the right to remove the image.
Account Profile
To view and change your account information (e.g. login password, avatar), open the account menu from your avatar and select Profile.
The Vivaldi forum is a place to talk about the browser, share customization ideas and clever tricks, troubleshoot bugs, shape the browser’s development, and, why not, just talk about tech with like-minded people from around the world.
Forum categories
Topics are divided into 8 main categories with many subcategories.
Desktop – All topics, including news, bug reports, feature requests, and more about the desktop version of Vivaldi on Windows, macOS, and Linux are in this category.
Mail, Calendar & Feeds – The category to discuss everything related to the browser’s built-in mail, calendar, and feeds clients.
Mobile Browser – All topics, including news, bug reports, feature requests, and more about the mobile version of Vivaldi on Android and iOS are in this category.
Android Automotive – Vivaldi browser is available in numerous cars. This is the place to talk about them.
Let’s talk about Vivaldi – You’ll find Vivaldi’s news, media coverage, and general discussions about the company in this category.
Everything else – All topics that aren’t about Vivaldi can be found in this category.
Local forums – Bigger non-English speaking communities have their own category, where they can have discussions in other languages.
Watching and ignoring categories and topics
To follow or unfollow a category, open it and select your preferred option, Watching or Ignoring, from the drop-down menu above the list of topics. In case the category has subcategories, the menu is between subcategory folders and topics. In addition to watching/ignoring the current category, the change will also apply to all subcategories.
To follow or unfollow a specific topic, look for the same menu in an open topic (see image below). In addition to just Watching and Ignoring, there’s also an option Not Watching.
All your Watched topics are listed on https://forum.vivaldi.net/me/watched. You can access it on your profile from the menu on the edge of your cover image > Watched.
Unread & Recent posts
New posts in categories that you watch but haven’t seen before will appear in the Unread section. Fresh watched posts, both read and unread, are listed in the Recent section.
Topic tags
Tags are another good way to find discussions related to topics you’re interested in. When you create a topic, you can also add tags. Please use the existing ones as much as possible.
Popular topics
Most discussed topics of the day / week / month and all time can be found there.
Upvoting posts
If you like or agree with a post you can upvote it.
Voting is most used in the Feature Requests category. We use upvotes to determine the most popular feature requests.
The button will turn green once you’ve cast your vote. You can view the posts you’ve upvoted on https://forum.vivaldi.net/me/upvoted. It is also available under your profile page if you click on the blue menu button below the cover image.
Every time a post or comment is upvoted, the author’s reputation increases by one point.