Answers to common security-related questions about Vivaldi. The questions and answers can also be found on https://vivaldi.com/security/common-questions/.
I am unable to login or register for my Facebook/Google/Other website account
We make the Vivaldi web browser. We do not own the websites that you visit (except vivaldi.com and vivaldi.net) and we cannot control your accounts on those websites. If you are having problems with your account on a website, you need to contact the owners of that website.
When I log in to my Facebook/Google/Other website account, it tells me that an unknown device or person has just logged into my account
The website owners choose how to notify you when you, or others, try to access your account. The website may be trying to tell you that this is the first time they have seen you using the Vivaldi browser, or some new device. You should contact the owners of the website if you need clarification about what is happening with your account.
When I try to access a website, my government or Internet Service Provider (ISP) blocks it
Your ISP and government choose which websites to block. You can contact your ISP for information about why a website was blocked, and whether it can be unblocked. Alternatively, your ISP may allow a member of your household to choose which websites to block. You should contact them for more information. If you are certain that the website you want to access is actually legal in your country, and if VPNs are also allowed, you may choose to find and use a VPN product to bypass local filtering. See our blog post for more details of VPNs.
Adverts keep popping up unexpectedly while I am browsing websites
(Or lots of adverts are showing on websites in places they are not supposed to have adverts)
Firstly, check that you have not enabled unwanted pop-ups on the website you are visiting. Click the badge to the left of the website address. Select “Site settings – Pop-ups and redirects”, and make sure that pop-ups are blocked. Websites are only allowed to open a single pop-up window when you click or type on the page.
Check that you have not allowed websites to display notifications without your permission. Menu – Tools – Settings – Privacy and Security – Webpage Permissions – Global Permissions – Notifications = ask. You can check if you have accidentally allowed a website to show notifications. Menu – Settings – Privacy and Security – Website permissions. Select “Global Permissions” and make sure Notifications is set to “Block”. Select each listed website in turn, and check that notifications are also set to “Default (Block)” unless you actually trust that website, and want it to be able to show you notifications.
Websites may show adverts as part of the page if the website owner chooses (though you may use advert blocking extensions to block them), and those adverts may be designed to look like a pop-up, but without opening new tabs or windows. Some websites even block access to their own website, in order to show adverts (such as the Tubidy website), either intentionally or as a result of the website being hacked. The website owners would need to fix this, if it is the result of a hack – we cannot do this for them.
If you are seeing more adverts than the website owners intended on many websites, or if windows or tabs still keep opening to show you adverts even if you are not clicking on the page, you may have some malware or virus on your computer/device, that is showing the extra adverts.
If you recently installed another app/application/program, toolbar, add-on tool, or extension, try removing it or disabling it, and see if that fixes the problem.
Install reputable anti-virus and anti-malware products, and use them to scan your computer/device for malware. If you have already tried one product and it found nothing, try using a different product – some may be better than others at detecting certain kinds of malware. This is an essential step, since without removing the actual malware, it could just set itself back up again, and remove any of your fixes. Wikipedia has a good list of products here: https://en.wikipedia.org/wiki/Category:Antivirus_software
Once the virus or malware has been removed, you will need to correct any settings that it had changed.
* Check for unwanted extensions. Menu – Tools – Extensions. Disable all extensions, and see if this fixes the problem. Then enable each extension you wish to keep, checking to make sure that none of those caused the problem to reappear.
* Correct your homepage and startup settings. Menu – Tools – Settings – Startup – Homepage and Startup with, or Vivaldi menu – Preferences – Startup – Homepage and Startup with.
* Open the start page, and check if any unwanted speed dials have been added.
* Check if any unwanted bookmarks have been added. Menu – Bookmarks – Manage Bookmarks.
* Check if any unwanted search engines have been installed. Menu – Tools – Settings – Search, or Vivaldi menu – Preferences – Search. Remove any unexpected search engines, and make sure the correct search engine is set as default. (Or just restore defaults.)
* For Windows users, locate any Vivaldi icons which can be used to start Vivaldi in the Start menu, desktop or Quick Launch. In the Windows 10 Start menu, search for Vivaldi, right click on it, and select “Open file location” to locate the actual icon. Right click on the icons and select “Properties”. Make sure that the target path to Vivaldi is correct, without any unwanted website addresses.
If you need assistance with these steps, consult a local computer servicing centre.
Strict SPF, DKIM and DMARC records are needed to prevent email spoofing
SPF, DKIM and DMARC do not prevent email spoofing. SPF protects only the envelope MAIL FROM header. It does not protect the email DATA “From:” header, which is what the recipient sees. DKIM (when enforced with strict DMARC) tries to protect the email DATA “From:” header, but it fails to cope with the reality that email clients accept multiple headers, and will show a different one than the one that DKIM will end up protecting. Strictly enforced DKIM also prevents or hampers the use of mailing lists, and is often undesirable. Email spoofing will always be possible one way or another, because of the flexibility of email. SPF, DKIM and DMARC cannot prevent that, unfortunately.
Most pages on the website do not have clickjacking protection
Most pages do not need clickjacking protection. Clickjacking attacks depend on the page performing a harmful action in response to simple clicks or keypresses. That is not possible on most pages. We enable clickjacking protection on pages where it is needed.
PrivacyTests.org (or a similar website) results show that Vivaldi does not block tracking
The results shown on that testing website are misleading. When you enable tracker blocking in Vivaldi, it does block actual trackers, but the tests on that website assume that browsers must use an approach that causes problems with legitimate websites. It does not test using actual trackers.
There are several different ways that a privacy oriented browser could try to prevent tracking online. It could simply refuse to support things that might get used for both legitimate purposes and tracking, such as localStorage and cookies (third party or otherwise), or APIs that might provide useful data to websites, such as the dimensions of your screen. This will definitely cause many legitimate websites to break. It could rely on heuristics to detect fingerprinting or tracking being used, and try to selectively disable things if they get used too often, in a pattern that appears to be tracking. This will randomly break legitimate websites or create false positives and negatives. Alternatively, the browser could use a reliable list of known tracking websites, and simply block access to those websites, so that no resources (first or third party, as needed) ever load from those websites. This prevents known tracking websites, without breaking legitimate websites, except in very rare cases where websites intentionally break themselves when trackers get blocked.
Vivaldi uses the approach of blocking known tracking websites. That testing website assumes that browsers can only use the other approaches, and does not test for Vivaldi’s approach. Therefore, the only way to make that website show a “PASS”, is to knowingly risk breaking legitimate websites, then add special hacks in for important websites to un-break them. We do not generally like that approach, as it will cause more issues on less frequented websites.
Vivaldi’s approach allows the APIs to work on websites that use them for legitimate purposes. There are pros and cons to either approach, but we favour the approach that causes least disruption on legitimate websites, while still protecting your privacy. The approach used by Vivaldi is similar to the approach used by virtually all browsers to protect against phishing, fraud, malware, and other malicious websites. That testing page does show a couple of minor things that should be different, however, and we are looking into those.
Vivaldi says that the website I am visiting is phishing, or serving malware
Vivaldi uses Google’s Safebrowsing API to detect websites that are known to be serving malware or phishing. It is possible for even a legitimate website to be hacked and have malware or phishing content installed on it. Normally, the website owner will then discover the problem, and remove the malicious content. The Safebrowsing project will periodically re-check the website and remove it from the blacklist once they detect that the malicious content has been removed. However, if Vivaldi displayed a warning on a website that you are certain is not infected, and you would like to ask the Safebrowsing project to re-check the website, you can report it to them here:
https://safebrowsing.google.com/safebrowsing/report_error/
If you are the owner of the website, you should make sure that any phishing or malware has been removed, including any conditional redirects to other websites, before contacting the project. Check the Webmasters section of the Safebrowsing website for more information:
https://safebrowsing.google.com/
A website is serving malware or phishing, but Vivaldi does not block it
Vivaldi uses Google’s Safebrowsing API to detect websites that are known to be serving malware or phishing. The Safebrowsing project periodically checks websites, to detect malicious content. However, if Vivaldi did not display a warning on a website that you suspect is malicious, and you would like to ask the Safebrowsing project to check the website, you can report it to them here:
https://safebrowsing.google.com/safebrowsing/report_badware/
https://safebrowsing.google.com/safebrowsing/report_phish/
My anti-virus product says that the Vivaldi installer contains a virus
Depending on how your anti-virus product has been configured, it may create what are called “false positives”; where it claims something contains a virus, when it actually does not. Make sure you have downloaded an authentic copy of Vivaldi from our website. If your anti-virus product still complains, you may wish to check whether it has been configured with its settings set too sensitive (eg. using heuristics in extremely sensitive mode). You can consult with your anti-virus product vendor to ask what settings are best.
If the settings are correct, and you have downloaded an authentic version of Vivaldi from our website, you can contact your anti-virus product’s vendor to report their product’s mistake. Alternatively, you can file a bug report with us to let us know, and we can contact them on your behalf. Please provide as much detail as possible about which anti-virus product you are using, and what settings you have selected in that product. Some anti-virus product vendors take a few days to update their product after new Vivaldi releases, to recognize the new version.
Note that online services such as VirusTotal may report far more false positives, because they use multiple anti-virus products set to their most overly sensitive settings. Some of these engines are far more likely to show false positives than others.
My anti-virus product says that my Vivaldi cache files contain a virus
Occasionally, malicious or hacked websites may attempt to serve virus contents as part of a page. These are then downloaded into the browser’s cache when you load the page. These viruses normally target outdated versions of other browsers, and do not cause any harm at all to Vivaldi. Therefore, although it is alarming to see the warning, it normally does not cause any problems for either Vivaldi, or your computer, by having these detected in your cache. Some anti-virus products are configured to ignore browser cache folders, for this reason.
When I try to visit a website, it says I have viruses on my computer/device
Websites may sometimes display fake virus warnings, hoping to convince you to install some malware disguised as an anti-virus product to remove them, or hoping you will follow other malicious instructions. These warnings are almost always fake and malicious. Simply close the website, and browse elsewhere. You may also choose to report the website to the Safebrowsing project, so that it can be blocked in future:
https://safebrowsing.google.com/safebrowsing/report_badware/
https://safebrowsing.google.com/safebrowsing/report_phish/
A product is using an outdated version of Chromium
Vivaldi is based on what is called the “Extended Stable” release channel of Chromium. This channel releases a feature update every 8 weeks. This channel uses a different version number from the standard release channel of Chromium, and it is therefore normal for the version number to appear not to match the latest versions of some other browsers based on Chromium. This means that the browser can appear to have a slightly older version number, in spite of actually being completely up to date. It also means that new Chromium features will be added when they land on the Extended Stable release channel, not the standard release channel.
However, it should be noted that security issues often get patched out of schedule, and the patches can be applied to any channel, if they are relevant to that channel. At Vivaldi, we aim to include important security and privacy patches and enhancements, as soon as a patch is available. This can mean that even if the Chromium version number appears to be a few weeks old, a release can include all applicable security patches, and be completely up to date from a security perspective.
We try to keep as up to date as possible with the Extended Stable release of Chromium in our products. However, sometimes the version of Chromium we are using falls behind the current release, depending on where we are in a release cycle at that time. In these cases, we aim to include security patches from the current release, even if the Chromium version number is a little behind the Extended Stable release channel of Chromium.
Whenever we release a stable version of Vivaldi, it includes applicable security patches for the current version of Chromium, even if it is based on an older Chromium version. As a result, as long as you allow Vivaldi to install updates, you will have important or relevant security patches from the current version of Chromium, no matter which version of Chromium it appears to be based on. Even if the Chromium version is behind either the standard Chromium release channel or Extended Stable Chromium release channel, the latest version of Vivaldi almost certainly already has all applicable security and privacy patches. We know how important it is to keep up to date with security patches, and we do our best to make sure that you can rely on Vivaldi to keep you safe.
Third party software is out of date on the website
Third party software is updated on a schedule determined by the system administrators. We do try to keep it as up to date as needed. If the third party software vendor releases a fix for a security issue, we may sometimes choose to patch the individual issue without updating the software version. As a result, even though the software version may not be the latest, it will often have the security fixes anyway. In some cases, we may not need to update the software or apply patches, if we are not actually using an affected part of the software.
Thanks for your feedback!
 Reply / Reply to thread below the post.
 More menu.
 Open in New Tab button in the top right corner of the preview.
  Close button or swipe down on the preview.
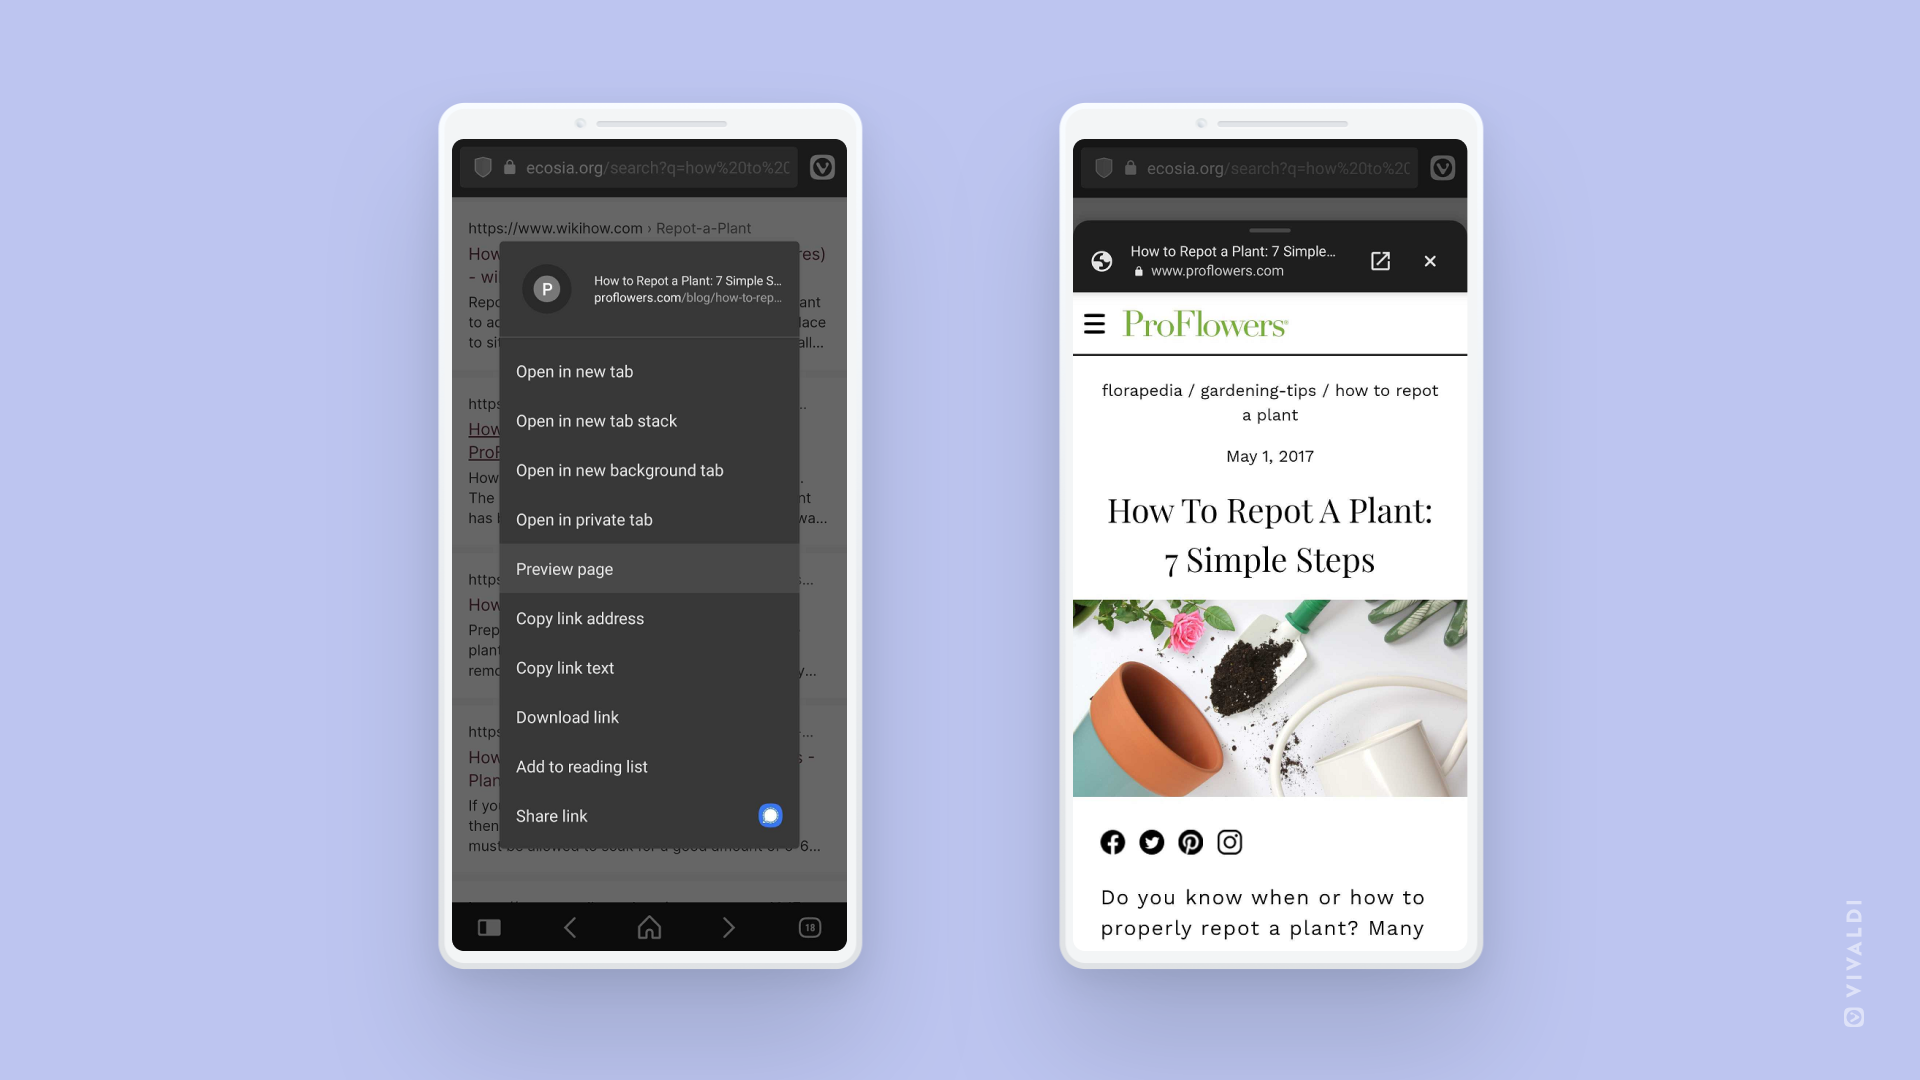


 , not secure
  or even dangerous
  .
.