Hold down the Shift key to select multiple tabs in a row or Ctrl/⌘ key to select tabs that aren’t necessarily next to each other.
While you hold down the key, click on the tabs you want to select.
Quick Commands
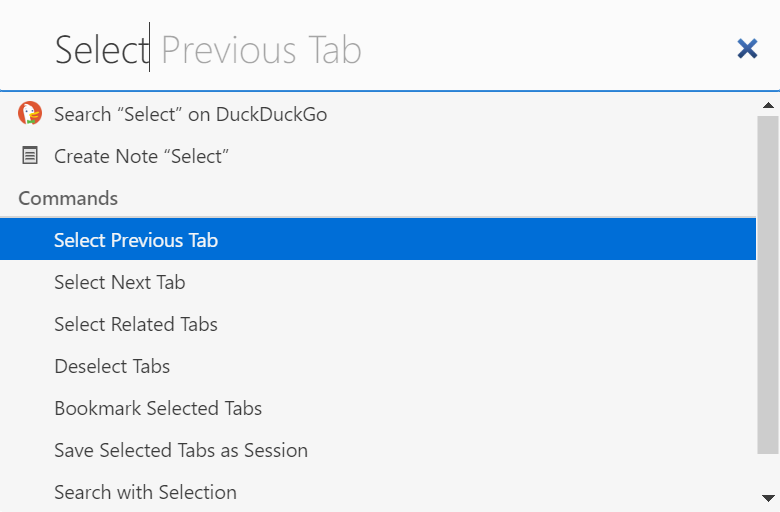
Open Quick Commands (F2/⌘ E) and start typing either: Select Previous Tab, Select Next Tab, Select Related Tabs or Deselect Tabs to execute the command.
Keyboard Shortcuts
In Settings > Keyboard > Tabs you can configure new Keyboard Shortcuts for selecting and deselecting tabs.
Mouse Gestures
If you prefer Mouse Gestures, create gestures for tab selection in Settings > Mouse > Gesture Mapping.
Combine Vivaldi on Windows with Razer Chroma to make browsing more immersive and personal.
Enabling Razer Chroma on Vivaldi
Make sure your Chroma devices are connected to your computer.
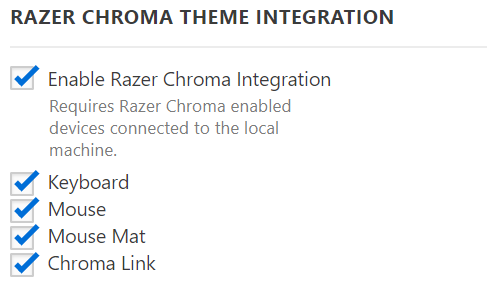
Go to Settings > Themes > Razer Chroma Theme Integration.
Make sure the box for Enable Razer Chroma Integration is ticked.
Select the devices you want to sync with Vivaldi.
If Chroma integration is enabled in Vivaldi, but the device colors don’t match the browser, check Razer’sSynapse > Connect > Apps and make sure Vivaldi is enabled and on top of the list.
If Accent Colour from Active Page is enabled in Settings > Themes > Edit Theme > Theme Preferences, the Chroma devices will change color based on the active tab’s webpage color. When disabled, your theme’s accent color will be used. If you’ve set up Scheduled Themes, Chroma colors will change when the Theme changes.
With Vivaldi’s Quick Commands feature you can do various calculations in a blink of an eye.
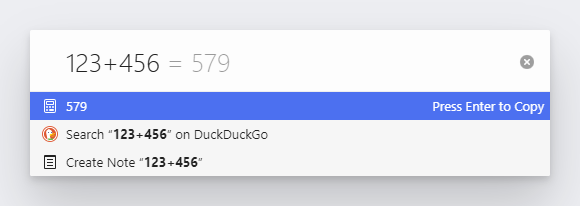
Open Quick Commands by pressing F2 / ⌘ E on your keyboard and start typing the equation. For example, “5166/123”, “sqrt 9”, etc.
The solution will appear below the input field and in a faded color also after the equation in the input field. When you press Enter, the solution will be automatically copied to your clipboard.
Types of calculations currently available:
Addition (x+y)
Subtraction (x-y)
Multiplication (y*z or y x z)
Division (x/y)
Remainder (x%y)
Power / exponentiation (x^y)
Root (sqrt x)
Factorial (x!)
Logarithms (ln x, log x, log10 x)
Trigonometric functions (sin x, cos x, tan x)
Inverse trigonometric functions (asin x, acos x, atan x)
It’s always good to keep your browser up to date in order to enjoy the newest features and get the latest bug fixes and security updates. A new version of Vivaldi is released roughly every 8 weeks, with a few minor updates in between.
Here’s how to update your Vivaldi browser:
Automatic Updates
When you have Automatically Download and Install Updates enabled in Settings > General > Updates > Show Update Settings, the update will be downloaded in the background and installed on the next restart. Restart Required message will also appear on the right side of the Address Bar when an update has been downloaded. Click on it and then on Restart to complete the update.
If Vivaldi was initially installed for All Users (an advanced option provided by the Vivaldi installer), this setting will be renamed to Automatically Download and notify when they are ready to install and updates will not be fully silent. The updated version will be downloaded in the background and a Windows notification will display to inform you when it is ready to install. Clicking on this will trigger the upgrade process and you will be presented with a User Account Control (UAC) dialog by Windows to complete the upgrade for all users on your system.
Check for updates manually
Go to Vivaldi menu > Help > Check for Updates. When an update is available, a dialog with the changelog will open.
Click on Install Update in the bottom right corner to update Vivaldi.
Download the latest version from the web
Visit Vivaldi.com, download the latest version, and install it to the same location with the same settings as the current browser.
Automatic Updates
When you have Automatically Download and Install Updates enabled in Preferences > General > Updates, the update will be downloaded in the background and installed on the next restart. Restart Required message will also appear on the right side of the Address Bar when an update has been downloaded. Click on it and then on Restart to complete the update.
Check for updates manually
Check for Updates manually from the top menu Vivaldi > Check for Updates. If the menu item is inactive, you already have the latest version.
Download the latest version from the web
Visit Vivaldi.com, download the latest version and install it to the same location with the same settings as the current browser.
Vivaldi on Linux gets updated automatically with the rest of the OS components.
If, after an update, the browser doesn’t function as it used to, try troubleshooting the issue. It’s strongly discouraged to downgrade to an older version as it can corrupt the browser profile and cause issues, if not immediately, then in the future.
Cookies are small pieces of data (text files) that a website – when visited by a user – asks your browser to store on your device in order to remember information about you, such as your language preference or login information. The cookie will be used to recognize you and your preferences the next time you visit the site.
Decide whether you want to accept all cookies, only allow them for the current session, or never accept them.
Third-Party Cookies
When First-Party Cookies are set by the website you see in the address field, then Third-Party Cookies are set by other domains. These cookies may be used for showing content from other domains (for example, an embedded YouTube video), advertising (to show you ads based on your browsing habits), etc.
Third-party cookies are blocked by default only in Private Windows. To block third-party cookies in all windows:
Go to Settings > Privacy and Security> Cookies > Third-Party Cookies.
Select Block All.
Note! Blocking cookies can cause a website not to work properly if the website uses multiple domains for their content.
Do Not Track
In Settings > Privacy, you can also enable the option Ask Websites Not to Track Me. It’s a polite way to ask websites not to set tracking cookies. However, they can simply ignore it, and in most cases, the ones you want to avoid will be the ones who do not respect your request.
Go to the Vivaldi menu > Tools > Delete Browsing Data.
Pick the time frame you want to delete cookies for;
Select Cookies for the data type to be deleted;
Click Delete.
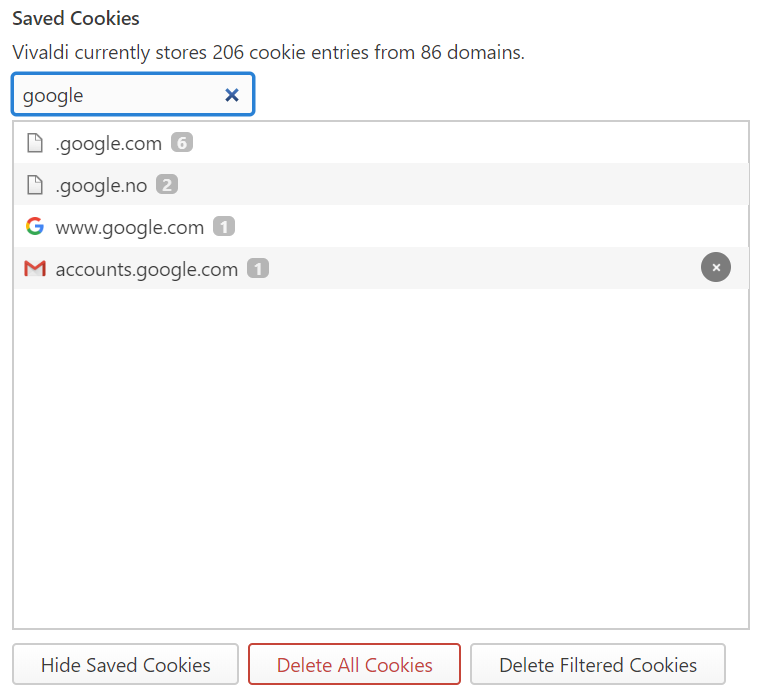
Alternatively, go to Settings > Privacy > Cookies. There you can view all the saved cookies by clicking on Show Saved Cookies. You can also filter them by domain. To delete all cookies, click on Delete All Cookies.
Delete Cookies from a specific website
To delete all cookies by the same domain:
In Settings > Privacy > Cookies, click on Show Saved Cookies;
In the search field. enter the domain name to filter out the cookies;
Click on Delete Filtered Cookies.
To delete a single cookie, hover the mouse cursor over it and click on X that appears on the right side.
Delete all site data per website
To delete all site data, including cookies for one site:
Open the website.
Click the Site Info button on the Address Bar and select Site Settings from the menu.
In the Usage section, click on Clear Data on the right.
Confirm, by clicking Clear in the dialog.
Reload the web page.
Delete Cookies and Site Data by cookie site
Open the website.
Click the Site Info button on the Address Bar and select Cookies and site data > Manage cookies and site datafrom the menu.
Next to the listed sites, click on Delete saved data from [site name] for each item you want to delete.
Click Done.
Reload the page.
Disable/Enable the storing of cookies per site
To block or allow cookies on a specific website:
Open the website.
Click the Site Info button on the Address Bar and select Cookies and site data > Manage cookies and site datafrom the menu.
In the pop-up window, click on More Actions next to each site that wants to save data on the current website.
Select between the following options:
Allow/don’t allow the site to save data.
Allow to save data, but delete the data every time you exit the browser.
Click Done.
Reload the page.
For an overview, go to Settings > Privacy and Security > Website Permissions, where you can see and manage all sites with customized settings.
Hide Cookie warnings
Since Europe’s GDPR and a few other user privacy laws don’t allow placing cookies in your browser without consent, most websites ask for your permission as the first thing after the web page is loaded. The fastest option is to just accept everything, which always serves the interests of the website not the user. The other option is to manage your preferences and disable the data usage options all at once, if you’re lucky, or one by one, if the website wants to make it especially cumbersome.
Vivaldi offers a third option by including two blocker lists in the Ad Blocker that hide annoying cookie banners and dialogs on most websites.
To enable these lists:
Go to Settings > Privacy > Tracker and Ad Blocking;
Enable Block Trackers and Ads;
Click on Manage Sources;
In Ad Blocking Sources, enable “Remove cookie warnings (Easylist Cookie List)”.
If you only wish to hide the cookie warnings, but don’t want to block ads, disable other blocking sources.
Please note that not all cookies are used for creating behavioral profiles about users. Some are necessary for the website to function. When the website you’re viewing doesn’t look or work as it should, please disable the blockers. You can do so per site from the Content Blocker menu on the Address Bar.
User profiles allow multiple “users” to share one Vivaldi installation, without requiring you to log in to a different operating system user account, or maintain multiple Standalone installations.
If a second profile is needed only briefly, for example, for a friend to use your browser (without messing up your setup or interacting with your open tabs), use a temporary Guest Profile.
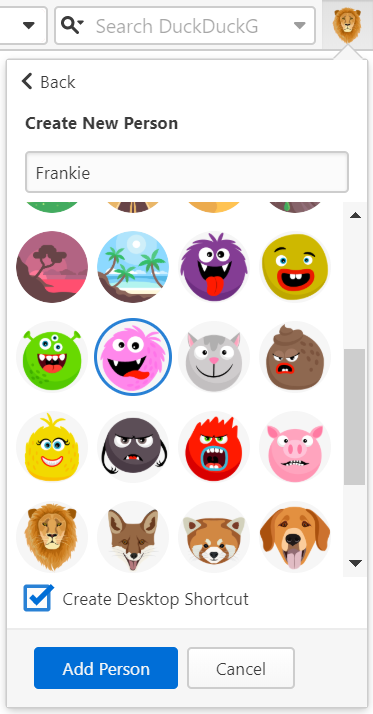
Add a new profile
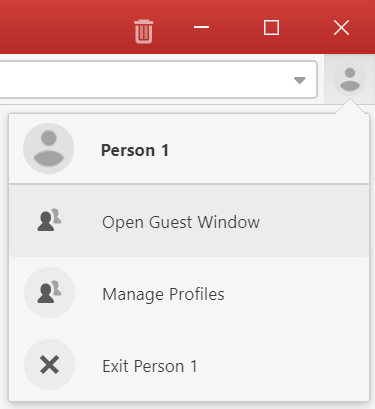
Click on the Profile button in the top right corner of the browser window and select Manage People.
Click on Add Person at the bottom of the popout menu.
Pick a name for the new profile and select or upload an avatar. On Windows and macOS, you can also decide whether you want a Desktop shortcut for the profile or not.
Click Add Person.
You can also manage profiles from Settings > General > Profile Management and click on Manage Profiles, or type “Manage Profiles” in Quick Commands.
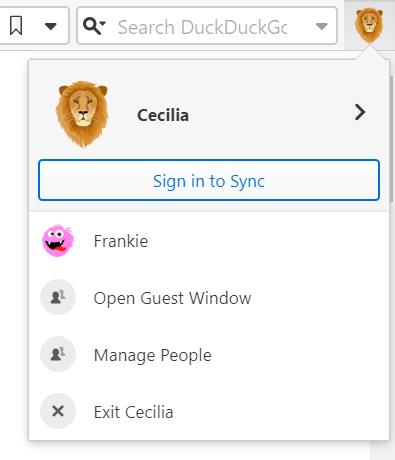
When you are logged in to your Vivaldi account to use Sync, your account’s username and profile image will be shown instead.
Switch between profiles
Open the Profile menu and click on the profile you want to open.
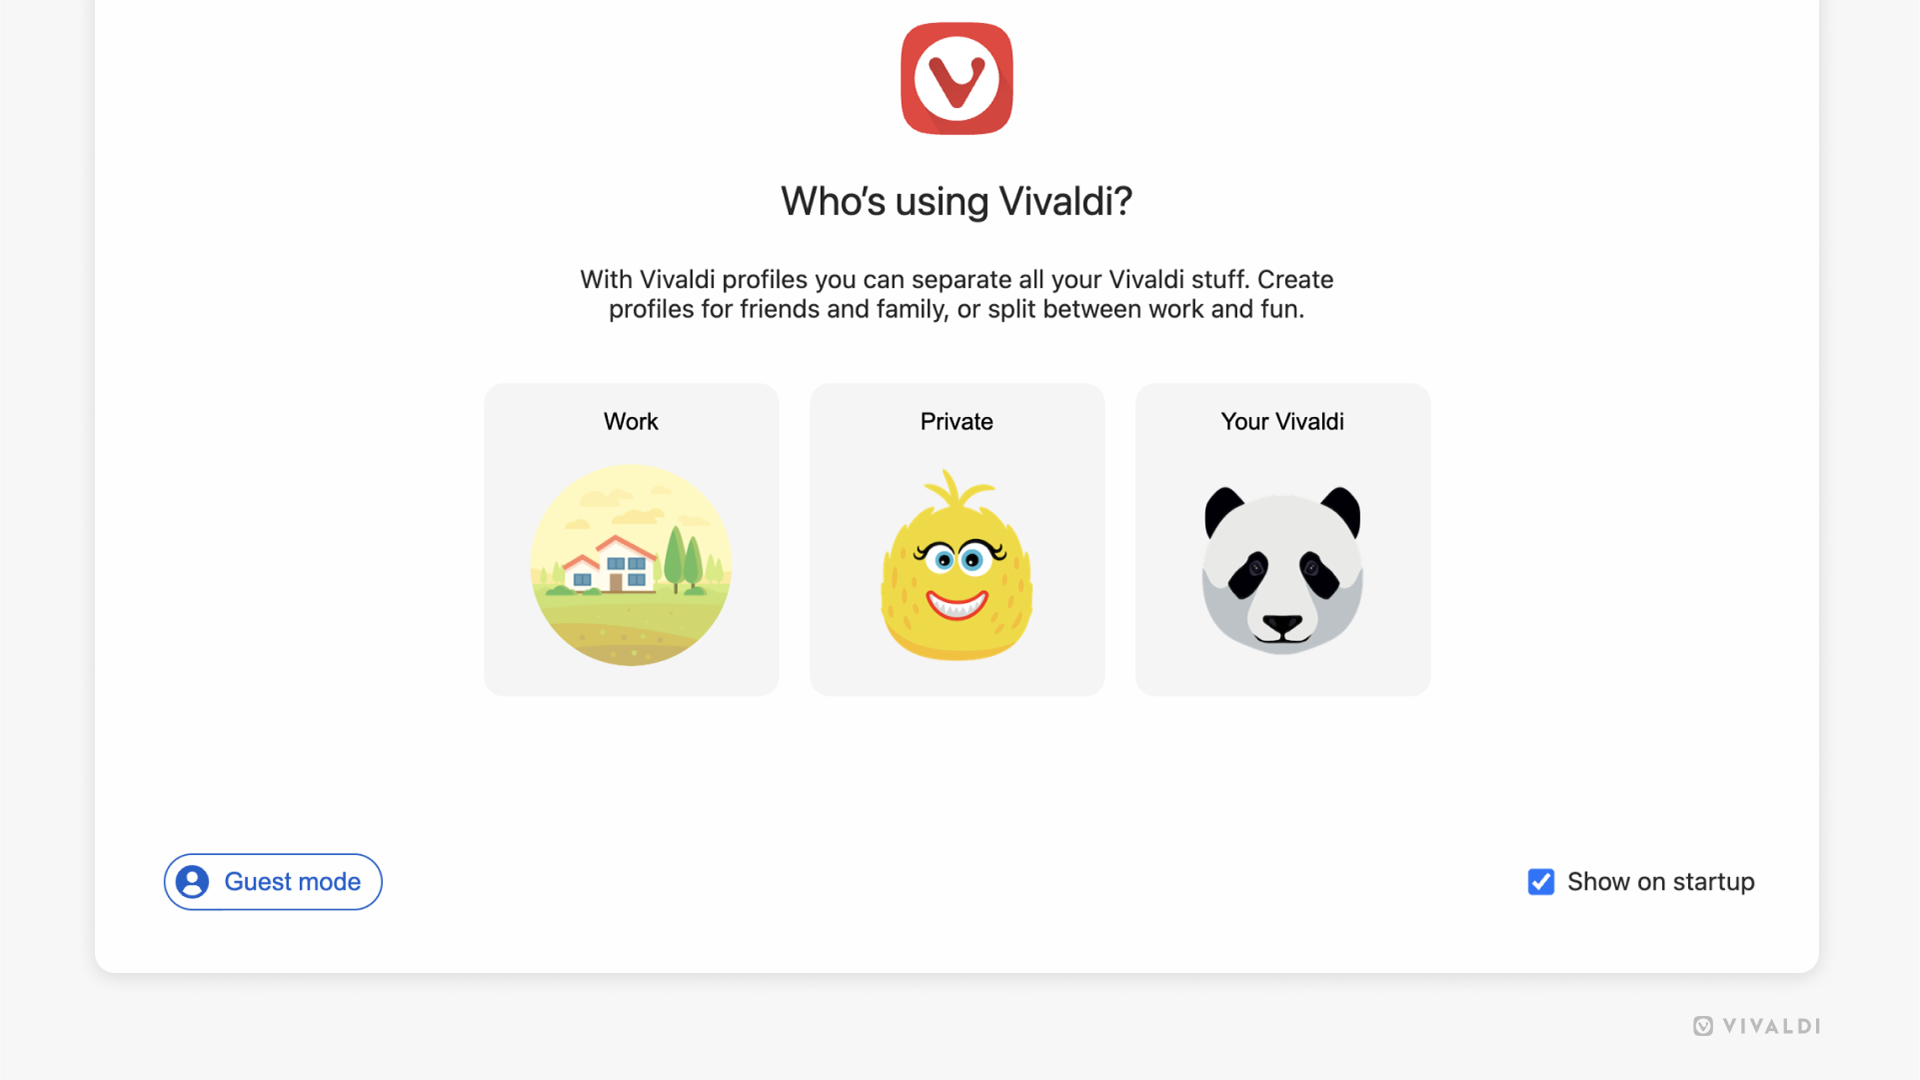
Choose a profile on startup
To choose which profile to open when you start Vivaldi:
Type “Manage Profiles” in Quick Command or go to Settings > General > Profile Management and click on Manage Profiles.
In the bottom right corner, enable Show on startup.
When enabled, before the browser opens, you’ll see the window shown on the image below.
Edit a profile
To change the name or avatar of the profile or create a desktop shortcut:
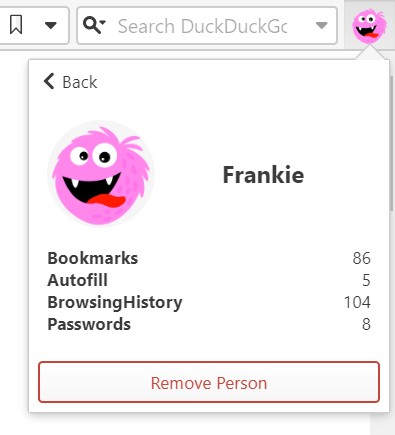
Before you delete the profile you’ll see information about the profile, such as the number of Bookmarks and saved Passwords;
Click Remove Person to permanently delete the profile and all its data.
Move or hide the Profile button
You can change the location or remove the User Profiles button by Editing Toolbars.
If you don’t want to use the multiple profile feature or don’t want the button to clutter your Address Bar, right-click on the User Profiles button > Edit > Remove from Toolbar.
Sync profiles
To Sync profile data across devices, currently, a separate Vivaldi account is needed for each profile.
Browsing in Guest Profile means that searches, sites visited, cookies, and temporary files won’t be stored by Vivaldi.
The Guest Profile will have Vivaldi’s default look and settings and the Guest won’t be able to change any of your browser settings or access your data from the Guest Profile. If all you want is to browse privately – with access to your customizations – use Private Windows instead of the Guest Profile.
Open Guest Window
Click on the Profile button in the top right corner of the browser.
Select Open Guest Window from the menu.
Alternatively, for example if you’ve hidden the Profile button, go to Settings > General > Profile Management > Manage Profiles > Guest mode.
Close Guest Window
Close the Guest Window as a normal window.
Open the Profile menu in the main profile window and select Exit Guest Profile.
If the Guest Window was the very last window you closed, then on restart Vivaldi will display the profile manager.
Privacy
Guest Profile does not encrypt or otherwise modify your connection. Note that if you log in to any websites, the website may still record your activity on any websites they have access to, and associate it with your account on that website. Use of guest mode will not hide your browsing activity from the website – it does not offer any anonymizing service. You would need to use a VPN or anonymizing proxy service if that is required.
Your activity might be visible to:
Websites you visit (including the ads and resources used on those sites);
To pin multiple tabs at once, select them using the Ctrl or Shift key and select Pin from the right-click context menu.
If the Tab Bar is located on the top or bottom of the window, the pinned tab will shrink to only fit the favicon (commonly the website’s logo) and position itself to the left side of the Tab Bar.
In case the Tab Bar is either on the left or right side of the window and in the Window Panel, the pinned tab will position itself at the top of the tabs list.
Pinned tabs will be listed in the order they were pinned, but you can change their order by dragging them. Pinned and regular tabs cannot be placed alternately.
Restrict a pinned tab to the current site
To keep the pinned tabs locked to the same domain:
Right-click on the pinned tab.
Select Restrict Pinned Tab to Current Site.
When enabled, all links from the same domain will open in the pinned tab and all links from other domains will open in new regular tabs.
Unpin a tab
Right-click on the pinned tab and select Unpin tab. The unpinned tab will position itself as the leftmost/topmost tab after pinned tabs (if there are any).
If you enable Lazy Loading Restored Tabs (which restores tabs in a hibernated state) in Settings > Startup, but you wish to always fully load pinned tabs, check the box for Always Load Pinned Tabs.
By default, pinned tabs are grouped under one folder in the Window Panel and the Tab Button pop-up, but you can disable it in Settings > Panel > Window Panel > Pinned Folder.
A “crash” occurs when Vivaldi encounters an unrecoverable error and shuts down unexpectedly or a tab’s contents disappear and are replaced with a “dead bird” image. Information pertaining to the crash is logged by Vivaldi.
Enable automatic crash reporting
When you enable automatic crash reporting, we will receive the crash logs automatically. You can enable crash reporting during the welcome flow after installing the browser, or any time in Settings.
Enable Share Crash Reports to Help Us Improve Product Quality.
Provide additional information
By adding context to the crash, the team will have an easier time fixing the bug that’s causing the crash. You can do that by filing a bug report that gets linked to your crash log.
To file a bug report about the crash:
Go to vivaldi:crashes.
Look for a crash log that was created around the time you witnessed the crash.
Click on Provide additional details. You’ll be taken to our bug report page, where the crash’s ID is already prefilled in the Summary field.
Fill out the form with information you think is relevant to the crash, such as steps to trigger the crash.
Submit the bug report.
Manual crash reporting
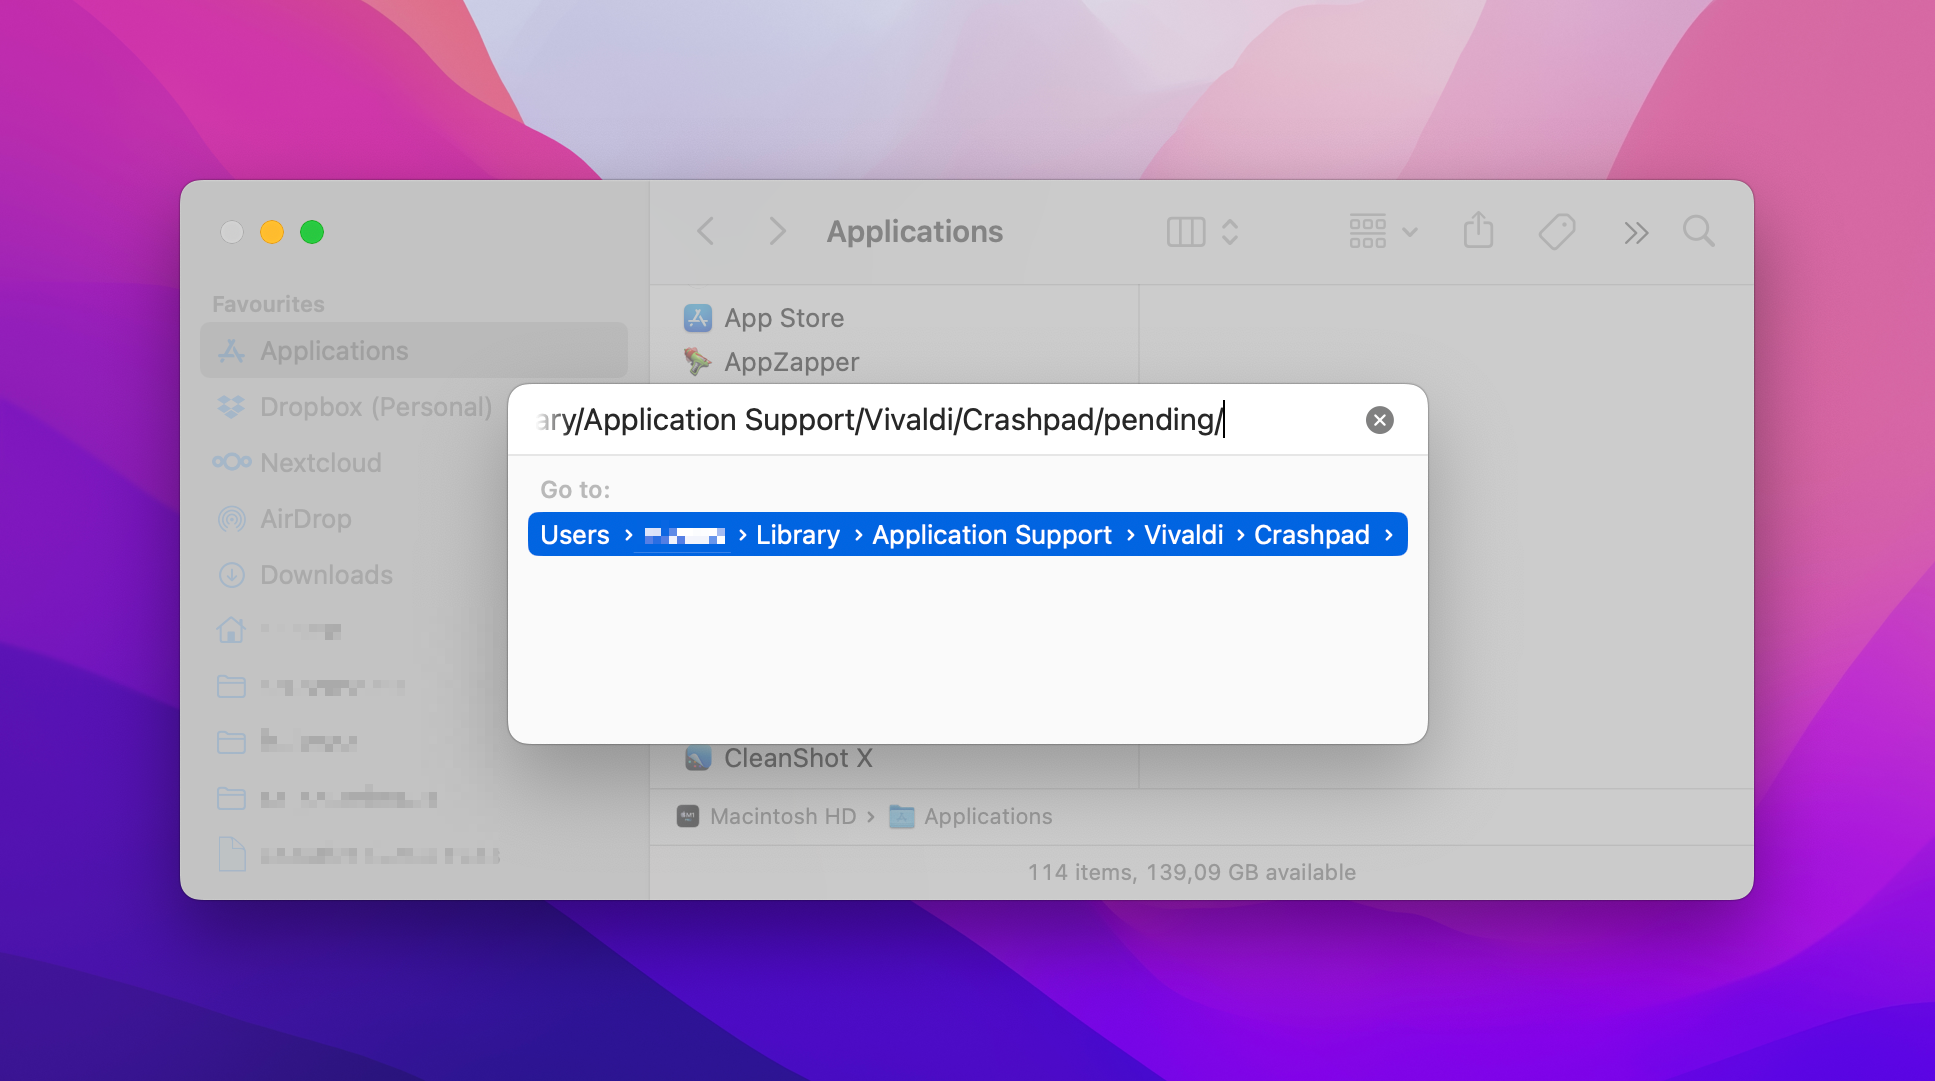
To locate your crash log files open Finder and use the menu “Go → Go to folder” or the keyboard shortcut “⇧⌘G” and then paste this line:
~/Library/Application Support/Vivaldi/Crashpad
Here you will find all your crash log files (.dmp) under the pending or completed sub folders. Sort the folder contents by date and only send the very most recent one(s) because they can only be processed if we know exactly which version of Vivaldi they are from. To save space you might want to compress them and send them inside a zip archive.
Alternatively, you can do the following:
Launch the “Terminal” application—open “Spotlight”, type: Terminal
Copy and Paste the following text into the Terminal window and press “Enter”—triple click to select find ~/Library/Application\ Support/Vivaldi/Crashpad -newer /Applications/Vivaldi.app -name \*.dmp | zip -j ~/Documents/Vivaldi\ Crash\ Logs\ $(date '+%Y%m%d-%H%M') -@
Now open your “Documents” directory or type the following into “Terminal” open ~/Documents/
You will find a dated “Vivaldi Crash Logs” zip file that you can attach to your bug report
Then, go to vivaldi.com/bugreport and fill out the form with details about the crash and attach the crash log file to the report.