Address Field

Address Field is a section on the Address Bar where you can see the URL of the page you’re currently on. There you can enter a new web page link to navigate to the website or a search term to see search results. But the Address Field in Vivaldi has a lot more to offer. Continue reading to learn all about the Address Field.

Focus on the Address Field

To use the Address Field, you first need to focus on it. To do that:


Go to a web page

To open a web page with a link you want to visit:

  1. Focus on the Address Field.
  2. Enter the full link or start typing and select a previously visited link from suggestions.
  3. Open the link in one of the following ways:
    • Press Enter on your keyboard.
    • Click on a suggestion in the drop-down menu.

Press Alt + Enter to open the link or search results in a new tab. The shortcut can be changed to Shift + Enter in Settings > Address Bar > Open Address in New Tab.


Search in the Address Field

To execute a Search from the Address Bar:

  1. Focus on the Address Field.
  2. Enter the search term to search with the default search engine or type a Search Engine Nickname before entering the search term.
  3. Open the page with search results in one of the following ways:
    • Press Enter on your keyboard.
    • Click on a suggestion in the drop-down menu.
    • Click on the icon on the left of the Address Field. The icon can be Search’s magnifying glass or selected Search Engine’s logo.

Searching in the Address Field is enabled by default, but you can disable it from Settings > Search > Search Options, if you prefer to search using the dedicated Search Field and/or Quick Commands.

From Search Settings, you can also enable Search Suggestions and limit suggestions only to times when you’ve entered the Search Engine Nickname prior to entering the search term. It’s a convenient feature, but has privacy implications. You can read more on our Team Blog.


Address Field Options

Address Auto-Complete

When you type something in the Address Field, Vivaldi offers to auto-complete it with suggestions from your Bookmarks and History. In Settings > Address Bar > Address Auto-Complete you have a couple of options for the feature:

  • Autocomplete on Item Title – In addition to links, page titles will be searched through for a match.
  • Autocomplete on Domain First – This will prioritize autocompleting the homepage of a site before suggesting sub-pages.

Show Full Address

URLs can have a lot of distracting information in them, such as a protocol, query string parameters, and anchor identifiers.

We want to make it easy for you to see the most important parts of the URL by default. Those are the website’s domain, and which part of the website you are looking at.

The protocol, such as http: and https: look like they might be helpful, but they can be misleading. “https:” can make a website look like it will be secure, when actually, it could be insecure for some reason, such as using low grade encryption or no encryption, have failed certificates, or have mixed insecure content into the page. As a result, rather than showing the protocol, Vivaldi just shows a badge, which says whether the page is secure or not.

The query string parameters and anchor identifiers can add so much confusion that it can be hard to see which website you are using, and we need to make sure you know exactly which website you are using, without having to struggle to find it. The domain is far more important than everything else in the URL, which is why it appears first, why we highlight it, and why we try to reduce the clutter that might distract you from it.

To always show the full address:

  1. Go to Settings > Address Bar > Address Field Options.
  2. Enable Show Full Address.

Alternatively, right-click on the Address Field and select Show Full Address from the context menu.

Select Address on Activation

To place a text cursor to where you clicked on the address field instead of selecting the full address:

  1. Go to Settings > Address Bar > Address Field Options.
  2. Disable Select Address on Activation.

Copy and Cut Encoded Address

The number of characters that are allowed in a website address, aka URL, are limited. If a URL contains special characters, for example spaces and characters from languages with a non-Latin alphabet, the browser encodes them before sending the URL to a web server. When you see a URL in the address field with special characters, like this: https://forum.vivaldi.net/category/26/日本語-japanese, the URL has been decoded. An encoded URL of the same address looks like this: https://forum.vivaldi.net/category/26/%E6%97%A5%E6%9C%AC%E8%AA%9E-japanese.

By default, Vivaldi copies and cuts encoded addresses. If you wish to copy and cut decoded addresses:

  1. Go to Settings > Address Bar > Address Field Options.
  2. Disable Copy and Cut Encoded Address.

Important! Other apps may not be able to understand decoded URLs, which may break the URL.

Page Load Progress Bar

When Page Load Progress Bar has been enabled in Settings > Address Bar > Address Field Options, the Address Field will turn into a progress bar in your Theme’s accent color while the page is loading.

QR Generator

To create QR links of the active tab from the Address Bar enable QR Code Generator in Settings > Address Bar > Address Field Options. Learn more about the feature on the Help page about creating and sharing QR Codes.


Address Field Drop-Down Menu

Show Drop-Down when Typing

As you type a search term or a web link in the Address Field, you’ll see suggestions that match what you’ve typed in a drop-down menu. If you don’t want to see any suggestions, you can disable the drop-down menu in Settings > Address Bar > Address Field Options.

Always Show Item’s Badge

On the right side of the drop-down menu, a badge shows up on hover/selection which lets you know whether the suggestion is a bookmark, history, or some other type of entry.

To always display all badges:

  1. Go to Settings > Address Bar > Address Field Options.
  2. Enable Always Show Item’s Badge.

Typed History

If you wish, you can disable the showing of search queries in the Typed History. When disabled only links will be displayed.

To view your Typed History in the drop-down menu even when you haven’t typed anything in the Address Field, enable the Typed History drop-down button from Settings > Address Bar > Address Field Options > Drop-Down Menu.

Drop-Down Maximum Size

By default, you’ll see 12 suggestions in the drop-down menu. If you’d like to see less or more suggestions:

  1. Go to Settings > Address Bar > Drop-down Maximum Size.
  2. Click on the – and + buttons to change the number of suggestions.

Address Field Suggestions

In the Address Field drop-down menu, you may notice entries from Typed History, Bookmarks, suggestions from Search Engines, search and browsing History, and Direct Matches. If some of the suggestions hinder your browsing flow, you can disable them in Settings > Address Bar > Address Field Suggestions.

To review your preferences:

  1. Go to Settings > Address Bar > Address Field Priorities.
  2. Enable/Disable suggestions from Bookmarks, Search Suggestions, History, and Direct Match on and off as you wish.

Delete suggestions

If an irrelevant suggestion in the drop-down menu keeps popping up, you can remove it by hovering over the entry and clicking on the X on the right side of the drop-down menu. Alternatively, while the entry is selected, use the Keyboard Shortcut Ctrl+Delete / ⇧ Fn Delete.

To restore Direct Match suggestions you’ve removed:

  1. Go to Settings > Address Bar > Address Field Priorities.
  2. Click Reset Hidden Direct Match Providers.

Address Field Features

Go to parent page

Ctrl / ⌘ + Click on the URL to cut the link at the point you clicked and go to that page. For example, when you click on the word “blog” in https://vivaldi.com/blog/address-field-drop-down-guide/, you’ll be taken to https://vivaldi.com/blog/.

Copy Without Parameters

Sometimes web page links have additional information, called parameters, added to the end of the URL. Parameters in an URL come after a ? symbol and if there are multiple parameters they’re separated by an & symbol. URL parameters are used for sorting and filtering, pagination, language options and more. But parameters can also be used for tracking.

Example URL from Vivaldi Forum with multiple search parameters: https://forum.vivaldi.net/search?term=tab%20stacks&in=titlesposts&matchWords=all&categories%5B%5D=32&sortBy=relevance&sortDirection=desc&showAs=posts.

The same URL without parameters: https://forum.vivaldi.net/search.

To copy a link without parameters:

  1. Right-click on the Address Field.
  2. Select Copy without parameters.

Tracker and Ad Blocker

Adjust the blocking of the active tab and view information about blocked trackers and ads from the Content Blocker button. Learn more about the feature on the Help page about Tracker and Ad Blocker.

Site Info

You can tell from the icon on the left side of the Address Field whether a site is Secure , not secure not secure icon or even dangerous .

Clicking on the icon will open a menu with additional site settings, for example, for Cookies and Website permissions

Start dragging from the Site Info button to your desktop or file folder, to create a webpage shortcut.

Feeds

Page Offers Feeds icon will appear on the right side of the Address field when the website offers feeds. Click on the button to preview and subscribe to the feed.

Learn more about the feature on the Help Page about Feed Reader.

Reader View

To concentrate on the main content of the web page and hide all distractions, switch on Reader View.

Learn more about the feature on the Help Page about Reader View.

Translation

With Vivaldi Translate, you can translate full web pages easily. Just click on Translate Page on the right side of the Address Field.

Learn more about the feature on the Help Page about Translate.

Bookmark Page

Click on Bookmark Page to add the active tab to Bookmarks.

Learn more about the feature on the Help Page about Bookmarks.


Address Field Security Features

When there’s not enough space to show the full domain name, a warning icon will be shown. Make sure to check the full link and that you trust the website before submitting any data on the page.

Base Domain Highlighting

The URL’s base domain (eTLD+1) is highlighted and the rest lowlighted to help recognize which company controls the domain and prevents scams and phishing attacks.

Address field

It’s not recommended to disable base domain highlighting, but Vivaldi still gives you the option to do it in Settings > Address Bar > Security Features.

Strip Javascript from Pasted Text

Vivaldi allows you to type javascript: URLs in the address field. When you press enter, the JavaScript is run in the context of the current page. This allows you to quickly type some commands and execute them to modify the page’s behavior, without needing to open up the debugging tools.

When pasting a javascript: URL into the address field, by default Vivaldi will remove the “javascript:” protocol prefix from the start of the URL. This is done to prevent social engineering attacks, where an attacker convinces you to copy a JavaScript URL, paste it into the address field, and press enter before you realize what you pasted, allowing them to compromise your accounts on that website. When the setting is enabled, you would need to manually add the protocol back after pasting, which is enough to let you know that something malicious is happening.

However, some users might not want that protection, so they can disable the protection from Settings > Address Bar > Security Features. With it disabled, the protocol will remain.

Important! Only disable that setting if you are certain that you can detect this kind of malicious attack yourself.

Always Use Secure Connection (HTTPS)

To always load websites using the secure HTTPS protocol instead of the less secure HTTP:

  1. Go to Settings > Address Bar > Security Features
  2. Enable Always Use Secure Connection (HTTPS).

By default, when you do not enable this setting, Vivaldi will check if websites can be accessed securely, and will use the secure connection if possible. As a result, for most websites, this setting is not actually needed. However, you may choose to enable this setting if you absolutely never want to use websites that do not offer HTTPS, without clicking on a warning message first.

Note that this setting will sometimes cause websites that do offer HTTPS to show a warning, if the website responds very slowly to HTTPS requests, since Vivaldi cannot tell if this is the website not supporting it, or just supporting it very slowly. Only enable this setting if you are willing to accept this annoyance!
Was this helpful?

Yes
No
Thanks for your feedback!

Pop-out Video on Android

Pop-out Video, aka Picture-in-Picture, is a popular feature on desktop, but did you know it’s also available on Android and iOS? The main difference is that, on your mobile device, you can’t browse other tabs in Vivaldi while Pop-out Video is enabled, but you can use most other apps.

Enable Pop-out Video on Android

  1. While browsing with Vivaldi, find a video you want to watch.
  2. Press play and enable full-screen view of the video.
  3. Tap on your phone’s home button.

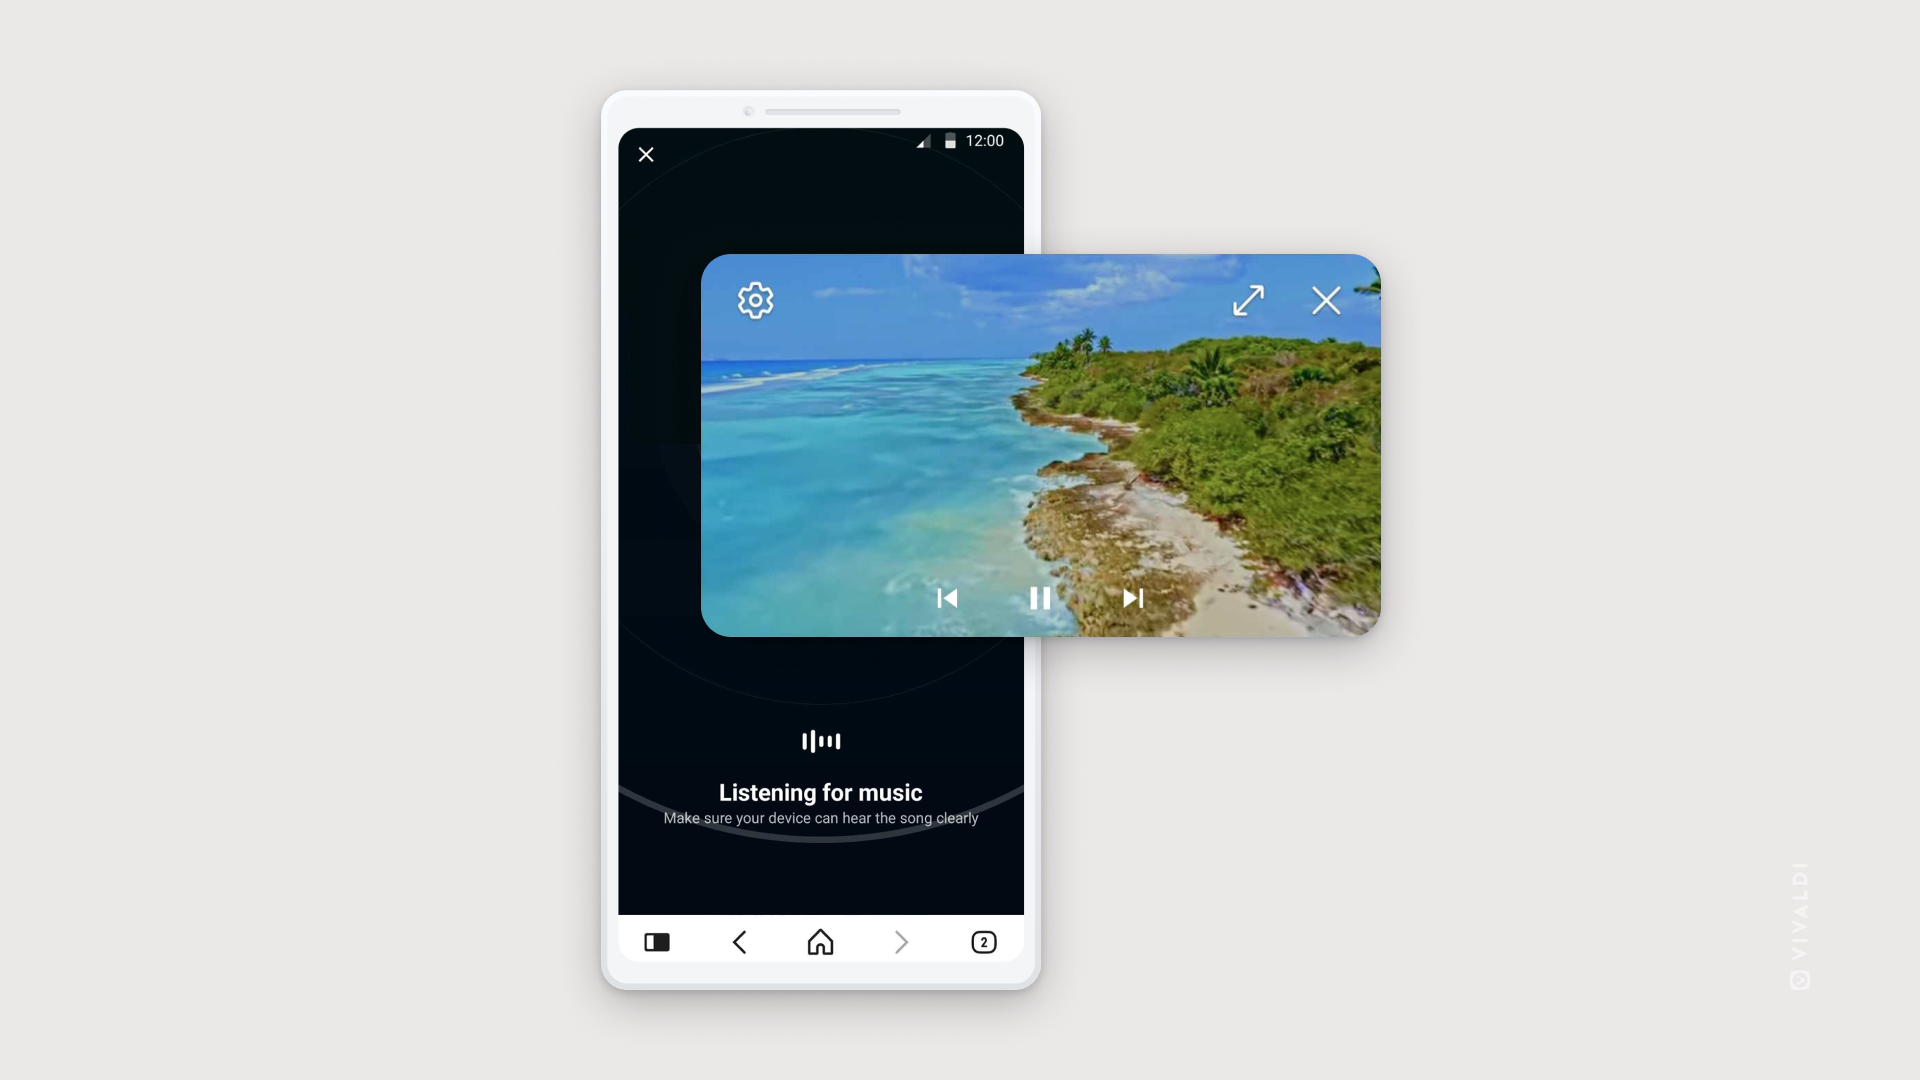
The video will continue playing in a small rectangle on your home screen. You can move the video by dragging it around and use the two-finger zoom gesture to change the size of the video.

Pop-out video from Vivaldi open on top of the Shazam app.

Tap on the rectangle to see video controls. Pop-out Video includes controls for:

  • Pausing the video.
  • Moving to the next/previous video (when playing a video from a playlist).
  • Closing the popped-out video.
  • Returning to the main window.
  • Shortcut to Android’s Picture-in-Picture settings.

If you’re unable to use Pop-out Video in Vivaldi, check whether you can enable it from Android Settings > Apps > Special Access > Picture-in-Picture.

Was this helpful?

Yes
No
Thanks for your feedback!

Donate to Vivaldi

Though, Vivaldi is a commercial company, fighting the gatekeeping behemoths of the web comes with a cost. Our users often show interest in contributing to Vivaldi’s development. Some give their time and volunteer as translators, testers, moderators, and/or ambassadors. Others prefer to give a donation.

You can donate anonymously or show off a donator’s Badge of Appreciation that gets added to your profile picture on vivaldi.net and in the browser. The badge is given automatically to all logged-in users. Logged-out users can claim the badge at a later date via the donation confirmation email.

Supporter – one-time donation.

Patron – recurring donation.

Advocate – long-term donor.

Profile picture with a Supporter badge.

One-time donation

To make a one-time donation:

  1. Go to https://login.vivaldi.net/profile/donations.
  2. Select One-time above the predefined donation amounts.
  3. Select or enter a custom amount that you want to give.
  4. If you want to have a badge on your profile picture, tick the box for “I want The Badge of Appreciation“.
  5. Agree to Vivaldi’s Terms of Use and Privacy Policy.
  6. Click Donate / Log In and Donate.
  7. Enter your email address and card information.
  8. Click Pay. You may be directed to your bank’s website to confirm the payment.
  9. View and download the invoice.

The receipt will also be sent to the email address you provided and can be downloaded within 30 days from the donation date.


Recurring donation

When setting up a recurring donation, you’ll contribute to Vivaldi’s development monthly or annually.

To make a recurring donation:

  1. Go to https://login.vivaldi.net/profile/donations.
  2. Select Monthly or Yearly above the predefined donation amounts.
  3. Select or enter a custom amount that you want to give each month.
  4. If you want to have a badge on your profile picture, tick the box for “I want The Badge of Appreciation“.
  5. Click Donate / Log In and Donate.
  6. Enter your email address and card information.
  7. Click Pay and subscribe. You may be directed to your bank’s website to confirm the payment.
  8. View and download the invoice.

The receipt will also be sent to the email address you provided and can be downloaded within 30 days from the donation date.


Claim the Badge of Appreciation

The badge is given automatically to all logged-in users. If you were logged out during the donation, follow these steps to claim your badge:

  1. Open the donation confirmation email.
  2. At the end of the email, find the link to claim your badge and open it.
  3. Log in to your Vivaldi account.

Manage recurring donations

If you were logged in during the donation, you can view your invoice history from your account’s profile on Vivaldi.net > Manage Subscriptions. In case you were logged out, you’ll find the link to manage your subscription in the donation confirmation email.

To update how much you donate each month:

  1. Click on Update plan.
  2. Select the new amount.
  3. Click Continue.
  4. Click Subscribe and pay.

To update the payment method:

  1. In the Payment method section, click on Add payment method.
  2. Enter the new card’s information.
  3. Click Add.
  4. Click on the 3 dot menu after the new card’s info.
  5. Select Make default.
  6. Click on the 3 dot menu after the old card’s info.
  7. Select Delete and confirm the decision.

To update billing information:

  1. In the Billing information section, click on Update information.
  2. Enter a new email address and optionally your address.
  3. Click Save.

Cancel a recurring donation

To cancel a donation:

  1. Go to your account’s profile on Vivaldi.net.
  2. Click on Manage Subscriptions.
  3. Click on Cancel plan.
  4. Confirm your decision by clicking Cancel plan once more on the next page.

If you have any questions or need assistance with making a donation, get in touch using the contact form below.

Was this helpful?

Yes
No
Thanks for your feedback!

Rocker Gestures

Rocker Gestures are Mouse Gestures used to execute commands with the left and right mouse buttons.

Rocker Gestures are enabled by default, but the feature can be disabled from Settings > Mouse > Rocker Gestures > Allow Rocker gestures. Restart the browser for the change to take effect.

Use Rocker Gestures

To perform an action using Rocker Gestures, you have two options:

  • Rock to the right – hold down the left mouse button, then click the right mouse button.
  • Rock to the left – hold down the right mouse button, then click the left mouse button.

Edit Rocker Gestures

Predefined Rocker Gestures take you back and forward in History, but they can be assigned various different commands.

To edit Rocker Gestures:

  1. Go to Settings > Mouse > Rocker Gestures.
  2. Select a command from the list of available actions. Once you’ve opened the list, you can also type the name of the command to find it faster.

Was this helpful?

Yes
No
Thanks for your feedback!

Install Vivaldi for Snap

Vivaldi for Snap is distributed through Snapcraft. You may find Snap already built into your Linux distribution’s software center app. If not, click the button below or copy the following link: https://snapcraft.io/vivaldi.

Download on Snapcraft

How do I set Vivaldi for Snap as my default browser and/or as my mail client?

You must set your preferred applications through the desktop’s file and protocol association settings.

  • For GNOME, go to System Settings > Apps > Default Applications > Web > select Vivaldi.
  • For KDE Plasma, go to System Settings > Applications > Default Applications > Web Browser > select Vivaldi.
  • For LXQt, go to Settings > File and Protocol Associations > Default Apps > Web Browser.

The instructions will be similar for other desktop environments. If you do not see Vivaldi as an option after installing, please log out of your desktop session and back in again.


How do I import data from another web browser?

Vivaldi for Snap cannot detect or import data directly from another web browser, such as Firefox, Google Chrome, or Opera, but you can import the files exported from the other browsers for Bookmarks, Notes, and more.

  1. Go to Vivaldi menu > File > Import From Applications or Files menu.
  2. Select what you want to import from the dropdown menu and locate the file.
  3. Click Start Import.

To import logins and passwords:

  1. Go to vivaldi://password-manager/settings.
  2. In the Import passwords section, click on Select File.
  3. Locate the file and open it.

For a more complete import, including browser History and Cookies, you can import into a native installation for Vivaldi, available from vivaldi.com, set up Vivaldi Sync in the native version, and then log in to Sync in Vivaldi for Snap.

Vivaldi Sync is available for free and uses confidential end-to-end encryption.


I’m having trouble getting an extension to talk with an app on my system.

The NativeMessaging API — used by extensions to communicate with other installed software on your computer — is unavailable in Vivaldi for Snap. This can affect password managers, hardware-integration extensions, and other extensions.

If you require any such extensions, please install the native version of Vivaldi available from https://vivaldi.com/download/?platform=linux.


How do I migrate my profile between Vivaldi for Snap and a native install?

The best way to migrate from one install to another, or to keep using both versions in sync with access to your Bookmarks, Logins, Notes, and other data, is to set up Vivaldi Sync.

Vivaldi Sync is available for free and uses confidential end-to-end encryption.


Where is my User Data stored in Vivaldi for Snap?

Vivaldi for Snap stores data in the ~/snap/vivaldi/current/.config/vivaldi/ folder. Native Vivaldi stores data in the ${XDG_CONFIG_HOME:-$HOME/.config}/vivaldi directory.

You may do a one-time migration by copying the folder from one to the other, on the same computer. You should not run two copies of Vivaldi with the same data directory.

See also How do I migrate.

Was this helpful?

Yes
No
Thanks for your feedback!

Add and manage mail accounts

Enable the mail client

To use Vivaldi Mail, make sure you’ve enabled Mail, Calendar and Feeds from Settings > General > Productivity Features. On a brand new installation or in a new User Profile, choose the “Browser, Mail, and Calendar” option in the welcome flow.

Add an account

To add your first mail account to Vivaldi Mail:

  1. Go to Mail settings, either by:
    •  Opening the Mail Panel and clicking on Add Mail Account,
    •  Clicking on the Mail button on the Status Bar, or
    •  Going to Settings > Mail > Mail Accounts > Add Account.
  2. Enter your email address, select whether you want to add an IMAP (recommended) or POP account, and click Continue.
    Vivaldi will try to fetch the server settings automatically. If it can’t, please add them manually. To find the server settings, check your email service provider’s help documentation.
  3. Enter your mail account’s login password.
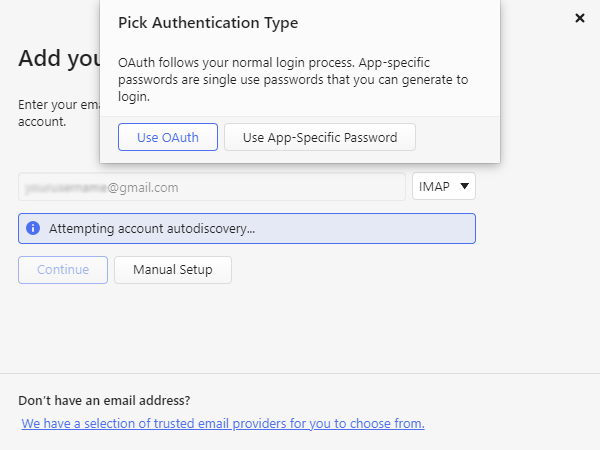
    Some email service provider’s require login from clients using either OAuth or an app-specific password. Before entering the password, choose the option that’s most relevant for your account.
  4. Once the account has been added you can add:
    • Sender Name – shown to recipients of your emails in their mailbox instead or in addition to the email address.
    • Account Display Name – displayed for the account in the Mail Panel’s All Accounts section.
    • Signature – text appended at the end of every email message you send.
  5. You can also enable the following sync options:
    • Download messages to view them offline and improve search results,
    • Upload sent messages to Sent folder, so you can view your sent messages via other clients or the account’s web interface.
    • Offline account to (temporarily) stop checking for updates.

To add more mail accounts:

  1. Go to Settings > Mail > Mail Accounts.
  2. Click on Add button Add account below the list of already added mail accounts.
  3. Enter your email address, select whether you want to add an IMAP (recommended) or POP account, and click Continue.
  4. Enter your mail account’s login password, app-specific password or log in using the service provider’s OAuth window.

If you’d like to use Vivaldi Mail, Calendar and Feeds separately from your main browser, we suggest setting your mail and calendar accounts up in a new User Profile. You can find more detailed instructions here.

Add a Google account to Vivaldi Mail

When you add a Google account to Mail or Calendar, you’ll be asked to log in through Google’s OAuth dialog.
Previously, there was a single login, which, in addition to the mail and calendar clients, logged you in to your Google account on all Google’s websites. Since Vivaldi 4.3, the logins are kept separate, improving privacy. This means that even if you’ve added, for example, your Gmail account to Vivaldi Mail, Google won’t know what you watch on YouTube or search on Google (unless you log in to the website).
If, for some reason, you’re logged out from your account(s) in Vivaldi Mail and Calendar, Google’s OAuth dialog will appear again for each account and service (Gmail, Google Calendar) you’ve added to Vivaldi. In that case, please login to your account again. If you ignore or dismiss the dialog, it will keep reappearing every time the account checks for updates. Alternatively, put the account offline from Settings > Mail > Mail accounts > select the account > enable Offline Account. Though, in that case you won’t receive new messages until you log in again.

In case you don’t want to use OAuth to log in to your Google account, you could use an App password instead.

Alternative Option – App password (needs two-factor authentication)

For this to work you will need to set up an App Password in your Google account settings. You have to have two-factor authentication set up as well. Once you have the password you can just fill this in when the password prompt appears in the setup with the option to use App-Specific Password.

Mail account setup window with a pop-up to choose the authentication method.

Add a Microsoft account to Vivaldi Mail

To log in with a Microsoft hosted account (Outlook, Hotmail, MSN, etc.) you have two options. You can use OAuth or an app-specific password.

Option 1 – OAuth

  1. In Vivaldi, go to Settings > Mail > Mail Accounts > Add account.
  2. Enter your Microsoft email address and click Continue.
  3. Select Use OAuth.
  4. Follow the instructions in Microsoft’s OAuth window.

Option 2 – App-Specific Password

  1. Go to your Microsoft account’s additional security settings page on https://account.live.com/proofs/manage/additional.
  2. To create an app password, you need to have two-factor authentication enabled for your account. If you haven’t already, enable two-factor authentication following Microsoft’s instructions.
  3. Click Create a new app password in the App password section. You’ll see a generated password on the screen.
  4. In Vivaldi, go to Settings > Mail > Mail Accounts > Add account.
  5. Enter your Microsoft email address and click Continue.
  6. Select Use App-Specific Password.
  7. Enter the password that Microsoft generated for your account.
  8. Click Sign In.

Add an Apple account to Vivaldi Mail

To add your Apple’s iCloud account to Vivaldi Mail:

  1. Create an app-specific password to use in Vivaldi Mail (instructions).
  2. In Vivaldi, go to Settings > Mail > Mail Accounts > Add account.
  3. Type in your iCloud email address and click Continue.
  4. Enter the app-specific password for Vivaldi Mail.
  5. Click Sign In.

Add a Proton Mail account to Vivaldi Mail

To add a Proton Mail account to Vivaldi:

  1. Install Proton Bridge.
  2. Log in to your Proton account (the account needs to be on a plan that supports Bridge use).
  3. Select Other for the email client.
  4. Click Continue and then Done.
  5. In the Bridge, go to Settings > Advanced Settings > Connection Mode and change both IMAP and SMTP connections to SSL. Click Save.
  6. Go to Settings > Advanced Settings > Export TLS certificates and click on Export. Save the two certificates on your computer.
  7. Import the certificate (see additional instructions below).
  8. Restart the browser.
  9. In the Bridge, click on the account to see mailbox details.
  10. In Vivaldi, go to Settings > Mail > Mail Accounts and start adding a new account.
  11. Enter your Proton email address.
  12. Enter the password from Proton Bridge’s mailbox details.
  13. Click Sign In.

Importing certificates:

On Windows

  1. In Vivaldi, go to Settings > Privacy and Security > Security > Manage Certificates..
  2. Click Import.
  3. In the Certificate Import Wizard, click Next.
  4. Click Browse to select the certificate file.
  5. From the bottom right corner, change the file type to All Files (.).
  6. Select the “cert.pem” file.
  7. Click Next.
  8. Click Browse to change the Certificate store.
  9. Select “Trusted Root Certificate Authorities”.
  10. Click Next.
  11. Click Finish.

On macOS

  1. In Vivaldi, go to Settings > Privacy and Security > Security > Manage Certificates.
  2. Click on Keychain Access and enter your Mac profile’s password.
  3. From the Keychain Access’ app menu go to File > Import Items.
  4. Locate the “cert.pem” file and click Open.
  5. Find the imported certificate named “127.0.0.1” and double-click on it.
  6. Expand the Trust section.
  7. For “When using this certificate” select “Always Trust”.
  8. When asked, enter your Mac profile’s password and click Update Setting.
  9. Exit Keychain Access.

On Linux

  1. In Vivaldi, go to chrome://settings/certificates.
  2. On the page, go to Your certificates > View imported certificates from Linux.
  3. Click Import.
  4. Locate the certificate file (“cert.pem”) you exported from the Bridge and click Select.
  5. Check the box for “Trust this certificate for identifying websites”.
  6. Click OK.

Add a Yahoo account to Vivaldi Mail

To log in with your Yahoo account (or Yahoo hosted email account) with your email address and login password, Yahoo requires the client or app to have Yahoo’s branded login dialog. Vivaldi Mail doesn’t have that feature implemented just yet, so adding a Yahoo account to Vivaldi Mail requires a small workaround.

To add your Yahoo account to Vivaldi:

  1. First log in to your Yahoo account’s security page on https://login.yahoo.com/account/security.
  2. On the page, go to App Password > Generate app password > Get started.
  3. Fill in the App name, for example, Vivaldi Mail and click Generate Password.
  4. In Vivaldi, go to Settings > Mail > Mail Accounts > Add button Add account.
  5. Enter your Yahoo email address and click Continue.
  6. Select Use App-Specific Password.
  7. In the password field, instead of your regular login password, enter the app password that Yahoo generated for you.
  8. Click Sign In.

IMAP vs POP3

With IMAP (Internet Mail Access Protocol), your emails and email folders are kept on the server. Any changes you make in the mail client will reflect on the server and vice versa. You can add your mail account using IMAP to as many mail clients as you need and also access your mail from the email service provider’s webmail interface.

With POP3 (Post Office Protocol version 3) the mail client downloads and stores your emails on the computer as soon as they arrive to the mail server and then generally deletes them from the servers. Vivaldi doesn’t delete the messages on the server automatically, but you can enable it in Settings > Mail > Mail Accounts > select account > Server settings.

Download full messages

When you enable Download Messages for Offline Viewing and Searching for a mail account, all content of your messages will be indexed in the mail database even before you open the message. Downloading messages, aka prefetching, improves search results and lets you easily access your messages offline.

Note: When emails are deleted from the server (another client or webmail) and the body of the email is already fetched we put those emails in trash and mark them as internal.
You can then replace them from there if the deletion was a mistake. If the body wasn’t already fetched we just delete them since there’s no reason to keep them.


Edit an account

To update the name, signature, password or check the account’s server settings:
1. Go to Settings > Mail > Mail Accounts.
2. Select the account you want to edit.
3. Update the information.

Changes will be saved automatically.

Email Signature

To add a signature:

  1. Go to Settings > Mail > Mail Accounts.
  2. Select the account.
  3. In the signature field, enter your signature.

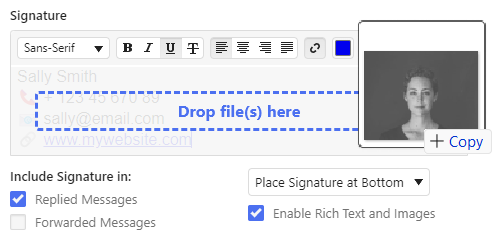
By default, signatures are in plain text. In case you’d like to format the text and add images, below the Signature field, tick the box for Enable Rich Text and Images. That will add the common text formatting options to the text field.

To add an image to your signature, locate the image file and drag it to the Signature field.

Signature location

Your signature can be located in one of two places:

  • At the bottom – if you’re replying to emails, the signature will be at the very end, after the quoted text.
  • At the top – if you’re replying to emails, the signature will be straight after your message, before the quoted text.

Furthermore, you can decide whether the signature is included when you reply to a message and when forwarding a message.

Remove default signature

If you don’t want to include any signatures in the email and want to delete the default signature:

  1. Go to Settings > Mail > Mail Accounts.
  2. Select the account.
  3. In the Signature field, type something and then delete it.

Reorder Mail Accounts

To change the order in which your accounts appear in the Mail Panel:

  1. Go to Settings > Mail > Mail Accounts.
  2. Select the account you want to move.
  3. Click on the up and down arrows below the list of accounts to move the selected account.

Delete an account

To remove your mail account from Vivaldi Mail:

  1. Go to Settings > Mail > Mail Accounts;
  2. Select the account from the list;
  3. Click on Delete mail account button.
  4. Decide whether you want to keep the messages on the computer or not.
  5. Click Delete.

Was this helpful?

Yes
No
Thanks for your feedback!

Customize toolbars and the components on them

Vivaldi is all about customization. Editing toolbars is one of the customization tools that allow you to tailor the browser to your needs.

Move or hide toolbars

Tab Bar

To change the Tab Bar’s location:

  1. Go to Settings > Tabs > Tab Bar Position.
  2. Choose your preferred location for the Tab Bar:
    • Top,
    • Left,
    • Right,
    • Bottom.

When you move the Tab Bar to the side or bottom of the browser window, buttons like the Vivaldi Menu, Minimize, Maximize and Close will be merged with the Address Bar as long as it’s at the top of the browser window. When the Address Bar is at the bottom, a title bar with the buttons will be displayed.

To always display the Title Bar when the Tab Bar isn’t at the top of the window:

  1. Go to Settings > Appearance > Window Appearance.
  2. Enable Show Title Bar.

To toggle the visibility of the Tab Bar:

Address Bar

To change the Address Bar’s location:

  1. Go to Settings > Address Bar > Address Bar Position:
  2. Choose your preferred location for the Address Bar:
    • Top,
    • Bottom.

To toggle the visibility of the Address Bar:

Panel

To change the Panel’s location:

  1. Go to Settings > Panel > Panel Position.
  2. Choose your preferred location for the Panel:
    • Left Side,
    • Right Side.

To toggle the visibility of the Panel:

  • Click on Hide/Show Panel button on the left side of the Status Bar.
  • Enable Show Panel Toggle in Settings > Panel > Panel Options and use the toggle to hide/show the Panel.
  • Go to the Vivaldi menu button Vivaldi menu > View and select Show Panel.
  • Type “Panel” in Quick Commands.
  • Use the Keyboard Shortcut F4 / ⌥⌘P.
  • Create a Mouse Gesture for the action.

Status Bar

It’s, unfortunately, not possible to change the location of the Status Bar.

To toggle the visibility of the Status Bar:

  • Go to Settings > Appearance > Status Bar and select between:
    • Show Status Bar,
    • Status Info Overlay (for example, shows URLs at the bottom left corner of the window when hovering a mouse cursor over a link on the page),
    • Hide Status Bar.
  • Type “Status Bar” in Quick Commands.
  • Use the Keyboard Shortcut Ctrl+Shift+S / ⌘/.
  • Create a Mouse Gesture for the action.

Customize toolbars

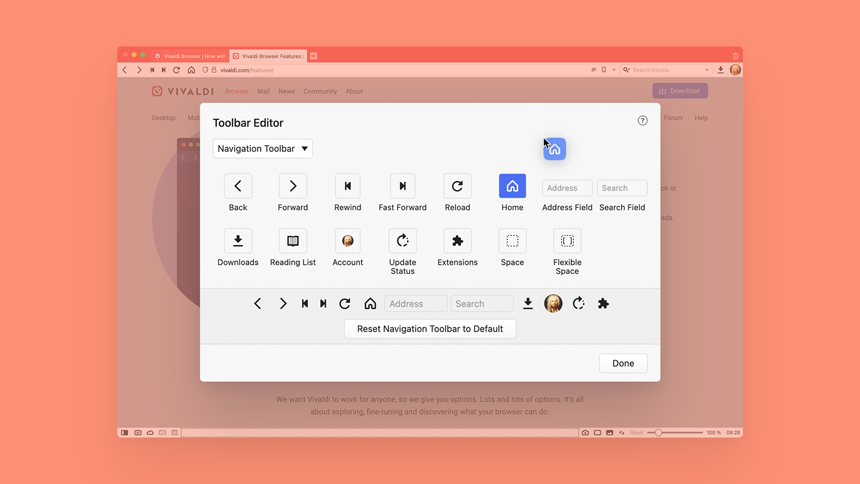
You can add, move and remove any of the components on the Tab Bar, Address Bar, Status Bar, Panels sidebar, Mail Toolbar, Mail Composer Toolbar and Mail Message Toolbar using the Toolbar Editor.

To open the Toolbar Editor, either:

  • Right-click on one of the components and select Customize Toolbar.
  • Go to the Vivaldi menu > View > Customize Toolbar.
  • Type “Customize Toolbar” in Quick Commands.
  • Create a Keyboard Shortcut or a Mouse Gesture for opening the Toolbar Editor.
Toolbar Editor with the Home button being dragged to the Navigation Toolbar.

Add components

To add a new component to the toolbar:

  1. From the Toolbar Editor’s drop-down menu, select the toolbar where the component can be found by default.
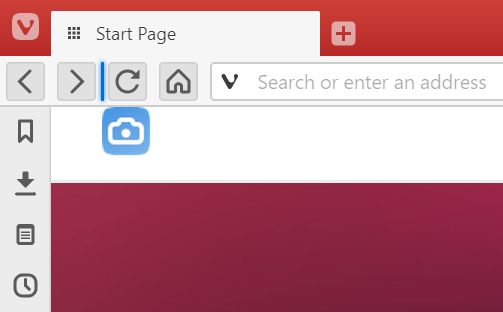
  2. Pick the component you want to add from the selection and drag it to its new place. A vertical line in your Theme’s highlight color will indicate where the component will be added.
Dragging a button to a new location

To add components to Mail views, first open the Mail tab or the Mail composer and then open the Toolbar Editor.

Command Chains

In addition to components normally found on the toolbars, you can also add buttons for Command Chains.

To add a button for a chains:

  1. Create a new chain in Settings > Quick Commands > Command Chains.
  2. Open the Toolbar Editor.
  3. From the drop-down menu, select Command Chains.
  4. Select the chain you want to add as a button and drag it to one of the toolbars.

Move components

To move a component that’s already on the toolbar, hold down the Ctrl / * key and drag the component to the new location.

*On macOS, release the key before you release the mouse button.

Remove components

Option 1

To hide a component from a toolbar, right-click on it > Remove from Toolbar.

Option 2

While you have the Toolbar Editor open, drag the component you want to remove to the area between the toolbar and Toolbar Editor window.

Reset Toolbars

Option 1

Right-click on a toolbar component and select Reset Toolbar To Default.

Option 2

Go to Settings > Appearance > Window Appearance > Toolbar customizations and click on Reset Navigation Toolbar / Reset Status Toolbar.

Option 3

Open the Toolbar Editor, select the toolbar you want to reset and click Reset [toolbar name] to Default at the bottom of the editor window.

Was this helpful?

Yes
No
Thanks for your feedback!

How to report a bug in Vivaldi?

In this article we’ve put together some guidelines that will help you write a good bug report. A good bug report will help our developers reproduce and fix the bug.

Before reporting a bug

  • Make sure you have the latest version of Vivaldi. If you’re on an older version, please update your browser and check if you can still reproduce the issue.
  • If you can still reproduce it, follow the steps on our help page about troubleshooting issues in Vivaldi. Some bugs are caused by an Extension or a setting and can be easily solved.
  • Check the Forum. Well-known bugs, updates and temporary workarounds are often discussed there.
  • In case no one has mentioned the issue you’re having on the Forum, please start a new topic. Then our Community members can either suggest solutions for a fix or confirm the bug. When others can confirm the bug, please report the bug following the instructions below.

How to report a bug?

  • Report each bug separately on vivaldi.com/bugreport/. Reports with more than one bug cannot be processed because each bug is allocated a unique bugtracker number.
  • Describe the issue in as much detail as you can.
  • If you’re reporting from another computer / browser, include information about the Vivaldi version and the operating system the bug is occurring on.
  • Add an exact link to a web page where the issue occurs, so it can be tested.
  • It helps, if you include some information about the extensions and security tools you’re using – they often point us in the right direction.
  • If you’re having issues with audio or video give information about your installed codecs and graphics card/GPU (vivaldi://gpu).
  • You can add more information, by attaching relevant files (screenshotscrash logs, etc.) to the bug report.
  • After reporting the issue, you will receive a confirmation email from the bugtracker with the bug number VB-XXXXX, so make sure you give a valid contact email address.

If you have questions about the bug please ask in the forum first and do not forget to post the VB-XXXXX bug number. Our helpful forum moderators will be able to help you.

Important! Please do not use the bug report page for support or other questions. These questions should be asked on the forum.


Issues with a Third Party Product

Lastly, if you are encountering an issue with a Third Party product, such as a firewall provider or security software that your company has set up, please share with us the following information:

  • Product name
  • Product version
  • Relevant error messages

If support cases have been opened with the Third Party Product’s support team, we would appreciate information (e.g. a case number) about it as well, so we can reference it in case we need to contact the vendor.

Thanks for helping us make Vivaldi better 🙂

Was this helpful?

Yes
No
Thanks for your feedback!

Settings

Use Settings to customise the look of the browser, log in to your Vivaldi account to synchronise your browser data, review privacy settings and much more.

Accessing Vivaldi Settings

There are multiple ways to access Settings in Vivaldi:

It’s possible to display all settings at once by choosing Display All located at the bottom of the list.

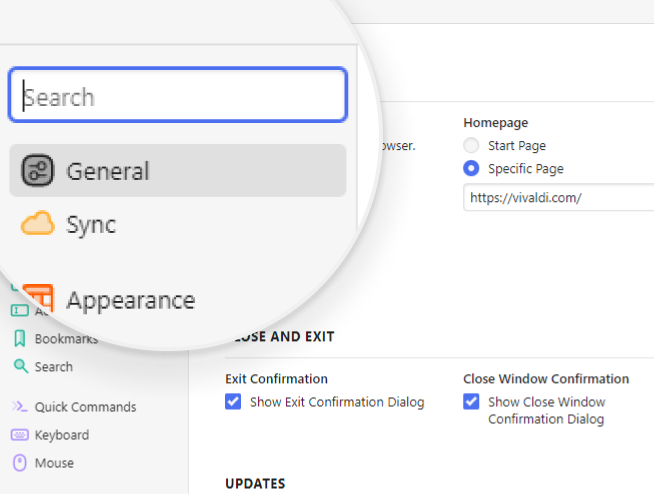
You can also search for the setting you want to modify by entering its term in the search field above the section list.

Many of the settings will be applied immediately; however, if a restart of the browser is needed for changes to be applied it will be denoted next to the setting as applicable.

Setting that requires a browser restart to take full effect

Settings options

To open Settings in a new Tab instead of a separate window:

  1. Go to Settings > Appearance > Window Appearance.
  2. Enable Open Settings in a Tab.

Settings categories in the column on the left are colored and grouped. If you prefer a more monochrome look on the category icons:

  1. Go to Settings > Appearance > Window Appearance.
  2. Enable Use Monochrome Settings Icons.

Reset Settings

If you’ve changed some settings after which the browser no longer behaves as you’d like, but you’re not sure which setting is causing it, try resetting the settings to their defaults.

To reset settings:

  1. Open Settings.
  2. Go to the settings category you want to reset.
  3. Scroll to the bottom of the section.
  4. Click Reset [category name] Settings to Default.
  5. Confirm the decision by clicking Reset Settings in the popup dialog.

Some Settings, such as Enable Mail, Calendar and Feeds, will not be reset.


Some additional settings can be accessed when typing chrome://settings in the Address Field.

Was this helpful?

Yes
No
Thanks for your feedback!

Search

Vivaldi browser lets you search the web any way you like. Here’s how.

Search in the Address Field

  1. Go to Settings> Search and make sure Search in Address Field is enabled.
  2. Type the search term in the Address Field and press Enter.
  3. Vivaldi will display the search results using the default search engine.
    Use Search Engine nicknames to see results from other search engines.

In addition to searching for web content with a search engine, you can use the Address Field to search for Bookmarks, open Tabs, and History.

To search the subset:

  1. Type the nickname “@bookmarks“, “@tabs“, or “@history” followed by a space in the Address Field.
  2. Then start typing the web page’s title or URL to see relevant results.
  3. Click on the suggestion to go to the web page.

To edit the nicknames:

  1. Go to Settings > Search > Shortcuts Nicknames.
  2. Enter a new nickname.

Search in the Search Field

Another option is to search the web using the Search Field on the Address Bar.

  1. Go to Settings > Search and choose between:
    1. Showing the full search field on the Address Bar,
    2. Showing only a search button,
    3. Disabling the search field altogether;
  2. Type the search term in the Search Field on the Address Bar.

To switch between Search Engines, click on the change search engine button Change Search Engine button on the left side of the Search Field and pick a different Search Engine from the dropdown menu.

When you search with different search engines from your default one in the Search Field, your last used Search Engine will revert back to the default one when you close the browser. To keep your last used search engine, go to Settings > Search and enable Keep Last Selected Search Engine.

To search for the same search term again, click on the arrow down button  Show Search History button on the right side of the Search Field to see a list of your latest searches.

To display the active Search Engine’s favicon instead of the magnifying glass, enable it in Settings > Search > Show Search Engine Icon.

The size of the search field on the Address Bar can be changed by placing the mouse cursor on the left edge of the Search field and dragging the mouse in preferred direction.


Search on the Speed Dial

  1. To search on the Start Page, go to Settings > Search and make sure the Show Search Field on Speed Dial is enabled.
  2. Type the search term in the Search Field on the Speed Dial.

To switch between Search Engines, click on the search engine favicon button on the left side of the Search Field and pick a different Search Engine from the dropdown menu.

To search for the same search term again, click on the arrow down button Show Search History button on the right side of the Search Field to see a list of your latest searches.


Open search results in a New Tab

You can have your search results open in a new Tab, instead of the current one when you search in the Search Field. This feature could be particularly useful if you’re doing research or need to look up multiple search terms at once.

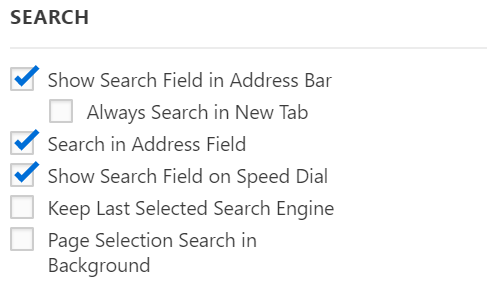
To enable it, go to Settings > Search and tick the box for Always Search in New Tab.
Search settings

Alternatively, type the search term in the Address or Search Field and press ALT + Enter to open the results in a new tab.


Search images

You can do a reverse image search to find more information about it or to find similar images.

To do an image search:

  1. Open the web page with the image you want to search with.
  2. Right-click on the image to open the context menu.
  3. Select Search for Image. Select Image > Search for Image, if the image is also a link.

Search results will open in a new tab.

The search is done with your default Image Search Engine. To change the default search engine for images:

  1. Go to Settings > Search > Image Search Engine.
  2. Select your preferred search engine that offers image search.

Search with page selection

Instead of copying and pasting a search term from a web page to the Address or Search Field, right click on the highlighted text > hover over Search With > select a Search engine. To open the search results in a new background tab, go to Settings > Search and tick the box for Page Selection Search in Background (see the image above).


Search Suggestions

Among other options in Settings > Search > Allow Search Suggestions, you can decide whether to enable search suggestions in the Address and Search fields.  When enabled, you’ll get search suggestions as soon as you start typing in a search query. It’s a convenient feature, but has privacy implications. You can read more on our Team Blog.

Even if you have enabled search engine suggestions, in Settings > Search > Allow Search Suggestions, you can limit it to allowing search suggestions only if you type a Search Engine nickname, which is a clear indication that this is intended to be a search, not a URL.

Alternatively, you can manually disable search suggestions for particular Search Engines, by going to Settings > Search > Search Engines > selecting the Search Engine > emptying the Suggest URL field. Or you can use another Search Engine’s Suggest URL. For example, get suggestions from a more privacy conscious DuckDuckGo, even if you search with Google.


Available Search Engines

Vivaldi has several search engines available by default.

  • Bing – for searching the web via Microsoft Bing.
  • Yahoo – for searching the web via Yahoo.
  • DuckDuckGo – a search engine that doesn’t track users.
  • Yelp – for searching crowd-sourced reviews about businesses. Available by default in selected countries.
  • Ecosia – a search engine that plants trees.
  • Qwant – a privacy focused search engine. Available by default in selected countries.
  • StartPage – a private way to search Google.
  • Wikipedia – for searching the Wikipedia free online encyclopedia.
  • Google – for searching the web via Google.

Change the default Search Engine

You can set any of the search engines listed in Settings > Search Engines as the default Search Engine.

Option 1

  1. Go to Settings > Search > Default Search Engine;
  2. Select your preferred Search Engine from the dropdown menu.

Option 2

  1. Go to Settings > Search > Search Engines;
  2. Select the Search Engine you want to set as default;
  3. Tick the box for Set as Default Search.

To make your private browsing more private, you can set a different default search engine for the Private Window.

Option 1

  1. Go to Settings > Search > Private Window Search Engine;
  2. Select your preferred Search Engine from the dropdown menu.

Option 2

  1. Go to Settings > Search > Search Engines;
  2. Select the Search Engine you want to set as default;
  3. Tick the box for Set as Private Search.

Some search engines allow users to use the POST method for search. The combination of POST and no-redirects, ensures that websites won’t know the search terms you use to find their site, nor will your search terms be stored in your local history. If you have enabled Use POST method, but search doesn’t come up with any results, this means that the search engine of your choice doesn’t support the POST method. If you still want to use this search engine, you should disable Use POST method.


Search Engine Nicknames

Using Search Engine Nicknames, you can quickly switch between one Search Engine to another just by typing the nickname at the front of your search term.

  1. Get to know the default Search Engine Nicknames in Settings > Search > Search Engines.
  2. Start the search with the Search Engine Nickname, followed by Space.  For instance, the search term “d Vivaldi browser” will search for “Vivaldi browser” via DuckDuckGo.

You can change the default Search Engine nickname to anything you like by:

  1. Clicking on the search engine you would like to assign a new nickname to;
  2. Entering the new nickname in the Nickname field;

To hide search engine nicknames in drop-down menus, go to Settings > Search > Search Field Display and disable Show Search Engine Nickname in Drop-Down Menu.


Add a New Search Engine

Vivaldi lets you add your preferred search engines in a few simple steps.

Option 1

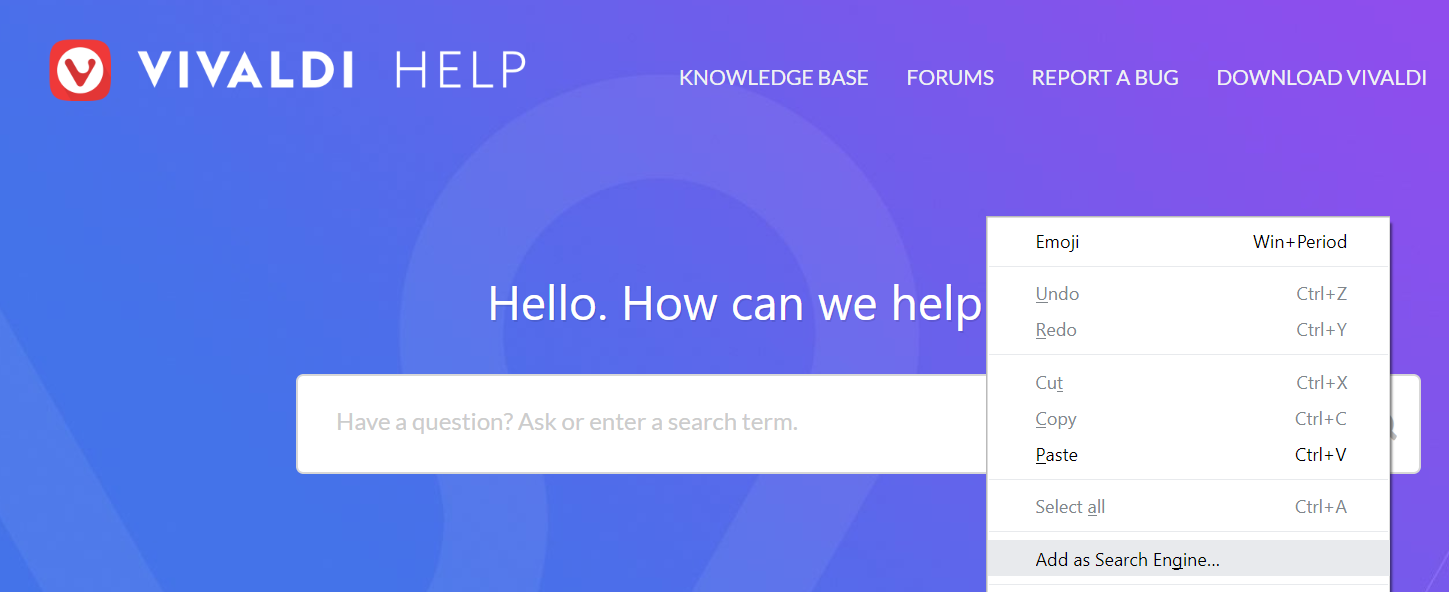
  1. Go to the page you want to add.
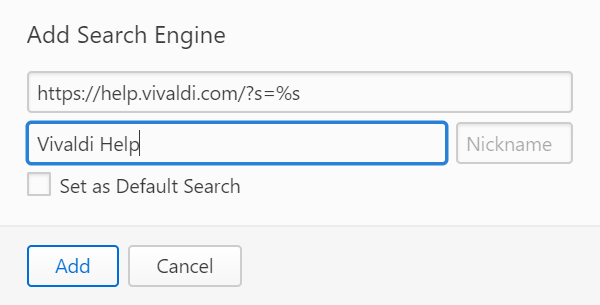
  2. Right-click on the search field of the page and select Add as Search Engine.Using the context menu to add a new search engine
  3. If you wish, add a nickname and make the new Search Engine your Default Search.
    Adding additional information to a search engine before saving it as a new search engine.
  4. Click Add.

Option 2

  1. Do a search on the website you want to add as a Search Engine.
  2. Copy the URL of the search results page.
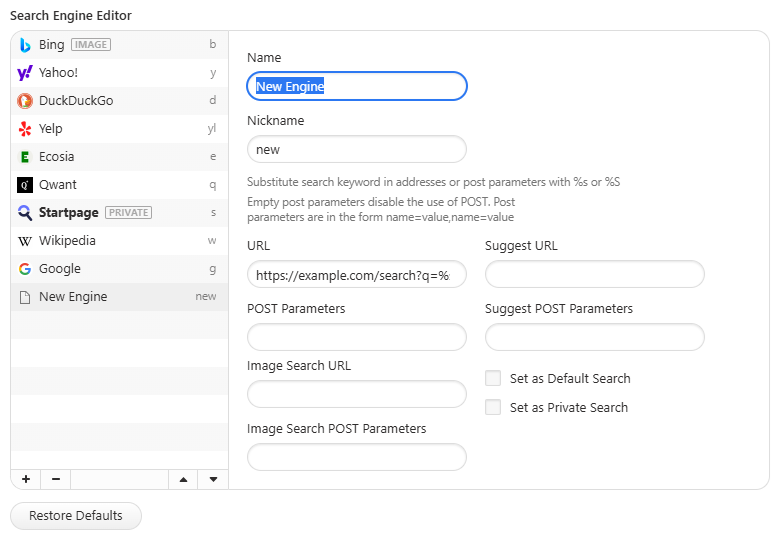
  3. Go to Vivaldi Browser Settings > Search > Search Engine Editor.
  4. Click on the Add button Add Search Engine button to add a new Search Engine.
  5. Paste the link to the URL field and substitute the used search term with %s
  6. Enter the Name and a Nickname for the Search Engine.
Adding a new search engine in Settings

Delete a Search Engine

To remove a Search Engine:

  1. Open Settings > Search > Search Engines;
  2. Make sure the Search Engine you want to delete isn’t set as Default Search or Private Search;
  3. Click on the delete button Delete search engine button.
  4. Confirm your decision by clicking Delete in the pop up window.

Was this helpful?

Yes
No
Thanks for your feedback!